General Posts

Bikernet Bike Build: BETSY’S REVIVAL STORY Part 2

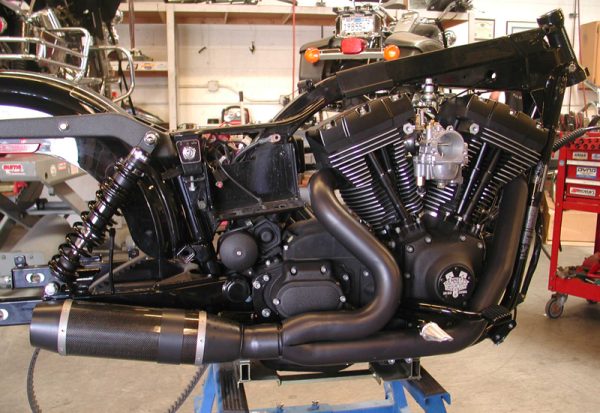
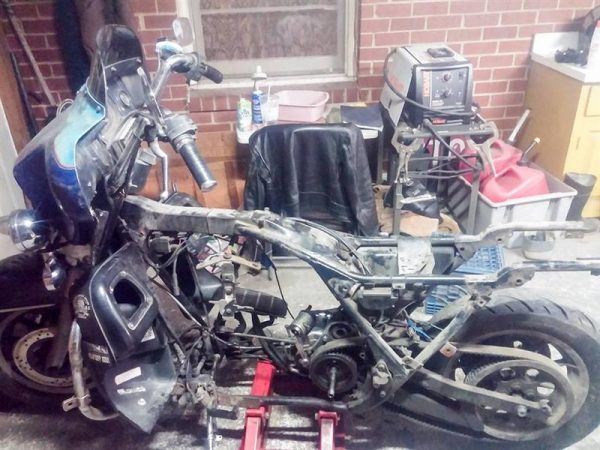
       Oncethat trailer gate hit the driveway back at home I could see tired ol’Betsy begging for another chance at life! As I walked aroundthe trailer she lay resting after the 1500 mile journey back. Iassessed the impending task of making this Ol’ girl right again.   “Rode hard and put up wet,” I said to myself thinkingof all the journeys and adventures she served Scooter Tramp Scotty through.As I took in every line every worn out part of this soul servingmachine I tried to imagine all the places she saw, all thelandscapes, the women who made passenger, the endless white lines stretched for over half-a-million miles. The nomadicvessel of freedom that is this motorcycle I now have the honor ofsorting out to make whole again.          Ilugged the broken pieces of this ’88 Electra Glide into the garageone by one. With an enthusiastic fire burning inside that I’vebecome a master at harnessing, I went straight to rearranging the shop foraccommodation of the new project. The work bench was clearedand the sorting of parts began, one-by-one. The bike “formallyknown as” Betsy quickly became a shell of her former self.The quest to get to her skeleton was my frantic goal, because there iswhere the worst lie waited to be healed. The evening faded to nightquickly and sleep was beckoning. Tomorrow would be a new daybut with it came the disruptive chore of work so Betsy would laywaiting for my 6:30 return from the daily grind.         Ipulled in to the house with anxious anticipation to strip her down tothat rusted and broken frame.As all parts lay categorized on the bench, I was left staring at 20years of grease and road grime thicker than the remaining paint theMoCo laid down 29 years prior. Before […]

Bikernet Bike Build: BETSY’S REVIVAL STORY Part 2 Read More »

Doug Coffey’s RetroMod Panhead Part 3

  I needed an oil tank for this build that would be rather unique. It had to hold a full size battery from a late model electric start Dyna or Softail as my large high compression stroker motor would need all the starting power it could get. It had to completely hide the battery because I didn’t want any of it to protrude above the frame rails and it had to hold lots of oil.
My preference was round oil tanks so I started looking for cylinder like containers to see what size might fit.
After testing a variety of ice cream containers and my wife’s Tupperware I found a one gallon paint can to be perfect. (once I cut the bottom out to clear the electric starter)       The first step in  making the oil tank was to fabricate a battery box. I used some 14 gauge sheet metal and bent one up on my brake and then welded in the sides. The batteries I use are the late sealed type so they can be placed in any position. This one was going to lay in at an angle to miss the electric starter.   With the battery box out of the way I used some more 14 gauge sheet metal and rolled up the tank on my 3 roll machine.       I cut a rectangular piece out of the tank shell and welded the batter box inside the tank. Now you can see why I wanted such a big tank, that battery box displaces a lot of oil holding capacity.       The under side of the tank had to be notched for electric starter clearance.     With the oil tank shell part taken care of it was time to make some tank ends.

Doug Coffey’s RetroMod Panhead Part 3 Read More »

Bennett’s Performance Dyna Build, Part Two

It took a while before the call shook the receiver on the wall.   “We’re ready, finally to move onto the next stage,” Eric said, and I slipped across congested Long Beach on Pacific Coast Highway to the base of Signal Hill, where the clean offices of Bennett’s Performance and Branch O’Keefe reside in an alley.   There’s a bit of a dichotomy here. When you say Pacific Coast Highway, you immediately have visions of the sea splashing against white sand. That’s not the case when PCH skirts through the Los Angeles Harbor area behind container ships, container trucks, and container trains Terminal Island and through the concrete jungle of Long Beach packed with steel supply joints, body shops, junk yards, stucco Mexican fast food joints, and dingy bars. Sure, once you weave south of Long Beach, the coast comes into view again and islands, marinas, and white sand can one again be seen. Sorta the same equation in reverse fits Bennett’s. They are located on an alley, but it’s about as clean and wide as a comfortable two-lanner, and the buildings are pristine and orderly. Hell, there’s even some landscaping bordering the buildings. Eric and his dad keep the shop tidy and it’s open and painted white on the interior and the exterior. Makes it easy to take tech shots. So we got to work. Eric hadn’t ridden his own motorcycle in six months, broke up with his girlfriend three times, and needed his two-wheeled Valium. Working with D&D, they altered a stock D&D system to fit ’91 to ’13 Dynas. The heat shield was modified and the system was ceramic-coated for a long-lasting satin black. He also had to modify the mounting bracket for the performance pipe system. Eric is going to share his mods with the D&D

Bennett’s Performance Dyna Build, Part Two Read More »

Doug Coffey’s RetroMod Panhead Part 4

  I started building my gas tank with a King Sportster tank shell available from Paughco. In this picture I have already cut the ends out to receive the tunnel in the bottom.     In this picture I have already started building the bottom from a flat piece of sheet metal I cut out and a tunnel. The tunnel is 1/2 of a piece of automotive exhaust pipe I cut with a plasma cutter and cleaned up on a belt sander. The elongated slots are for adding a rubber mount system.     Test fitting. Clearance all around the frame tube is required for rubber mounting tanks. The elongated slots left me room to tack weld mounting tabs to the frame. (This was way too complex, I have an easier way of doing it now)     This picture shows the rubber mounting system welded in the bottom of the tank.     The bottom is welded in the tank and tried on for size. Time for fuel tap bung, gas cap and speedo. Speedo????     This picture serves two purposes. It shows the rubber mounts welded onto the frame and the special tool I turned to mark the bottom of the tank to align my speedo mount. The speedo wiring will run down through the frame through the old unused stock speed drive cable hole.       Speedometer mounting gear. I turned the cup from steel bar stock on my lathe and welded a piece of DOM tubing to it for wires to run through the gas tank into the frame. The slight bend it to get everything to line up.     Test fit the Dakota Digital speedo in the tank. Looks good.     Good to go. Mark the tubing, Cut it off and

Doug Coffey’s RetroMod Panhead Part 4 Read More »

Timbo’s ’64 FL Restoration (Part Five)

Well here she is, finally complete and out for her last shake down run. We stopped at a scenic area and shot a few pictures before I have to hand her over to the owner, Tim. I took my buddy Sal along. He’s the only one I have available to kick start this old gal. Sal owned a couple of Pans in the past, and he has the starting sequence down pat! With gas off, kick her through a couple times, gas on, breaker retarded, half choke and a little throttle, and Ka Bam! She starts right up! Riding the Pan is an art form in itself. The steering is spot on; it will turn on a dime! The suspension is wonderful for the age of the bike. It floats along better than most modern Harleys. The only thing I can’t get use to yet is the pogo seat, feels like it wants to buck you off sometimes. On the way back from our ride, I noticed a loud noise as I pulled to the stoplight. It’s Sal, yelling at me to slow down, YOUR DOING 85!! If you followed the articles from the past year and a half, you know that hundreds of man-hours and a little mega money went into this restoration. And I loved every minute of it! I’d be safe in estimating the restoration at 95% original, give or take a percent or two.   Enjoy the photos, and stay tuned next month when I start another restoration. This time a 1966 Shovelhead, Police special. Here’s a sneak peak!   Hope everyone has a save and wonderful 2013 Holiday season!   –Tail Gunner out till next month.

Timbo’s ’64 FL Restoration (Part Five) Read More »

Doug Coffey’s RetroMod Panhead Part 5

    Back in the sixties the movie Wild Angels came out shortly followed by a soundtrack album with a great cover One of the bikes on the cover caught my eye. The one to the right of the lead bike has a set of low rise Zee style handlebars. Try as I might I could never find a manufacturer low rise Zee bars. Everything available was four inch rise or higher and it is still the same today. I decided I would make my own Zee bars for this new bike project. I wanted a beefier look for my handlebars than the usual one inch diameter so I used 1-1/4 inch DOM tubing and cut the pieces to size on my milling machine.     I made the end pieces from one inch tubing and after welding everything together I finally had some 1-1/2 inch low rise Zee bars     My good friend Ron McBroom from Paughco offered to chrome plate my bars for me and I think he did a darn fine job. Risers     I wanted handlebar risers that looked just like original Glide risers but I had a problem. Original Glide risers are made for one inch handlebars and my bars were 1-1/4 inch which is 25% larger. I wasn’t going to let that stop me so I made a drawing of the original Glide risers scaled up 25% larger. After boring and tapping a hole to 1/2 x 13 threads per inch for mounting, I bolted them into an angle plate on my mill and bored a 1-1/4 inch hole for the bars. In the picture at right you can see a stock original Glide riser.       After boring the holes for the bars on my milling machine the risers went

Doug Coffey’s RetroMod Panhead Part 5 Read More »

Doug Coffey’s RetroMod Panhead Part 6

I wanted rear belt drive on my new retro modern chopper. All the old rigid framed bikes from the factory were chain drive and they were messy and always need adjustment. After doing a little research I chose the shortest belt available. It was 123 tooth and had been used on the very first rear belt drives Harley offered on Shovelhead models. After installing the back wheel and belt I discovered I had two problems. The belt was too long and too wide.Later Harleys have narrower belts so I purchased a 70 tooth narrow rear belt sprocket and slit my belt on the milling machine to fit the late sprocket.     I wanted rear belt drive on my new retro modern chopper. All the old rigid framed bikes from the factory were chain drive and they were messy and always need adjustment. After doing a little research I chose the shortest belt available.  Slitting a wide belt down to 1-15/16.     The skinny piece I slit off my rear belt. I offered it to a friend with an 883 Sportster. He didn’t see the humor. Haha.     If you look at the rear axle in the above picture, you see it is almost all the way back in the axle slot and the adjuster is near the end. This bothered me. A new bike should look like a new bike, not one with a belt stretched to the max.. I needed a fix.       I envisioned an axle spacer (photo above left) that doubled as an adjuster plate and would hide the appearance of the rear axle way back in the slot and the adjuster maxed out. So after a little imagineering I grabbed some stainless steel and headed to my milling machine.    

Doug Coffey’s RetroMod Panhead Part 6 Read More »

What the Hell is 5-Ball Racing?

  It all started when my mother ran over my metal- flaked Honda 55 Super Cub with a single shotgun pipe. She stormed into our tiny stucco house in Long Beach and announced, “Get that damn thing out from under my car.” Her car was a massive ’59 Ford station wagon. It was 1964 and I was 15.5 years of age. That Honda was my first motorcycle.      Mom and I didn’t see eye-to-eye on a couple of issues. The day after I graduated from high school, I joined the Navy and was shipped to a heavy cruiser off the coast of Vietnam for three tours. I fell in love, and got married, to my mother’s chagrin (my loves have always played a major part, as you will see). During that time, I bought my first Harley, a ’69 kick-only XLCH with a magneto and no battery.      And so began a life of running wild, building motorcycles, ditching wives, and being involved in Bonneville racing. One of the first bikers I ever met was on a small destroyer, the USS Maddox. Andy Hanson was also building his first ground-up big twin in 1970, and his mentor was the late Bob George. Bob was an engine builder and an innovator. He taught me how to build engines. When I slipped away from the Vietnam War, honorably discharged, while dodging a pot-smuggling bust, I returned to civilian life. I was innocent, I tell ya.   They let me out early if I took a trade course, so I took a welding class at Long Beach City College, so I could rake frames. I took the certified welder course. Once clear of the Navy, I enrolled at the liberal arts campus at LBCC and started taking classes. I worked part

What the Hell is 5-Ball Racing? Read More »

J&P Cycles Giveaway Bike – Part One

    Editors note: The following is an introduction to a 5 part tech series which will document the processes used at Bare Knuckle Choppers to transform the J&P Roller with an S&S X-Wedge motor into a street pounding machine to be given away at the 2015 J&P Cycles Open House Rally.  Clocks dictate so much of our lives. My wake up call is at 6am. Checkout is 9am. I’ve been on the road for 30 of the last 48 hours to get to the roller for J&P Cycles’ Giveaway bike.  At least before Paul Wideman of Bare Knuckle Choppers (BKC) rips into it. Kate, who’s been with me since Atlanta, is from my hometown near Chicago. She knows me better than myself. She’s also the Sicilian version of Jessica Rabbit, if Jessica could belch like a sawed-off shotgun. “Quit being a little bitch,” she lovingly encourages me. Since I moved to Raleigh, I missed her Mid-Western charm. I give in, and we pull over after sundown and hit the hotel pool for a couple hours, with a garbage can full of Miller Lites. This is when I lose track of time. In the morning I’m meeting Paul Wideman at the crack of dawn. It’s a good thing I’m not building the bike since there’s only six weeks to do it. Well, that and the fact that only the J&P Cycles Ultimate Builder Custom Bike Show champion gets the privilege—and that trophy belongs to BKC. (You can see Paul’s winning bike in the February 2014 edition of Cycle Source.)          “The roller came in about three days ago. We tucked it back there until you got here to shoot it,” Paul confesses as I get to the shop. It was obvious he had approached it with wrenches

J&P Cycles Giveaway Bike – Part One Read More »

The Mudflap Girl FXR Saga

It all started when a brother was desperate for cash and I bought a basket case Dyna, and with the help of JIMS machine turned it into an FXR. I started to build it for my son, Frank, the tattoo artist, around an old Kenny Boyce-styled pro street frame. Making progress on this build, with a massive upside down Custom Chrome front end, a brother stumbled into my shop and told me about Paul Cavallo and Spitfire Motorcycles. Paul’s been around the industry for a couple of decades. When the economy tanked, he hung on with his dad and started Spitfire motorcycles. He was struggling and a brother thought I could help by using a couple of his Spitfire components on a Bikernet.com build. I went to visit Paul and was inspired by his non-stop drive to create new components daily, build world-class old school chops for customers, and kick ass at shows all over the country. Then I was hit with the bike builder blues. My girlfriend left and I was forced to sell my 2003 Road King, leaving me with a ratty rigid Shovelhead and a Bonneville racer to ride. I needed a new girl and a long distance rider. Too often, around the campfire we debated twin cams versus Evos and most of the bros confirmed the solid stature of the FXR configuration. A plan formulated to build myself another FXR. I returned to Paul’s shop to cut a deal on a chassis for myself. Both were stretched, almost single-loop, long-distance riders with Spitfire Girder front ends. Paul’s team built my chassis in pure traditional FXR style and Frank’s in the pro street configuration. We re-manned Frank’s FXR engine in black and chrome, and I ordered a bone-stock crate H-D 80-inch Evo. Both transmissions were rebuilt by

The Mudflap Girl FXR Saga Read More »

Scroll to Top