

Bikernet Bonneville Effort, Part 9
By Bandit | | General Posts

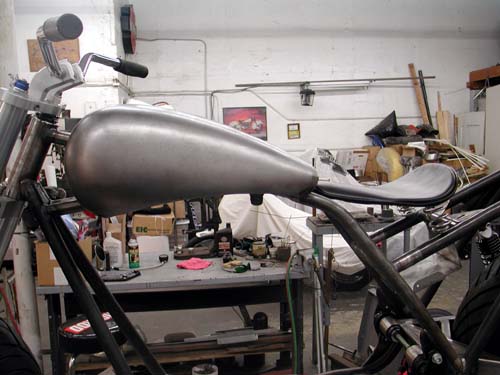
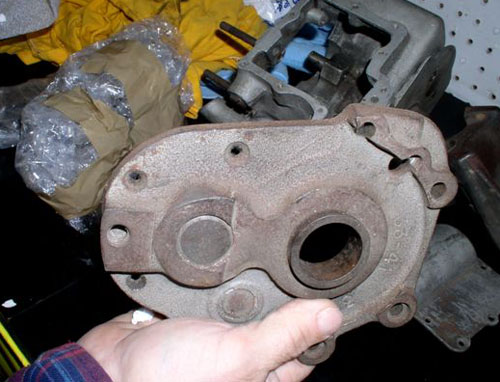
This is the original aluminum dash that we mounted the old Triumph handlebar fairing to for positioning, but I knew another dash panel needed to be in the works. Honestly I didn’t know how the hell I was going to build it. I grabbed a piece of stainless 1/6 inch sheet at the metal shop and went to work. I was thinking about using a jig saw to cut it, but dreading the maneuver. I knew it would take forever, then Jay arrived with the Plasma cutter.

We started the process with a sheet of heavy tar paper and cut a pattern as close to the actual dash area as possible.
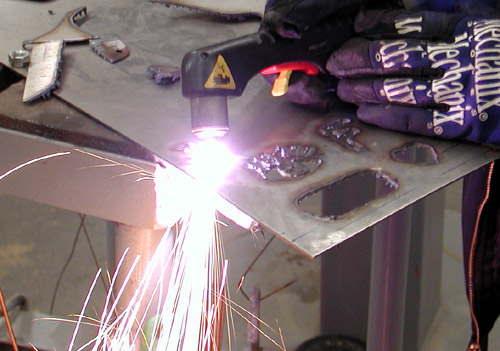
I marked it out on the stainless and went to work, blasting away. What a bitchin tool. You can cut a name into it, write your signature, whatever. I’m a newbie at the job and my lines were sloppy.


I ground, ground, then hit the edges with a emery disc. Once is was smooth I set it in the dash pocket, check it and made notes and marks, then ground some more. It took me a couple of days.

I thought I had a cool angle for the mounting tab and discovered that it wouldn’t work at all. I had to make another make and fire up the Plasma.

Once trick was figuring out the mounting hole positions and the electronic Custom Chrome speedo dash. I taped the original dash panel to the fairing then removed the bolts. I dropped the stainless plate into place and made markings from the back, then prayed.


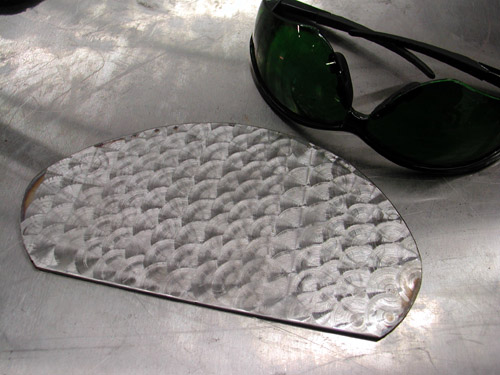
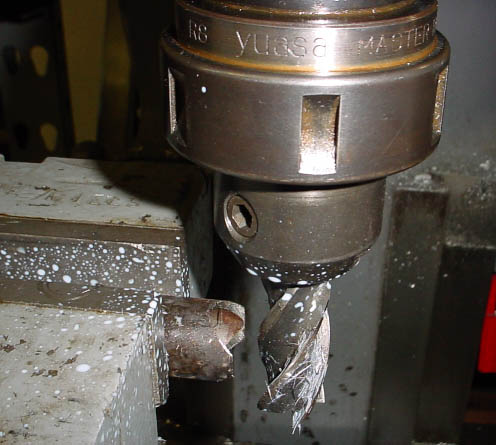
Here’s that puppy with the holes drilled in place. Then we moved to our machine turning operation. Too bad the shots didn’t come out, ‘cause it was a major operation, figuring out the pattern, running out of emery discs and clamping the sheet down securely to keep each row in line. Ultimately it came out not bad.

It’s got that antique sportscar look and it was hand done on the Bikernet milling machine.
May 6, 2010
By Bandit | | General Posts
Bandit has left the building? so to speak. The Bikernet headquarters?or as I often refer to as ?Cooter Town (population one too many)?was eerily silent this morning. The crusty one left a half-garbled message on my machine last nite, asking me to come down to the garage and see what I can do about posting the news.
I will be with you for a couple of weeks as Bandit explores the jungles of South-East Asia, so let?s get on with it?
?Canyon Carver
NOW STANDARD: THE SS TRIKE RUNS THE 117″ X-WEDGE ENGINE
SS Trike is proud to announce that, effective immediately, all SS Trikes will be shipped with an 117″ S&S X-Wedge EPA certified engine. In the firm’s never ending quest to provide the hottest Trike in the market today, they have figured out how to increase power and satisfy the EPA in one swoop.

“We decided to utilize the X Wedge because it is the most innovative, reliable and smoothest running v-twin product available today, said Jason Neiman, President of SS Trike. “We selected S&S Cycle because of the efficiency and power supplied by the motor.”
Current options that are available for the SS Trike includes a higher and more forward positioned seat, a passenger backrest, windshield, enclosed trunk and trailer hitch.About the SS TrikeOlmax Fabrication, a Wisconsin based manufacturer, first introduced the production version of the SS Trike at Sturgis in 2009. The Trike was unveiled at the AMD Official World Bike Building Championship and immediately grabbed the attention of everyone in attendance. The SS Trike is currently in production and the firm is currently signing up dealers.Consignment Program>SS Trike is offering a consignment program for qualified dealers. Olmax recognizes the current economic atmosphere and that many legitimate dealers just don’t have the extra cash to add complimentary product lines into their inventory mix. This program will be available for a limited time and all interested dealers are encouraged to contact Jason as soon as possible by phone at 715-435-3132.

BAKERSONGS.COM IS PROUD TO ANNOUNCE NASHVILLE’S 1ST ANNUAL BIKER EVENT TO BENEFIT SECOND HARVEST FOOD BANK KIDS CAF?The event will take place Saturday May 8th at the Limelight 201 Woodland St. Nashville, TN. from 12 noon till 8 PM Limelight is across from Titans Stadium. Event features a Food Drive (non perishable items please) live music along with a variety of vendors, raffles & custom motorcycle show.
Music headliners include national touring act, Biker Rock Chick “Geneva” coming home to Nashville to participate in the event with her band. She will be filming an upcoming episode for her Fox Reality T/V Show “Geneva’s Rock n Ride” to be aired this fall. Biker Musician ‘Baker” featuring his current hit Biker Anthem “Ride”. And from Asheville, North Carolina “The Campaign 1984” who’s recent CD release was produced by Chris Henderson from “3 Doors Down”.
Days events also include a mystery motorcycle parade ride starting at the Tin Roof 1516 Demonbreun Sreet Nashville, TN, signup begins at 11:00 AM with motorcycles rolling out at 12:30 PM, final destination arriving at The Limelight. Portions of motorcycle ride will be filmed and featured on Geneva’s Rock n Ride show, a T/V documentary & a Biker music video. 100 percent of proceeds from mystery parade ride go directly to charity. Fee will be $10.00 per rider but organizers encourage those who can give more to please do so. Riders participating will be automatically entered into a drawing for a free leather jacket (choose your size) courtesy of “Bundy Leathers”.
Raffles all day with prizes to include a “Tandem Skydive with Video for Two” from Adventure Skydiving TN. “Weekend Getaway” from “The Marriott Hotel”, Autographed CDs T-Shirts (“Brooks & Dunn” “3 Doors Down”) $250.00 motorcycle lighting package from “M&W L.E.D. Lighting”.. along with lots of merchandise donated by vendors & sponsors.
All information including a list of prizes is at . Click on tabs for Rock n Ride Show.
Admission is $12.00 with a portion of all proceeds going to charity.
The event has gained national attention throughout the Biker community from Biker Magazines, Radio Shows, Websites & Biker T/V Shows. Biker media & vendors are coming from as far away as CA. NY. WI. MD. VA. Along with Bikers from the Southeast & Middle TN. RSVPing with their support. Organizers hope to bring together Bikers from all walks of life to participate in this 1st annual event but “you don’t have to ride a motorcycle to attend”, says Baker. “The event is open to the public and we appreciate everyone’s support to help Second Harvest Kids Caf? along with bringing attention to their parent organization, Feeding America”
Through Kids Caf?, Second Harvest serves approximately 2,500 children per week, providing more than 350,000 meals and snacks each year. During the summer, in addition to the evening meal program, Second Harvest serves breakfast daily at 25 sites in Metropolitan Nashville.
SERIOUS BUDGET CUTS?CALIFORNIA HAS PROBLEMS!

?HLINS USA CONTRIBUTES TO US ARMY MOTORCYCLE SAFETY TRAINING DAY
Taking part in the training of motorcycle-riding Army personnel at the US Army Armor Center at Fort Knox, Kentucky, ?hlins USA, together with other motorcycle industry leaders, provided on-site presentations to the soldiers. This event, designed to enhance the safety of the enlisted-enthusiast?s riding experience, was the Fort Knox 5th Annual Motorcycle Safety Training Day. To encourage attendance, Major General James M. Milano had issued a memorandum in which he asked for, ??max turnout by our riders.?

May is Motorcycle Safety Awareness Month, as promoted by the National Highway Traffic Safety Administration (NHTSA). The US Armed Forces use this annual opportunity to augment the motorcycle safety training of its personnel, at various locations around the world. Fort Knox has between 700 and 800 registered motorcyclists at any time, who are required to follow more stringent rules than those governing the state of Kentucky, such as wearing a helmet and attending an Army-approved Motorcycle Safety Course. At Fort Knox?s 2010 celebration of safe riding on two wheels, Mike Fitzgerald and Matthew Hickson carried the ?hlins USA flag into battle against unnecessary riding risks, taking charge of setting up the personal motorcycles of attending personnel.
?hlins USA Road Racing Manager Fitzgerald said, ?Reggie Atkins, a WERA racer and track official who is a retired tank commander, asked us to take part in this year?s training of motorcyclists at Fort Knox. We spent the whole day setting up their motorcycles, everything from Harleys to BMWs, Goldwings and sportbikes. It was great. The soldiers were so appreciative and respectful, we felt really honored. They asked us to explain what we do at ?hlins, and as I was telling them about traveling the world and working with great riders, I had to say that this was, by far, one the coolest days we?ve ever had on the job.
?You have to be proud of these soldiers. They are there for all of us. It was great having this chance to show them how to get the most fun out of their bikes. But they outdid us by showing us their M1 Abrams tanks and other impressive equipment. Capping off the day, an officer pressed a coin into our hands, giving us a memento that we?ll proudly always carry with us.?
?hlins USA distributes and services the world?s leading performance suspension for automobiles, motorcycles, and ATVs. ?hlins develops its proprietary and innovative suspension components at the highest levels of racing from open-wheel car racing, to Moto GP, to off-road competition on two and four wheels. ?hlins USA also provides training for service centers and dealers.
AFT CUSTOMS TO PREMIER NEW BONNEVILLE RACER CUSTOM “KEMOSABE” AT THE 2010 LA CALENDAR MOTORCYCLE SHOW JULY 18TH
Custom Honda Bobber Built and to be Piloted by the ATF Models for Bonneville World Record Attempt
Reigning LA Calendar Bike Building Champions, AFT Customs of Martel, CA, with owner designer Jim Guiffra and his AFT Motorsports Model Agency spokesmodels (AFTcustoms.com), will again use this year’s 2010 LA Calendar Motorcycle Show on Sunday July 18th at the Queen Mary Event Park, Long Beach, CA to premier their latest custom built and potential Show winner “Kemosabe”.
Then after the Calendar Show the AFT crew and the bike will head to the legendary Bonneville Salt Flats in Utah to participate in the BUB Speed Trials where two of the girl builders, Sukhee and Shelby, will pilot the bike on speed record attempts. Also helping with the bike build and attending the events are models Cyndi, Sara, Malanie and Katy.
The 19th annual Los Angeles Calendar Motorcycle Show Weekend presented by Brown & Koro Motorcycle Attorneys, America’s premier custom, cruiser, performance and sportbike weekend returns to the Queen Mary Event Park in Long Beach on Sunday July 18, 2010. Join thousands of street bike motorcycle and music fans for the world’s most exciting motorcycle event in the beautiful Queen Mary Event Park on the grass alongside the Pacific Ocean in Long Beach. This is the world’s premier street motorcycle show featuring major motorcycle and parts manufacturers, top name builders, selected exhibitors, product and apparel vendors.
Included with admission is the Calendar Girl Music Festival with beautiful girl performers, and complimentary admission aboard the historic Queen Mary Ghost Ship. For additional LA Calendar Motorcycle Show & Calendar Girl Music Festival weekend details including the show schedules, hotels and parking information visit
BLONDE JOKE OF THE WEEK
After becoming very frustrated with the attitude of one of the shopkeepers, the young blonde declared, ‘Well, then, maybe I’ll just go out and catch my own alligator and get a pair of alligator shoes for free!’
The shopkeeper replied with a sly smile, ‘Well, little lady, why don’t you go on and give it a try?’
The blonde headed off to the swamp, determined to catch an alligator. Later in the day, as the shopkeeper was driving home, he spotted the same young woman standing waist deep in the murky water, shotgun in hand. As he brought his car to a stop, he saw a huge 9-foot gator swimming rapidly toward her. With lightning reflexes, the blonde took aim, shot the creature and hauled it up onto the slippery bank. Nearby were seven more dead gators all lying belly up.
The shopkeeper stood on the bank, watching in silent amazement as the blonde struggled mightily and barely managed to flip the gator onto its back.
Then, rolling her eyes heavenward, she screamed in frustration…..
‘CRAP! THIS ONE’S BAREFOOT, TOO!
SEATTLE COP WHO SHOT HELLS ANGELS SAYS DEPARTMENT FAILED, MALIGNED HIM
Cleared following the Sturgis shooting, detective says former chief’s comments out of lineBy LEVI PULKKINEN
SEATTLEPI.COM STAFFA police detective who shot a Hells Angels gang member during a fight at a South Dakota bar is suing the City of Seattle claiming Police Department management maligned him in the days following the shooting.
At issue in the suit, filed late Monday in King County Superior Court, are comments made by then-Seattle Police Chief Gil Kerlikowske in the days following the shooting, as well as an erroneous claim made by police investigators that Detective Ronald Smith was armed with a department pistol when he shot and wounded a Hells Angel during the Sturgis motorcycle rally.
Smith and several other members of the Iron Pigs Motorcycle Club were involved in an early morning altercation with Hells Angel Joseph McGuire.
Smith contends McGuire was choking him when he drew the weapon and fired, wounding McGuire. Another member of the Iron Pigs — a motorcycle club made up law officers and firefighters — treated McGuire’s wounds until help arrived at the Loud American Roadhouse.
Smith was initially charged with assault, perjury and unlawful gun possession after the Aug. 8, 2008, shooting. Those charges were later dropped; a state’s attorney said video of the attack showed Smith was “defending himself from a violent premeditated attack, and he responded in a manner which was neither excessive nor unreasonable.”
Now, Smith claims Kerlikowske, who has since left the department to serve as Director of National Drug Policy at the White House, was bad mouthing him days after the shooting.
During a community event, Kerlikowske is alleged to have called Smith an “embarrassment” to the department and claimed Smith would “not be working with (him) much longer,” according to the lawsuit. Other officers reported the statements to Smith, who remains with the department.
In the lawsuit, Smith’s attorney Liam McCann also contends department investigators repeatedly claimed Smith used his department-issue Glock during the shooting when in fact a different Glock model purchased by Smith from the Seattle Police Athletic Association was used.
Those statements by investigators, McCann argued, prompted South Dakota officials to file charges against Smith. “Were it not for (the) erroneous and grossly negligent statement to (South Dakota Division of Criminal Investigation Agent Jeff) Goble, Smith would not have been indicted for perjury and more than likely would not have been indicted for the other charges either,” McCann said in the lawsuit. “The South Dakota officials would have believed his statements absent his alleged perjury.”
McCann continued, arguing that either a check with the Bureau of Alcohol, Tobacco, Firearms and Explosives or a review of Seattle police equipment records would have shown the gun used was Smith’s personal weapon.
A spokeswoman for the Seattle City Attorney’s Office declined to comment in detail on the lawsuit.
As noted during the criminal case, federal law includes provisions allowing law officers to carry concealed weapons under most circumstances.
Suspended following the shooting, Smith was returned to full duty in January 2009, according to the lawsuit.
Writing the court, McCann said his client is due $150,000 for the emotional distress caused by the department’s handling of the matter. Smith, the attorney claimed, is also owed $19,800 in lost wages and attorney’s fees.
Levi Pulkkinen can be reached at 206-448-8348 or levipulkkinen@seattlepi.com. Follow Levi on Twitter at twitter.com/levipulk.

JEGS ON BOARD WITH LAT RACING OILSJEGS has just announced they have contracted with LAT to distribute the company?s exclusive line of LAT Racing Oils. Racers around the globe look to JEGS for the ultimate in racing products and the addition of LAT to their select line of products is seen as one more opportunity to provide JEGS customers with an edge over the competition.

You have certainly seen the now familiar LAT decal on winning machines with increasing frequency and there?s good reason; Teams demanding the very finest in protection and performance regardless of cost have found LAT racing Oils provide superior levels of engine and gear protection while allowing for noticeable increases in horsepower and overall performance. The Southern California based company has taken a unique hands-on approach to developing new blends and it has paid dividends to a rapidly expanding customer base. Working closely, on site, with race teams and privateers to formulate blends that work in real life and not just in the lab, LAT is able to identify first hand and immediately address specific requirements.
A direct result of LAT success at the track, many of the most notable Teams, engine builders and tuners have made the switch to LAT. While these high end oils were developed for racing applications they provide street engines with the same qualities of increased performance, reliability and longevity.
LAT Racing Oils are blended from only the very finest base oils, exclusive LFR additive, anti foaming agents, friction reducers, and rust inhibitors. These refined components provide attributes superior to traditional oils. The kind of protection and performance demanded by professional race teams doesn?t come cheap but when you consider lubrication is the life blood of your driveline it is money well spent.
VIPER MOTORCYCLE COMPANY RECEIVES FIRST ILLMOR-DESIGNED 152-INCH PRODUCTION ENGINES
Viper Motorcycle Company (OTCC: VPWI.OB), a wholly owned subsidiary of Viper Powersports Inc., recently received delivery of the first re-designed production short stroke engines for the 2011 Viper build.
According to Terry Nesbitt, President, Viper Motorcycle Company, ?The new engines are incredible. All engines and drive case parts are CNC machined from 6061 aluminum billet alloy. Each component piece is then hand polished by American craftsman prior to assembly. The 152 is the largest and most powerful air/oil cooled production v-twin available. In addition to overall increased performance, the new engine produces considerably less vibration and runs cooler due to the improved oil flow throughout the engine via an Ilmor designed twin scavenge dry-sump oiling system. Peak torque is an industry first massive 153 foot pounds?.

Paul Ray, President, Ilmor Engineering Inc., stated, ?We have hundreds of hours of dyno testing resulting in a powerful, dependable, EPA certified high mileage engine. This is a Viper proprietary engine with state-of the-art technology. The Ilmor air/oil dry-sump scavenge system utilizes 3 oil pump stages. The first stage is for oil feed with twin stages for independent drainage of the heads and crankcase, greatly improving overall oil flow. Our unique system provides much needed cooling to the cylinder heads, well beyond conventional air cooling resulting in greater reliability. The Viper/Ilmor crankshaft uses an oversize crank pin for durability and has a unique balance formula to dramatically reduce vibration levels?.
Nesbitt continues, ?We are extremely excited at this mutual opportunity. Our Joint Venture relationship with Ilmor will enable us to continue moving forward as an OEM providing a unique proprietary product designed and manufactured by Viper/Ilmor. The 2011 Diamondback 152 is scheduled for shipment in May while our second model, the Mamba is scheduled for later introduction this summer and will also be powered by the all new Ilmor 152. With an industry first chassis and the incredible Ilmor engine, we expect our sales will continue to grow resulting in enhanced brand value and visibility. We will also continue to increase our brand visibility through cross-marketing activities with Ilmor Engineering Inc?.
Viper Powersports designs, manufactures and markets a line of premium American V-Twin Super Cruiser motorcycles, V-Twin aftermarket engines and other related aftermarket products through an independent dealer network. Joint venture partner Ilmor Engineering, provides technical developmental support for the proprietary 152 cubic inch Viper V-Twin engine, utilizing their 25 years of engine design expertise, ensuring Vipers’ long term success as America’s newest domestic OEM of motorcycles. Viper Powersports and Viper Motorcycle Company’s websites are and

MLA RIDE – MAY 6, 2010 – THE MOST IMPORTANT DAY FOR MOTORCYCLISTS IN BC
In light of the recent changes made to B.C.’s Motor Vehicle Actregarding motorcycling, now is a more important time than ever formotorcyclists to gather together and discuss their views with ourprovincial government.

Please join us on Thursday, May 6th for the 20th Annual MLA Ride! Thisis BCCOM’s Annual Ride to the Legislature in Victoria to take the MLA’sand their staff for a ride on their lunch hour. It is a chance formotorcyclists to speak directly with your individual Member of theLegislative Assembly on motorcycling and safety issues that affect youand your family and let them experience firsthand the thrill ofmotorcycling. It is also the big kickoff to promote May as MotorcycleAwareness Month!
VANCOUVER: Riders assemble at Tsawwassen ferry terminal for the 9:00 amsailing
VICTORIA: Riders meet up at Mayfair Mall (Blanshard St in Victoria) at11:00 am with the riders from the mainland and proceed on to theLegislature
Motorcyclists will arrive just before noon at the front steps of theLegislature. After some speeches and the proclamation of May asMotorcycle Awareness Month, riders will take the MLA’s and their stafffor a short group ride. ?Please come support this very important eventand show our government just how many voters out there ride.
For more information please call: (604) 580-0111 or 1-877-580-0111
Folks, well I almost got all the metal works finished for the OTC show, he he he. Now just a few more hours and she’ll be ready for the test ‘n tune part of the project. . . . . So now it’s back to the shop for more fun!
I hope all is well with you all,Take care,
Kent

Well Kent, keep at it and best of luck for the show. The bike look killer.
Lucky Devil Metal Works specializes in creating exclusive, hand-fabricated Customs for individuals who want to take customizing to an entirely different realm. Their extensive metalwork capabilities enable them to create an entire project from scratch or perform radical transformations to your existing bike. If you are looking for a single part, want to build a complete Custom Chopper or anything in-between, Lucky Devil has something for you!
For more on Lucky Devil’s work, go to and see what’s cooking in the devil’s kitchen.
K and G CYCLES BRINGS YOU ANOTHER ROUND OF “PEEL BACK PRICING!”
This week?s deals are intended for the DIY biker.
How about a pivot head torx set? ?Extra long handles for that little boost of break loose power that the standard sized wrenches just don?t offer. ?
The set includes 6 sizes: T25, T-27, T-30, T-40, T-45 and T-50. ?

This set retails for $49.00 but you can get it at K and G Cycles for less than $40.00! That’s a steal.
This week K&G is offering 4 different roadside toolkits at unbelievable prices. ?
Try a 23-piece set for $63.69. ?The set includes: Combination Wrenches 10mm, 3/8″, 7/16″, 1/2″ & 9/16″ Adjustable Wrench 8″ length (opens to 15/16″) Locking Pliers 6″ length with coarse & fine teethAllen Wrenches 1/8″, 5/32″, 3/16″, 1/4″ & 5/16″ and much more.

They also have a 16-piece set for $34.69. The set includes: Combination Wrenches 10mm, 3/8″, 7/16″, 1/2″ & 9/16″ Adjustable Wrench 8″ length (opens to 15/16″) Locking Pliers 6″ length with coarse & fine teethAllen Wrenches 1/8″, 5/32″, 3/16″, 1/4″ & 5/16″ and much more.

Maybe a Roll Up Tool Kit for $77.94. This set includes: 3/8″, 7/16″, 1/2″ 9/16″ & 10mm combination wrenches; 8″ adjustable wrench, locking pliers; 1/4″ socket set with 48 tooth mini ratchet and 2″ extension.
Perhaps you fancy a Tear Drop Tool Kit for $77.94. Set includes: 3/8″, 7/16″, 1/2″ 9/16″ & 10mm combination wrenches; 8″ adjustable wrench, locking pliers; 1/4″ socket set with 48 tooth mini ratchet and 2″ extension and more.

K&G also offers service manuals, chopper tanks, and a ton more on this week?s ?Peel Back Pricing?

To get to these great deals, just drop by and “peel back” the upper right-hand corner of the page. Click on the graphic underneath and you will find the deals for the week. Act fast because these deals go away soon. While you’re there, check out all the great parts and prices at K and G Cycles. We are your one stop online motorcycle parts and accessories specialist.K and G Cycles…

Mr Lucky Sez??
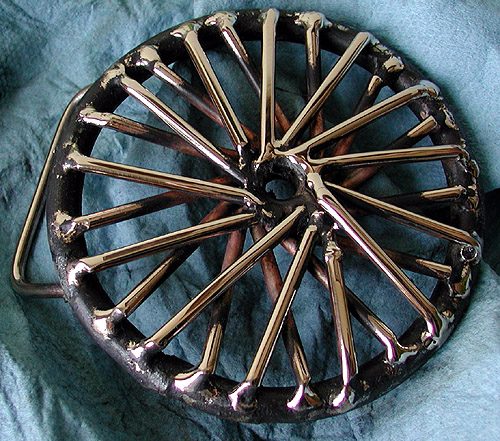
Always liked the looks of the 5-rail luggage rack on the early rides,but the stock version was just too big & bulky to go with the narrow, sleeker profile rides I?ve been building. I wanted to add the same convenience and nostalgic flavor to a current build so shrunk it down, added some Brass & Copper sparkle, and here ya have it folks?? my take on a classic? the 3-Rail Luggage Rack!

At the base,the rack measures 10?long x 6?wide, with three, 8?long chromed rails secured by wing-nuts adding that finishing old school touch! End plates are contoured to flow perfectly with the radius of round/fat bob fenders,and the design works/looks especially well on raised center ribbed fenders.
The 3-Rail Luggage Rack is offered either chrome with brass wing-nuts,or copper finished end plates with chrome wing-nuts as shown.
These are just the first in a line of classic-inspired parts crafted in chrome,brass & copper to be released at Mr Luckys. Each retails for only $99.99.Check it all out and keep up to date at .

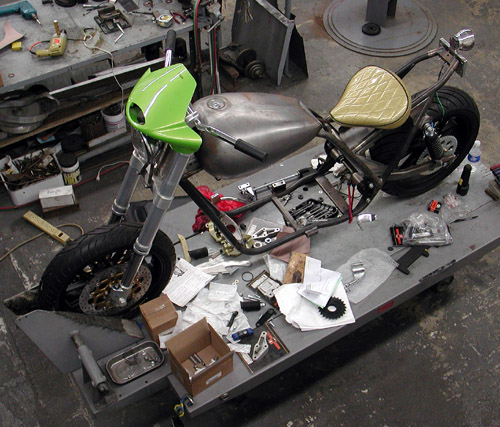
Bikernet Bonneville Effort, Part 8
By Bandit | | General Posts
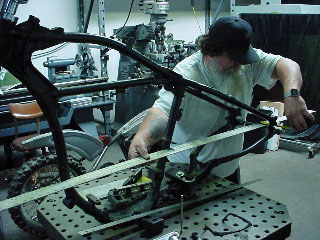
Life is bananas, and I add to the frustration by fuckin’ with everything. I can’t just bolt a part on, stand back and say, “Cool.” I’ve got to fuck with it. The V- kit comes with complete foot controls, but they were too far back and too high for my long lanky self. I cut them apart.
But first, since they were cast I had to ask the designer some questions. Fortunately John Reed, from Custom Chrome, is a good friend and here’s what he said. FXR and dresser primaries are the same dimensionally, however theouter primaries are the same on both, butthe inner primaries off the dresser has a piece on the front for the gear shifting bushing and shaft.
If you use the OEM primaries, I don’t recommend using latest models. Tochange the starter motor ratio on these the factory used a clutchbasket with more teeth on, but they are smaller than the early ones andthey break if engines with more power than stock power are used.
Late model primaries (1998 to present), use a starter motor that fitsthis year primary, it has a smaller diameter inside thread than earlymodels (‘94—‘97). It uses a smaller dia. starter shaft with smallergears to match the clutch basket.

If you want to use the latest model primaries on a big inch motoryou can use a 1994-1997 clutch basket (which uses the same clutchplates ) with the stronger starter gear, but you have to use a largerthread starter motor gear instead of the OEM one. Does any of this make sense?
Custom chrome sell them on page 11.45 (bottom right hand side).
— John Reed
I don't know what the hell he was talking about, but fortunately Wink Eller is working for BDL, in the R&D department, on a tall geared, super strong Bonneville system. So I didn’t need to worry about the starter gearing and clutch ring gear. I always use super strong Compu-Fire alternators and starters on my bikes and have never had a problem.
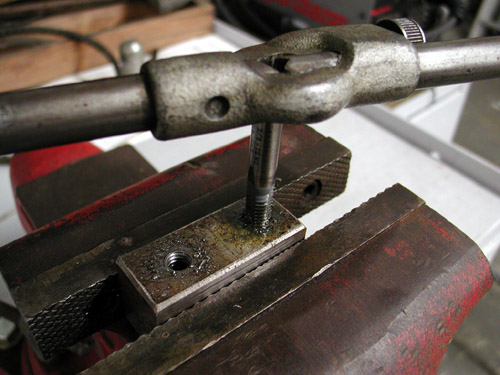
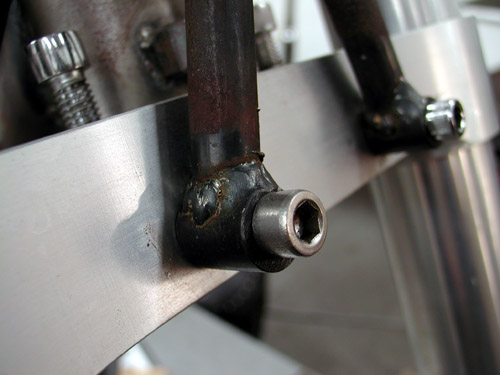
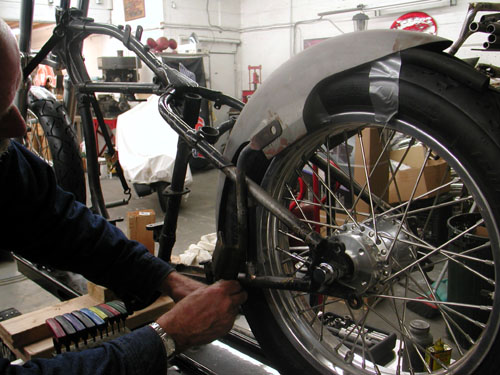
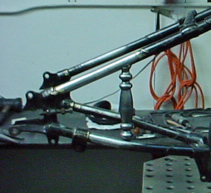
So first I cut two massive chunks of steel to move the controls forward and drilled and taped them. I noticed that the left controls with brake pedal attached had two 3/8 coarse bolts and the holes in the other side were 5/16 coarse. I drilled and taped both 3/8s.
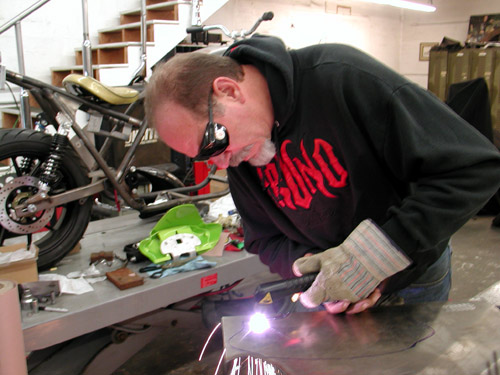
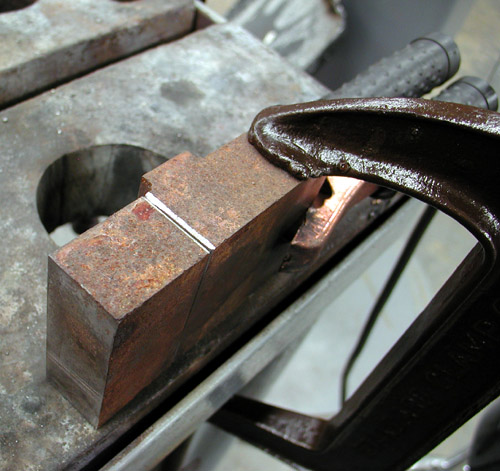
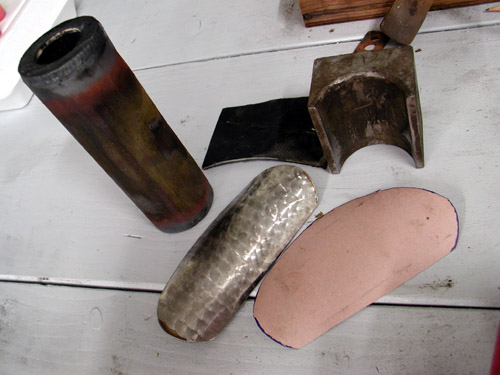
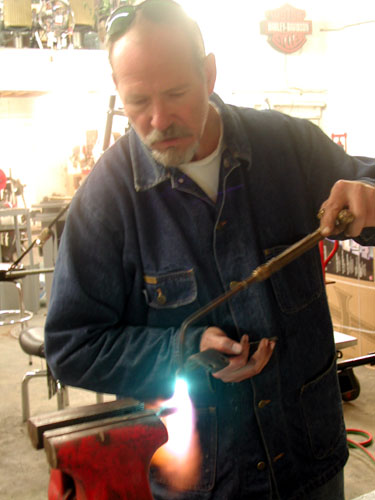
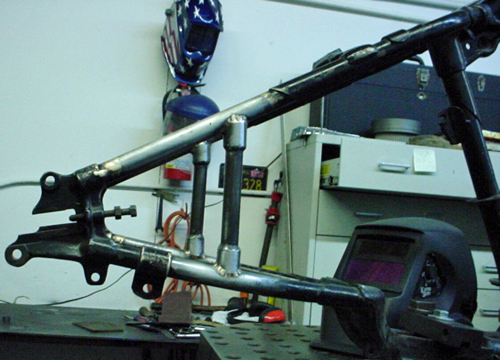
Remember the Le Pera solo seat? Well that left a massive notch in the rear of the tank for the original seat. I decided not to change tanks but use that area for a switch panel since I don’t plan to run switches on the bars or turn signals. So this is where the Plasma cutter came in handy. Jay showed up with the used cutter. He bought the sucka but never used it. It requires 220 volts and most folks don’t have those heavy outlets sticking out of their garage walls.
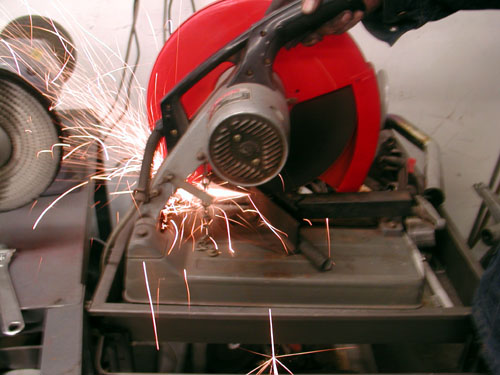
We pickup up the proper plug end from a Home Depot and wired it. It wouldn’t work. I called Kent at Lucky Devil and he clued us. We needed to have enough air in the compressor line to kick the switch, then the tip was used and wasn’t making an acceptable connection. We replaced it an went to work. Plasma cutters are amazing, safe, easy to use.We cut the chunk for the switch panel. Then we shifted to the milling machine to try our hands at machine turning the surface. It worked.
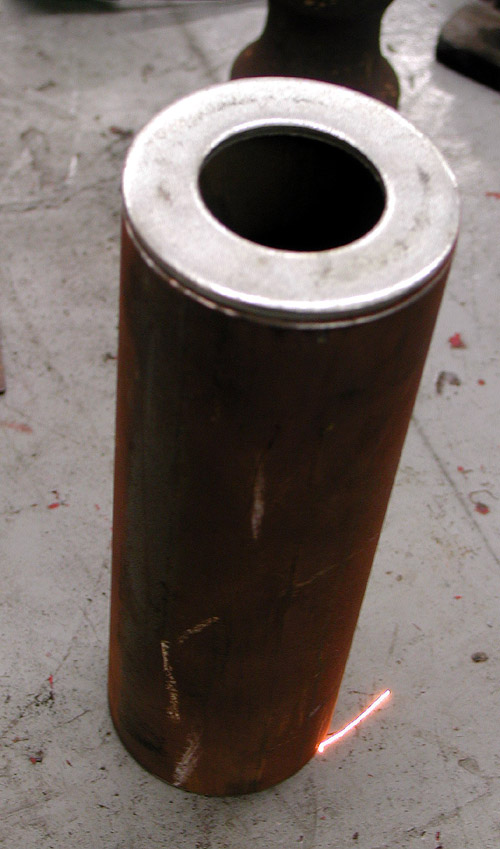
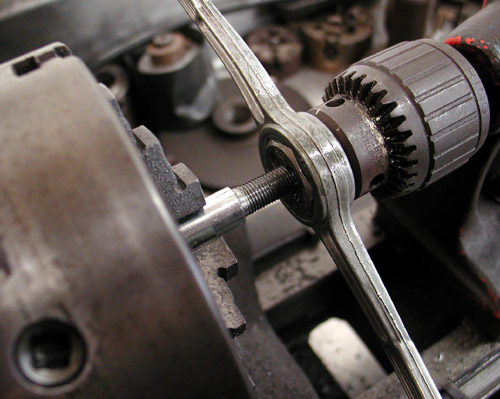
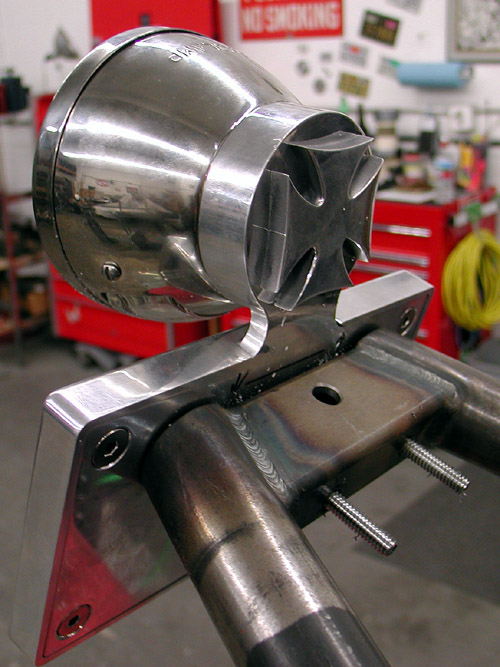
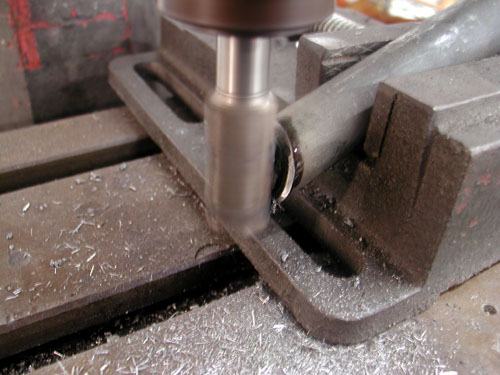
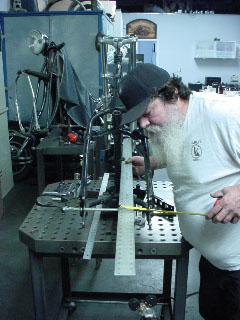
Next we moved to the bending procedure. We have pipe bending machine and a small stock bender, so we’re learning how mandrels work to form steel. We used a pipe bending mandrel and made the male out our of thick wall tubing with heavy washers welded on the ends for more strength.
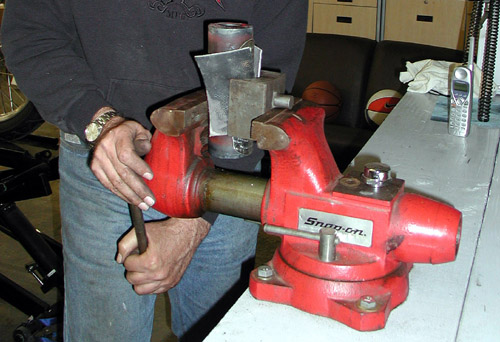
Then the massive Snap-On vice came in handy to crush our panel into the mold and is worked! We were blown away.
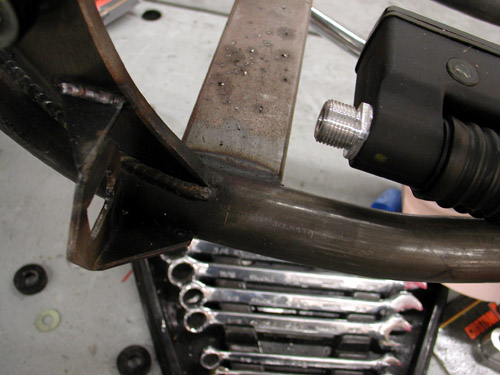
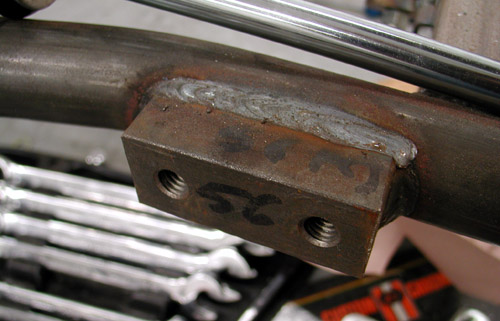
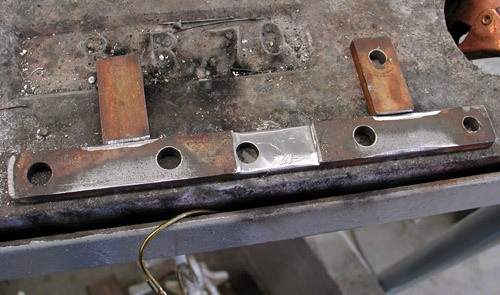
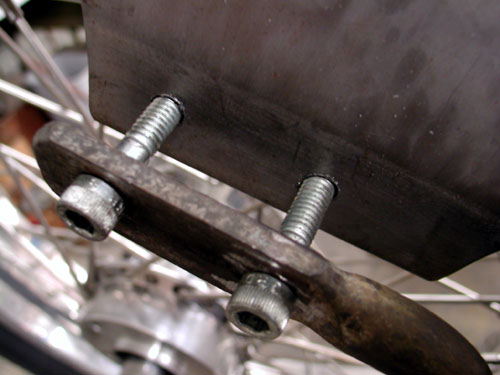
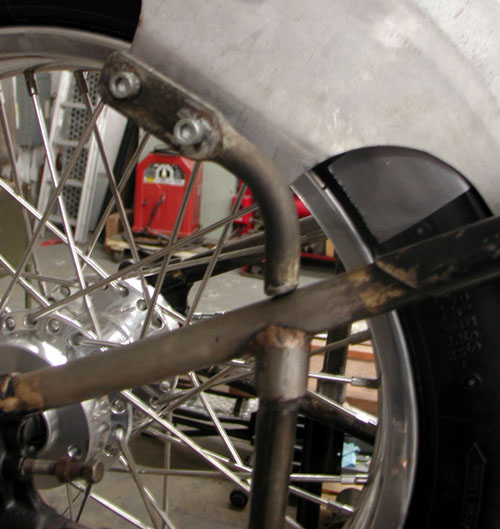
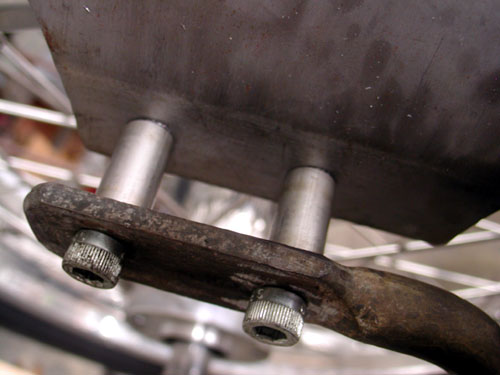
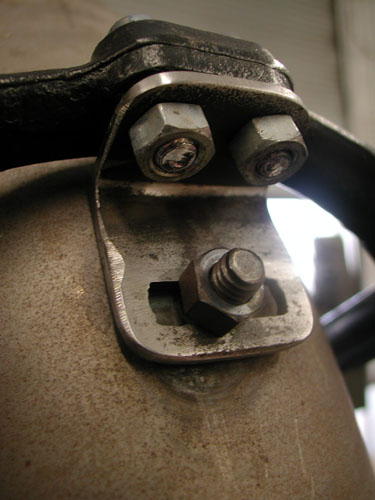
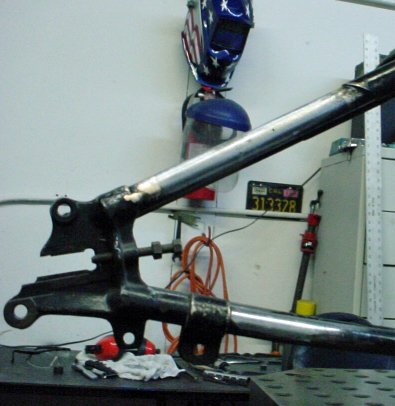
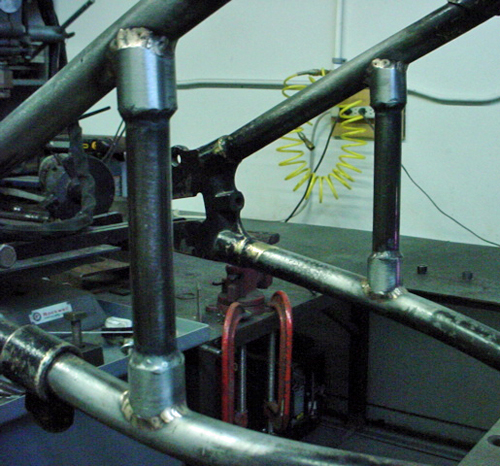
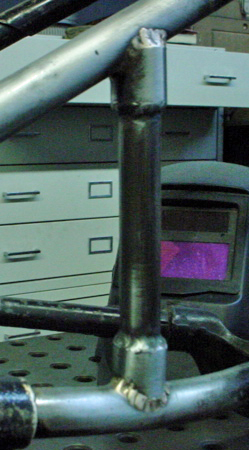
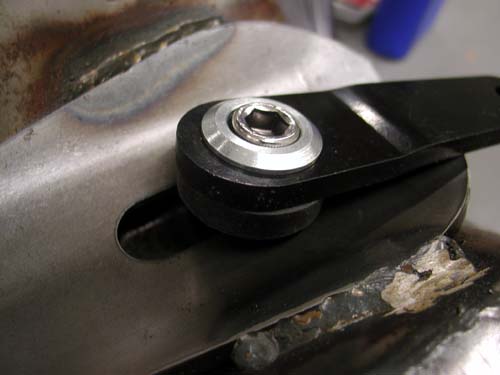
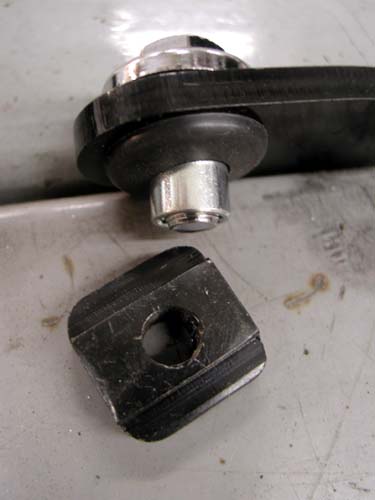
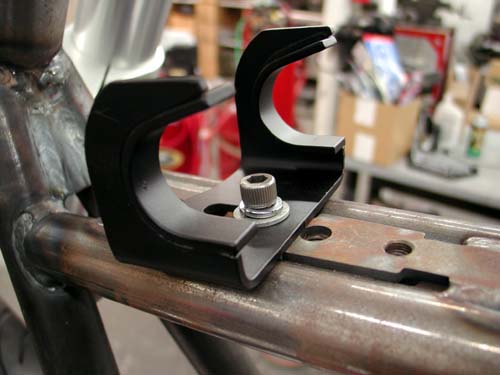
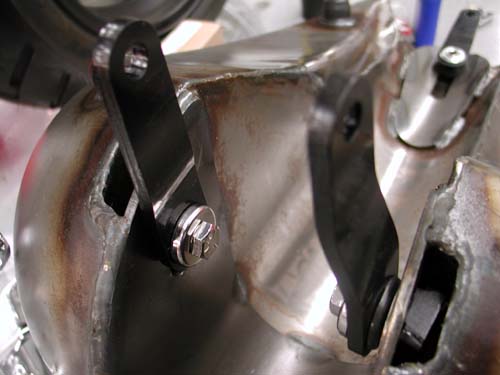
The next trick was building brackets to hold the panel in place. We used chunks of that same thick wall tubing to make arched brackets.
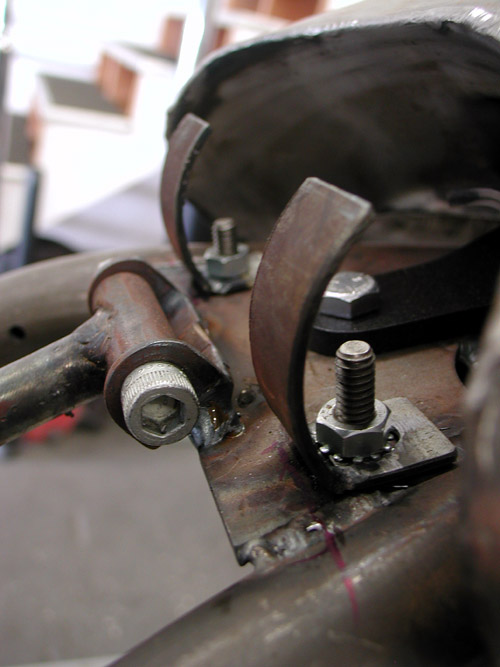
This shot shows the first aspects of building the brackets, welding them to tabs and drilling the holes for the frame connections. I needed to find a place to hold them so the fasteners would be accessible, but the brackets need to be spaced far enough apart to fit in the switches and fasten them.

Bikernet Bonneville Effort, Part 7
By Bandit | | General Posts
Plasma cutters are amazing, but let me back up just a taste. I needed to take care of the Devil in Houston at Lucky Devil’s Metal Works and made the brother a belt buckle. He’s going to build the lovely Nyla a Frisco style chopper in the near future—tight and light. You’ll see it come together right here on Bikernet.com.
So burning the midnight oil and silicone bronze rod I made this belt buckle and shipped it to Houston. Then I turned back to the Salt Shaker, since I was waiting on 45 Flattie components. I scored this Eye Candy classic taillight since we wanted to add some old school to the Panhead Sportbike. This puppy worked out perfectly. They also make the ’59 Cadillac taillight on last year’s Sturgis Shovel.
Eye Candy Custom Cycles LLC
Republic, Ohio(513) 312-1137
EyeCandy CustomCycles.com
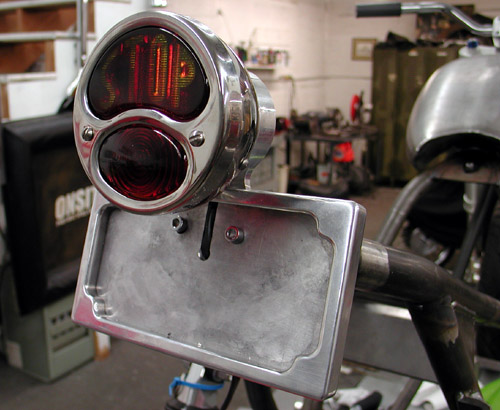
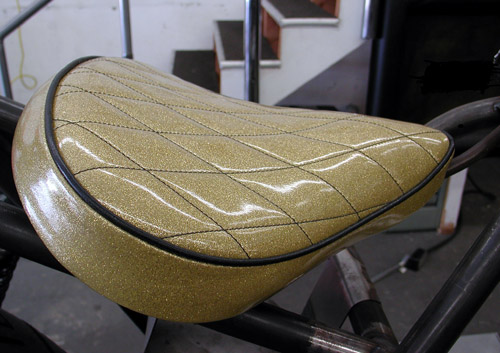
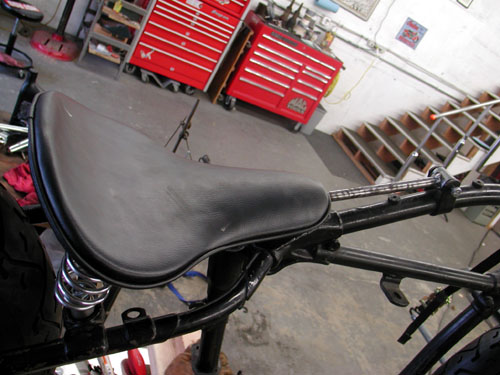
That was the easy part. Drill the holes through the frame rail and mount the sucker, so it fed the wires properly and looked cool. Then I shifted to mounting the gold metalflake Le Pera solo seat. You can order these in a number of colors and beading hues to match your theme. I’m stuck with gold Brembo rotors and calipers so I went nuts with the seat. The plan is to gold metalflake the frame and some components and shoot the sheet metal black with Bomber girl graphics.
Seats can be a pain in the ass to mount on custom frames, unless they are cast into the sheet metal and won’t move. I monkeyed with this for hours trying to pick the correct position. This Le Pera seat is a classic for stock or rigid frames. It comes with a black powedered front frame mount and bungs on the back for springs–simple, easy to mount, but I changed the system. I also wanted to be able to move the seat back for a salt flats prone position. Then the damn thing needs to be centered and slightly tapered off level. Then, once the front was mounted, I needed to mess with the rear.
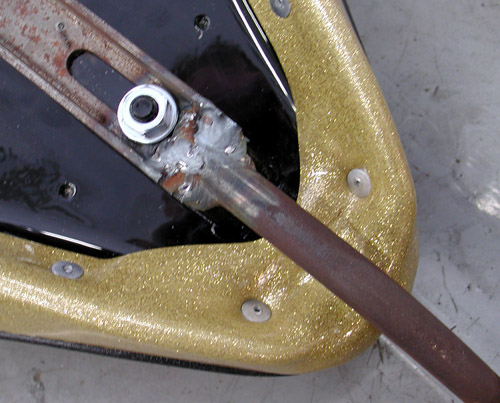
I split a stock solo-seat mounting bracket and welded a chunk of bent bar stock in between.
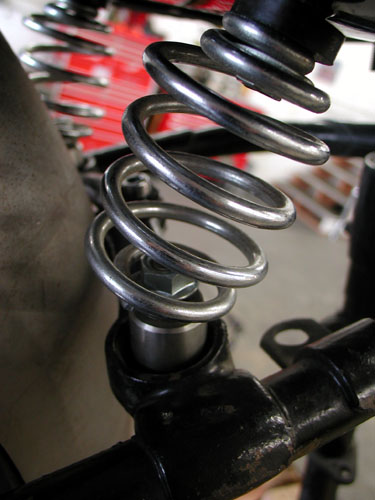
Then I cut apart one of my failed seat mounting systems and started to work on the rear bracket. I decided not to use springs for two reasons: The bike is rubbermounted and springs would make the seat too high.
I machined a slot in the strap so it would fit over the Le Pera support, but still be strong. Then I welded tabs to reach the frame holes.
As it turned out the seat set on a couple of rubber bushings and will slide back about an inch and a half for Bonneville prone racing.
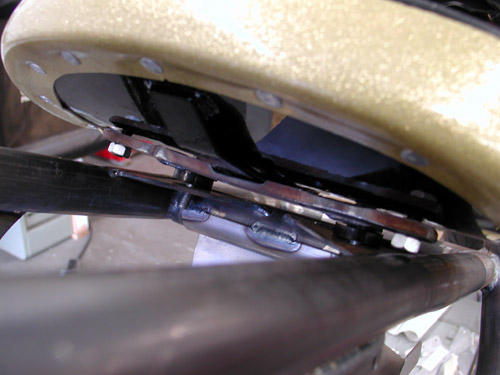
So there you have it. Three bolts remove the seat, it’s adjustable and secure. Shit, it was even comfortable. David Zelma, over at PM, keeps telling me that I’m going to hell for installing a solo seat on a sport bike. I’ve got lots of reasons for heading for the Devil’s den and that ain’t one of them.
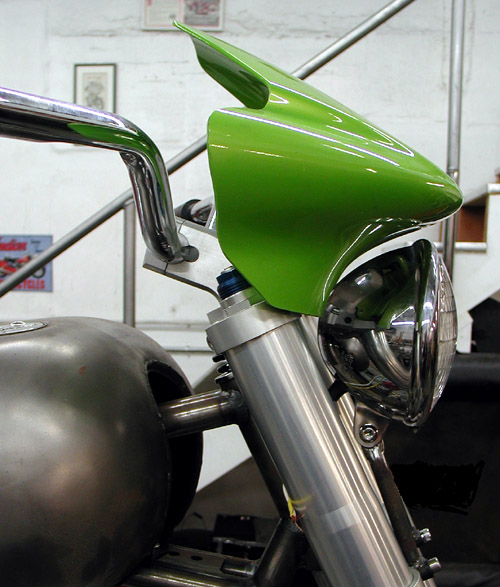
Next, I started to mess with an old triumph handlebar fairing. I wanted to run without the fairing, but the system with the V, comes with a dash of sorts. I shitcanned the original cat-eye fairing if favor of this one and a old school Bates headlight.
I made headlight brackets out of spacers and tubing to at the old school touch and place the headlight just under the fairing.
So far I liked the look for some strange reason, but we needed to finish off the dash aspect. That’s where the Plasma cutter came it so handy. Check the next episode of buiding this bike for Plasma and peg mounting tips.
Next I’ll show you the fork stops I built for the 45, then we’ll shift back to Plasma cutting and machining extended peg mounts for my long legs. That’s where John Reed’s words come in handy. The bastard designed the bike for a midget, and for several reasons I can’t handle mid-controls anymore. Wait till you see what we did.
“The primaries are FXR/dresser systems,” John Reed said. “You can weld the steel footpeg brackets. I am pretty sure they aredrop forgings.I put mine in a mill and machined the shit out of them to make themlighter, but if you are using the bike on the saltyou want to keep as much weight as the motor can pull.”

Bikernet Bonneville 2006 Effort, Part 6
By Bandit | | General Posts
We’ve made serious progress on both bikes, thanks to terrific help from friends around the industry. The buzz is hot for the Bonneville this year.
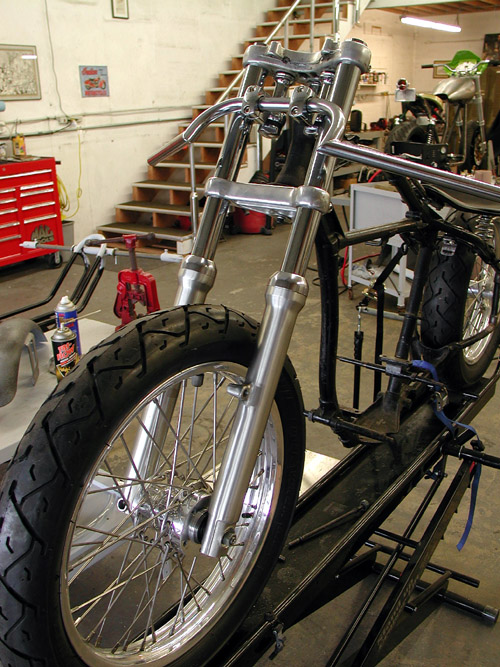
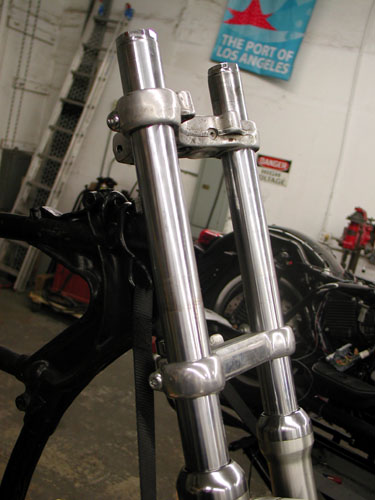
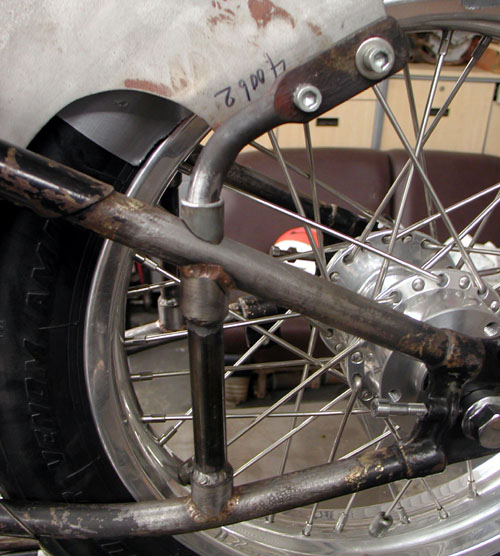
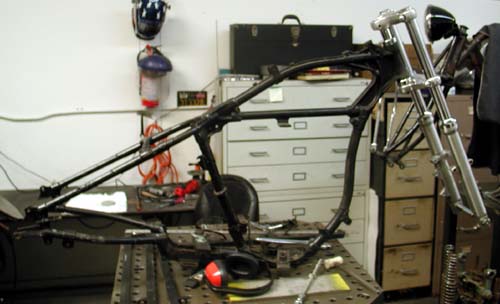
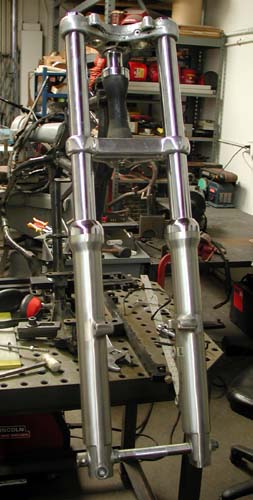
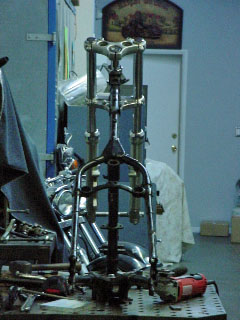
I may jump around a bit, but let’s haul ass into my first move. With the 45 frame aligned by U.S. Choppers, Rick Krost, the sheetmetal out to paint, at Jim’s Custom Paint, I needed to complete a few more tasks to finish the Bonne Belle roller. The front end needed shortening and bars, risers and fork stops. I ordered a sent of Custom Cycle engineering, 2-inch risers. I also ordered a set of 2-inch under Custom Cycle Engineering 39mm fork tubes. I still don’t understand why they measured only 1-inch shorter than the stock tubes, unless my tubes were lowered, an inch, from the factory.
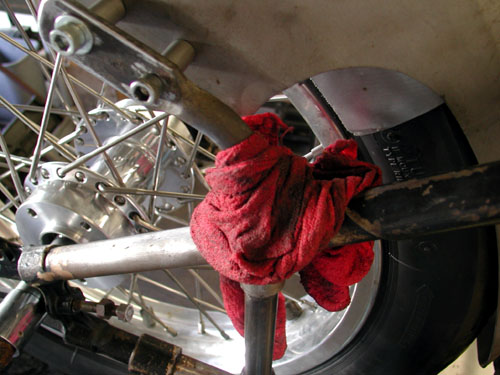
I ended up taking the front end apart a number of times. Kent, from Lucky Devil in Houston, told me to remove the metric Allens from the bottom of the lower legs first to drain them. I did. It worked alright, but there continued to be oil on the springs and inner components, so rags were necessary constantly.
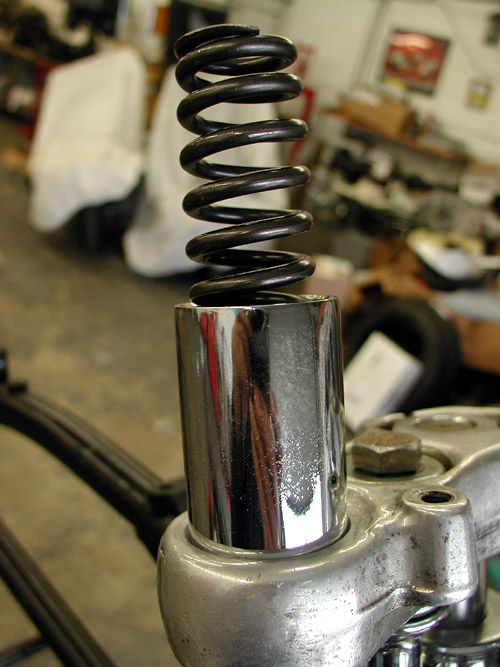
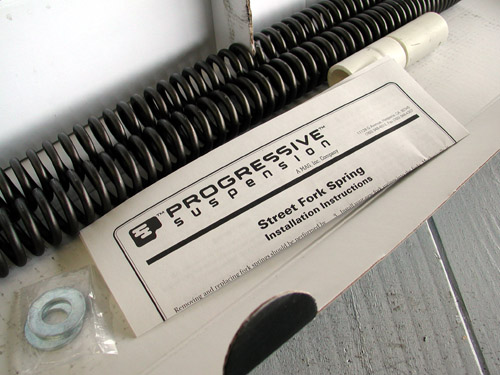
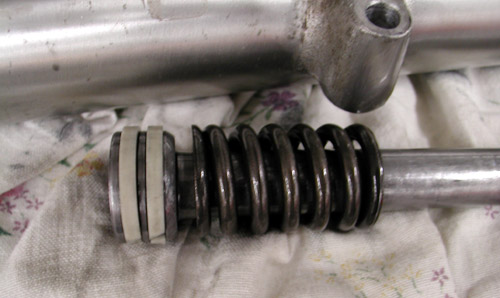
We ended up using shorter tubes and a set of Progressive suspension lowering kit springs from Custom Chrome to drop the front end even more.
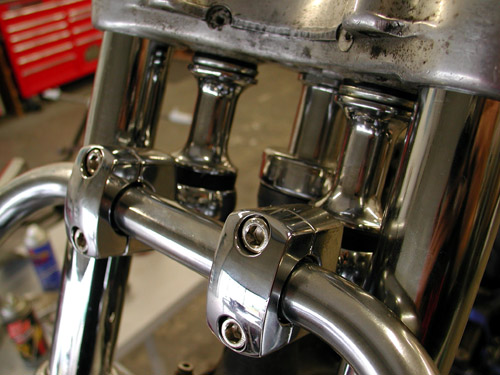
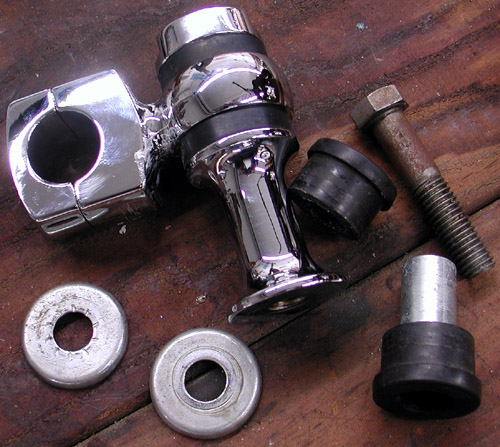
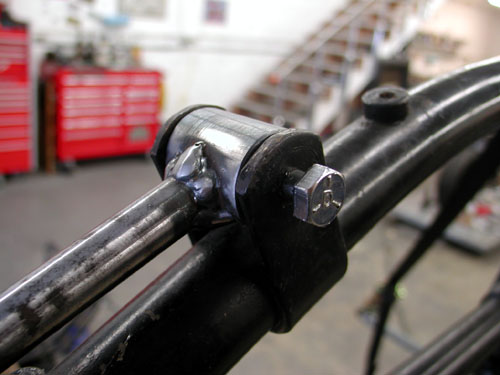
Before I finish the tube switchin’ procedure, here’s a shot of the dirt bike, 7/8 bars in place with the Custom Cycle Engineering risers upside down under the top triple tree.
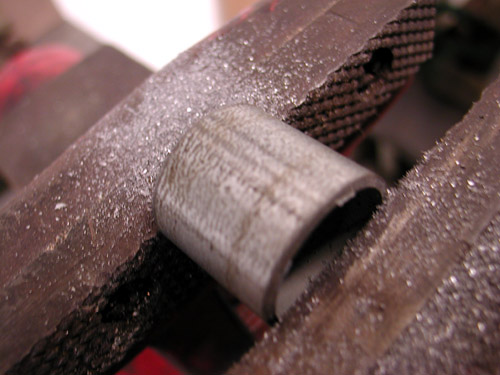
I cut chunks then sliced, in half, thin electrical conduit tubing to make shims to hold the bars securely in the risers. I used rubber trim cement to hold them in the risers, since I usually work by myself and it takes four hands to hold the riser caps, the Allens, the shims and the bars.

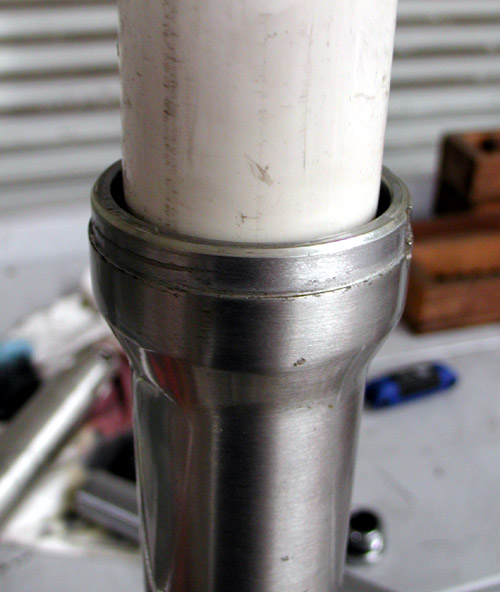
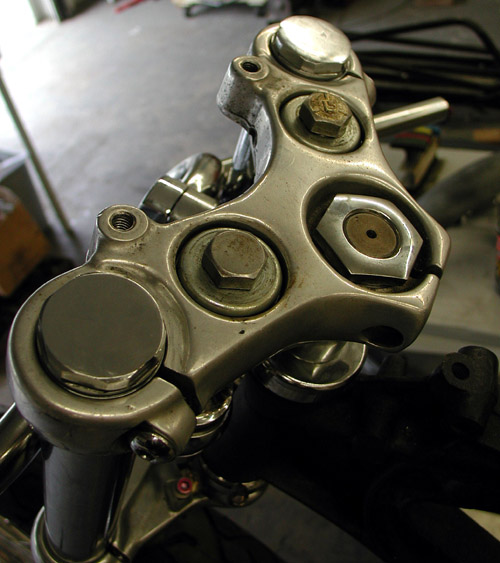
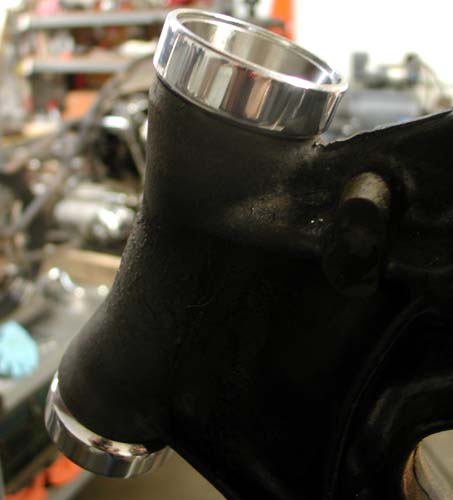
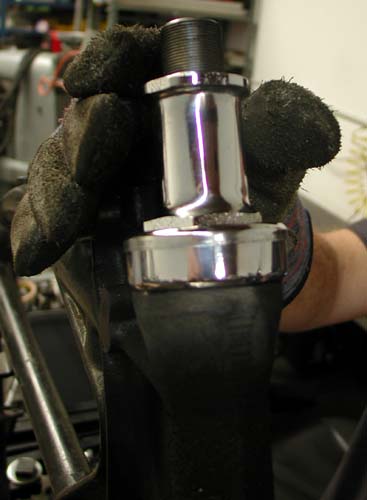
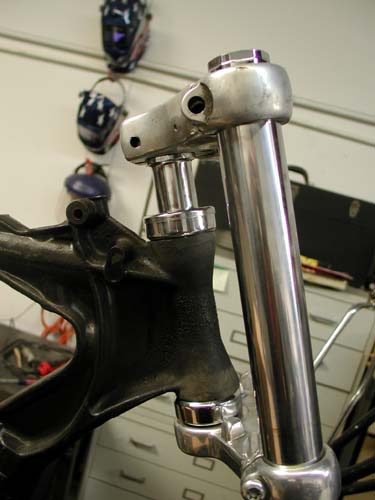
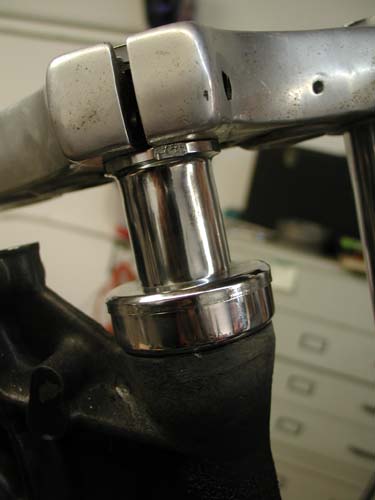
Here’s one more odd notion. We pressed a springer 7/8-inch neck stem into the Sportster bottom tree and left it Springer length, but altered the top bearing nut, so the top tree stands 1.5 inches above the top of the neck cup. That lowers the bike another 1.5 inches. We’re shooting for 4-5 inches of ground clearance.

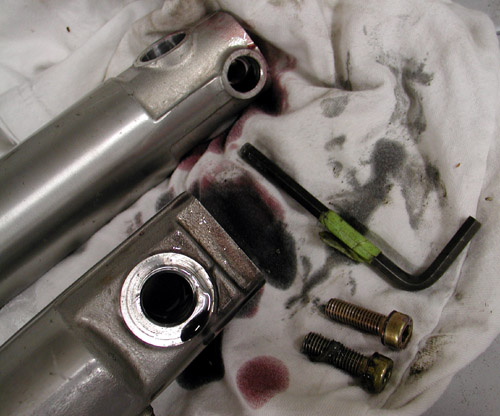
Okay, let’s run through disassembly of a Sportster front end. Of course remove the wheel and brake components. I might suggest prying that Allen on the bottom of the lower leg loose first. Don’t remove it, but the compressed spring holds tremendous pressure on it.
Then take the top cap off the tube with a 1 3/8 socket while the tube is still pinched in the trees. I loosened the pinch bolts and slid the legs out of the trees. I put a big coffee can on the bench and removed the Allen off the bottom of the lower leg and made sure to secure the brass washer that came with it. I slid the tubes up and down in the lower leg to pump out the fluid.
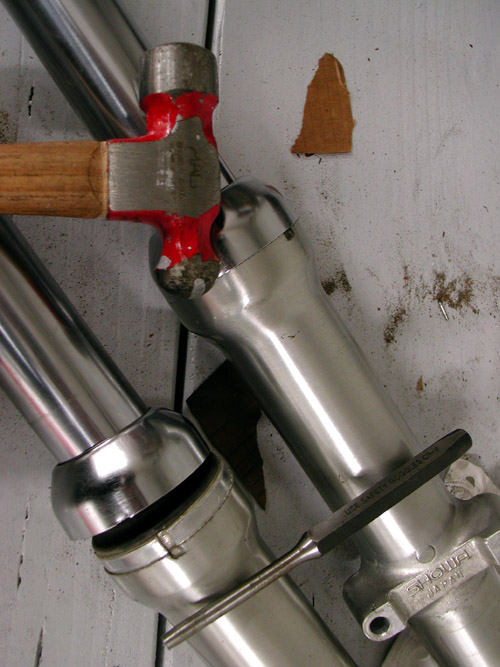
With a small punch and hammer I removed the dust shield/cap. There’s a notch in the lower leg for this chore, but be careful not to damage the cap or the leg. Tap it lightly.
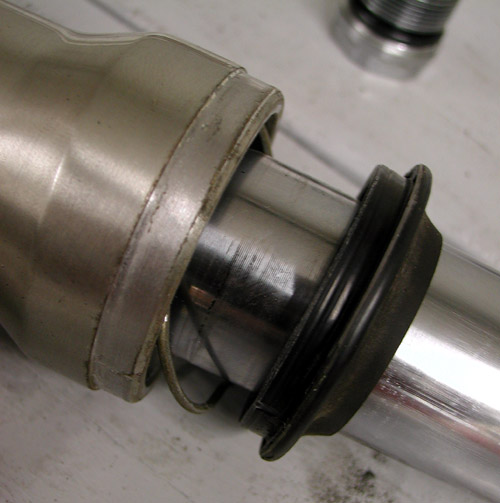
With a wedge I carefully dug under the rubber dust seal. This was a reasonably new front end, so I didn’t plan to replace these items. I took a lot of care not to damage them. Next, with a small flat screwdriver we removed the wire keeper that holds the fork oil seals in place. Then, by yanking up on the tube and sliding the damper components against the seal, it came out.
Then the damper tube came free with the rebound spring. I carefully washed all the components then reassembled the components with the new tubes.

First this brass lower bushing needed to be carefully removed from the old tube and slipped onto the new one. Then the damper tube was returned to the tube with the rebound spring in first.
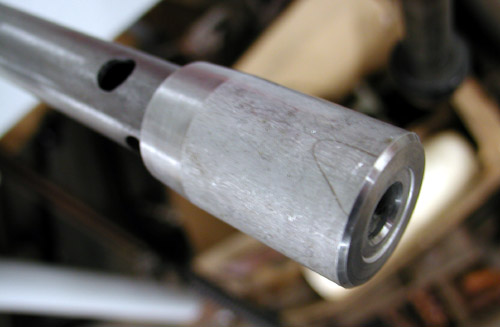
This cap slips over the damper tube and seals the bottom of the lower leg. It’s imperative that this puppy is clean and the inside of the lower leg completely free of dirt or debri, or the bastard won’t seal.
Here’s the kicker. Returning the oil seal can be a turkey. I made a tool out of a nut and chunk of exhaust pipe welded together, then wrapped it with duck tape to prevent marring the chrome. For some reason it didn’t work this time. Since the leg was off the trees I ran a chunk of 2-inch PVC pipe down over the tube and hit it with a rubber mallet. The Fork Seal slipped right into place. I returned the clip ring, the dust shield and dust cap (the PVC pipe worked as a tool here, also). I slipped the Progressive spring into the tube to hold it in place and tightened the Metric Allen at the bottom of the lower leg.
We slipped the tubes into place, tightened the pinch bolts, added 10 ounces of Amsoil Fork Oil in each tube and tightened the top fork tube caps. Shortly, we’ll have all of our Performance Machine Brake components, coupled with Yamaha 250 master cylinders, hand and foot controls for the light/small racing look. Yeah, I know, Jap stuff on our 45 flatty, but I think you’ll dig it when we’re finished.

We weren’t done yet. The tanks were being painted and the last thing we needed were fork dings. I pondered the glide front end for fork stops and thought we had it made, no way. They were too low to catch the arch in the frame.

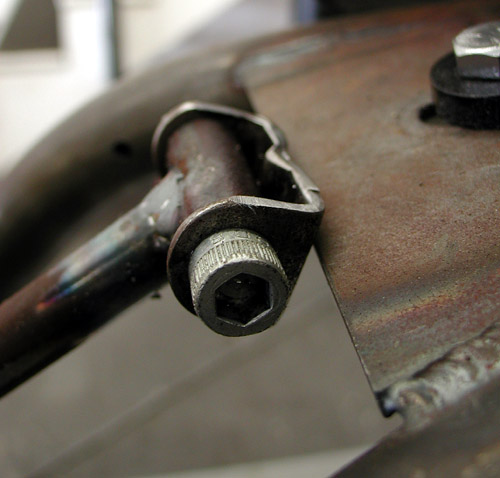
Then I discovered that even with extentions on the cast aluminum tabs the front end turned too far. That’s when the squirrely notion surfaced. I decided to connect the dots on the lower triple tree and create extensions that would reach the frame.
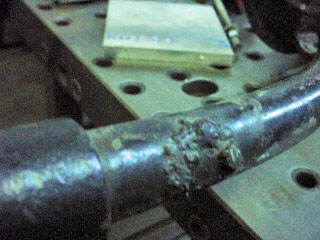
I bent a chunk of ¼-inch round stock and welded a couple of ¼ nuts in place. Then we bent the tips up to catch the frame.

Then for “Bandit” style I brazed a couple of old ball bearings on the tips to finish them off. Brazing works well for small pieces that don’t need excessive heat or strength.
These puppies won’t allow a whole lot of turning ability, but generally we’re running straight down the salt and these will be easy to adjust once we have the tanks in place.

Bikernet Bonneville 2006 Sponsors
By Bandit | | General Posts

I don’t know where to start with this? It’s all come together so fast. Last year while blazing across Mexico, with Dr. Hamster, in the La Carrera Pan Americana, World’s Most Dangerous Road Race, he asked me if I would be his partner the following year? At first I was pumped as the ’54 Hot Rod Lincoln rattled across Texas, then I realized that my adventure for 2006 was, and will always be, motorcycle destined. I was forced to decline his offer. We had decided to run to the Bubs Bonneville International Speed Trials, September 3-7 in Wendover, Utah.
As I started to work on our bikes in the Bikernet Garage, notions started to fly. Bob T., a Bikernet Contributor, contacted me from 14 Palms, California and the Chop N Grind effort formed, another bike was added to the 5-Ball Racing Team. Shit, I don’t know squat about Bonneville, except for being on the Easyriders team that took, and still holds, the World Land Speed Record. I wasn’t going after that record. We just wanted to have some fun on the Salt for our 2006 Motorcycle Adventure. Suddenly we had a team of three bikes and a department was formed on Bikernet. Jeff Najar called and said, “Can I be a sponsor?”

Next thing we knew, we had sponsors, brothers contacting Bob T. to help. Bob T. calling me for parts and we needed to form a Bikernet Sponsor system to credit anyone who bought us lunch, sent us a part, welded a frame or sent a check.

I’m not kidding when I say I’m flabbergasted at the response and the interest in our race effort and Bonneville. I immediately pitched in to help Bubs Bonneville effort as a sponsor to support the motorcycle-only event.

So here’s our growing list of sponsors. We will update this list on at least a weekly basis and try our damnest to give all the people and companies credit where it’s due. Don’t hesitate to contact me, if I screw-up or if you want to be involved.
–Bandit
Bandit@bikernet.com
BIKERNET BONNEVILLE 2006 5-BALL TEAM SPONSORS
“So far our sponsors include AMSOIL, BMC Choppers, Jims USA, AVON Tires, S&S Cycle, Leinweber Cams,” Bob T. said. “We also have help from my brother at Expressive Designs in Oahu, and LMC Concrete Pumping. We want to thank each and every sponsor and we will in our articles, on our Bonneville Banners, truck and bikes.”
Bikernet Platinum Level
Custom Chrome Inc.
Accurate Engineering
Baker Drive Line
Departure Bike Works
Jim’s Custom Paint

Bikernet Gold Level
BDl
Avon Tyres
Nick’s Performance and Amsoil Oil

BMC Choppers
JIMS USA
U.S. Choppers
Randy Aron – Cycle Visions

True-Track, Wil Phillips

Bikernet Silver Level
Chris Kallas
Glen and Kerry Priddle
Nick Roberts – Nick's Performance Acces.

Expressive Designs
Rollin Sixes Custom Choppers
Two-Bit Choppers.com
Bikernet Bronze Level
Andrea and Beach
Thebeachcruiser.com
Gene Koch
Peter Hagen, P.M. Fine Knives
Dr. Christian Reichardt
Jeff Najar, HorsePower Marketing
Glen and Kerry Priddle
Hank Hill
Jim Flickinger
Clyde Fessler
Lee Wimmer
California Customs
Randy Lee Meissner
Bikernet Rider Level
Mike and Meanest Pullin, Stealth Bike Works
Johnny & Salena White
Ray C. Wheeler
James Fly
Donald Magalhaes
Michael L. Turner
Two Wheelers Motorcycle shop
Bob Illingworth
Rick Fairless


Bikernet Bonneville 2006 Effort, Part 5
By Bandit | | General Posts
This is nuts. But let me try to explain. We’re making progress fast. Even our Bonne Belle art improved from a Chris Kallas black-and-white line drawing to a colored rendition by the master. Rick Krost straightened and strengthened the frame last chapter and we ordered Paughco cups designed for this frame (with Timken bearings) with a 7/8-inch, Paughco Springer stem. We (Settle’s Cycle, in Harbor City) machined the stem and pressed it into the Sportster bottom tree. Larry Settle also laced the PM hubs to the aluminum Sun Rims, mounted the V-rated Avon Tyres and balance the lot. We were rolling. Our goal was to turn this puppy into a roller, ship the sheet metal to Jim’s Custom Paint, while the frame and brackets were being powder coated. I’m getting ahead of myself. We were jazzed to pick up the wheels. We machined the rear hub, estimating the distance to the sprocket face from the frame, aligning it with the transmission sprocket. Fortunately we had access to a 1939 WLDR and made measurements. We ended up machining both sides of the rear PM hub before the wheel was laced. With complete wheels in our hot welding gloves, we returned to the Bikernet Headquarters and went to work. First we had to shave 1/32-inch off the rear axle landing to slip in the new Custom Chrome ¾-inch big guy axle. We looked at grinders, and various tools and decided to hit it with the traditional metal file and some cutting fluid. It took no time at all for the axle to slip in securely. Next we installed the front wheel on the stock Sportster front end with the springer stem. The bike set way too high. The stock ’39 stood between 4.5 and 5.250 inches off the ground with an original springer is place. Rodan, an avid Bonneville racer and SCTA official, told me recently, “You want your bike to set as low as possible and eliminate anything off the front that will interfere with air passage.” We need to keep lowering this sucker. It’s currently close to 6 inches in the air with the tubes pushed up through the top Sportster triple tree.


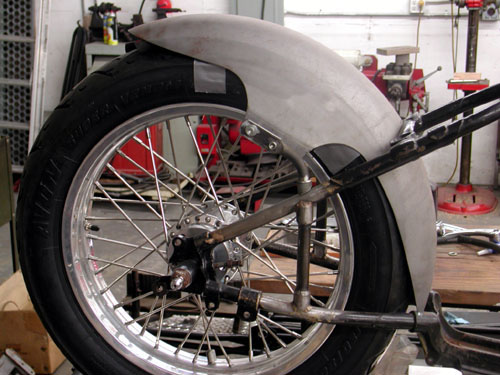
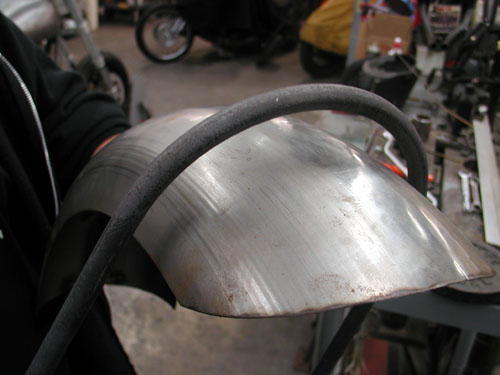
Next we needed to mount the rear fender so it would be ready for Jim Murillo, the master painter, to go to work. He already has the tanks and a stock Sportster front fender. We looked for a narrow front fender for the small Avon, 120/18, rear tire and discovered a heavy gauge Kraft Tech front fender and started pondering do-ability. We laid it over the tire and found some old rubber (used to vibration dampen handlebars). We cut it in two and duck taped it to the tire. For racing clearance we gave it about ¾-inch of clearance from the tire surface on the top. It was sorta tight on the sides.
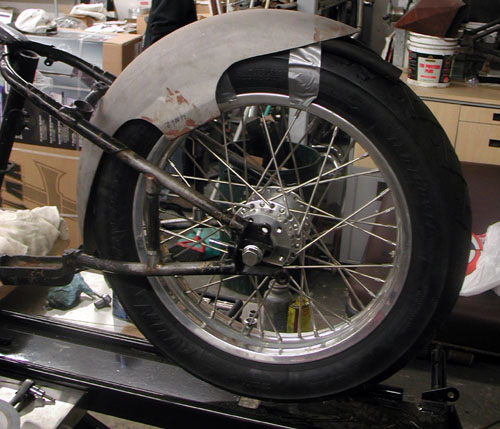
We decided to use the front fender tabs instead of shaving them and running standard fender struts. We dug around the shop for some stock that might match the material used to gusset the rear fender arms. We wanted to give it the same caped look as the gusset tubes with an outside sleeve at the ends.


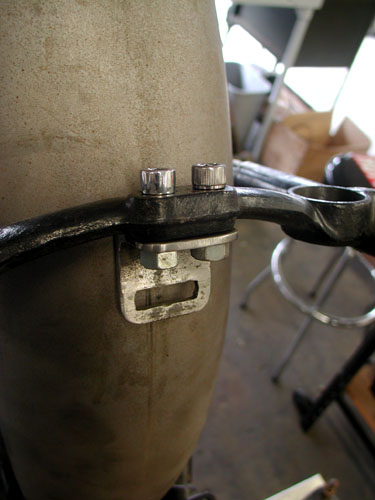
We discovered a solid rod, muffler bracket with tabs already in place. For a couple of days we monkeyed with the tabs, bending them, twisting the flats and fitting them to the fenders. We decided that since we were going with this configuration, that we would set it up so the fender could be moved to the right and left, if the wheel needed to be re-aligned.
It took a lot of balls to make the initial cut. Even with adjustments built in, it’s nerve racking to fit fenders. The slightest shift throws everything out of whack.
We found the right sized tubing to make sleeves from and began by setting up my mill so we could trench cut the tubing to fit the fender rails. This brings up a couple of wild stories. We’ve been fortunate to stumble into caches of machining equipment and I don’t throw a damn thing away. A buddy inherited his dad’s pad. When he moved in, he discovered a complete machine shop in the small teetering garage. He was rapidly building a business around “On-Site” hazardous waist collection bins. He needed to clear out the garage and called. We scored. Then we bought a cheap, used milling machine from Settle’s Cycle. This was the first time we put all the pieces together and fired her to life.
Next we drilled the tabs. They already had one hole, so we drilled matching holes in each tab and on the fenders. Then I went to work on developing spacers to hold the fender centered in the frame and over the tire.
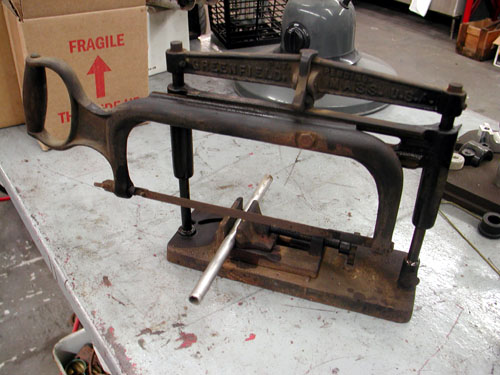
One of the wild benefits of living in an industrial ghetto is the strange opportunities that pop up. The Welder down the street was force to move, since the shop property was sold. He turned me onto a bunch of stainless tubing which would work out perfectly for this operation. Get this, recently a homeless guy called and told us about a shop that burnt down and the people were being forced out. We scored a bunch of old tools, including the above antique hacksaw guide.
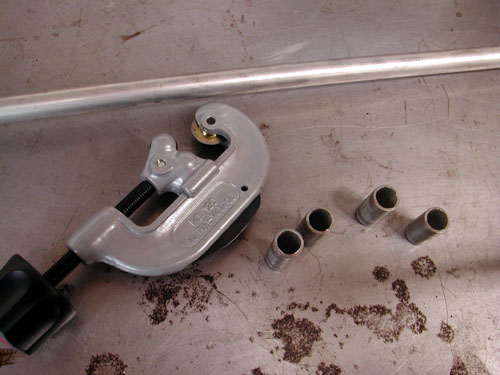
Unfortunately I didn’t have any blades that small. I turned to a tubing cutting tool that worked like a charm. I could cut segments almost any length accurately and cleanly. I cut a variety of sets, ¾-inch, 1-inch and 1.250-inch.
With the grooved sleeves in place and the spacer juggling act completed, we believed we had something going. There was a question about the welding, though. I called master builder Rick Krost, from U.S. Choppers, the man who straightened our frame. We discussed the frame sweat-brazing and avoiding any contact with brass. We also discussed his TIG welding with silicone bronze and the need to keep extreme heat away from delicate welds.
We decided that the best method was quick MIG welds that wouldn’t produce excessive heat. He suggested that I tack them, then rotating from side to side, welding from one tack to the next. I tacked them front and rear, then welded from tack to tack on one, then shifted to the other and finally doused them with a wet rag to prevent the heat from lingering.

With the fender rails in place and fasteners tightened we discovered that we still needed something in front, although we were elated with the outcome. They were solid as hell. We cut a chunk of angle iron and drilled it to fit the frame. Then by drilling and using a Dremel tool cut-off blade, we cut a slot in the bracket to allow the fender to be shifted right or left. Finally we welded a bolt to the inside of the fender for ease of installation and adjustment.
The last element we could mess with, at this stage was the seat. I’m constantly shifting seats around the shop. This seat was destined for the Salt Shaker for awhile, but it fit the 45 like a glove, so I looked for spacers so it would sit enough above the fender and the springs wouldn’t rest against the frame and fuck with the finish. I save anything that might be considered a spacer. We dug through the drawers and discovered two perfect units, made of stainless steel, a bonus.
Back to the milling machine and shop lathe we cut a spacer for the front of the seat and machined it for a perfect fit. We furrowed another chunk of tubing and welded it to 6-inches of steel strap. It was drilled for the bottom of the seat then welded to the tubing.
The seat fit perfectly with the bike. We are trying to position Valerie so she can tuck in and low for the blast along the salt. Wait till you see the handlebars in place.

We were just about to slam the door shut on the shop for the night when Japanese Jay showed up and asked for help building his sissy bar. It was another chance to get some experience with our Bill Hall strap-bending machine. Chris Kallas our official Bonneville Team artist was helping us with the 45 and gave Jay a hand bending the solid stock.
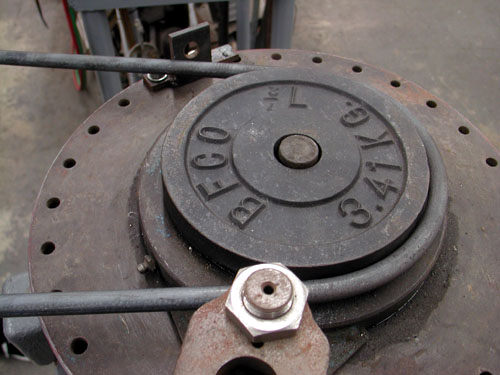
We looked around the shop for the perfect diameter guide and discovered various weight plates, from the Bikernet Gym, might do the trick. We tried 2.5 pound, 5 pound and ultimately 7.5 pound, which worked like a goddamn dream.
This move could be introduced in any shop with a weight plate and a strong vice. It would be tougher to handle than with this bastard, but you could pull it off. The rail fit Jay’s fender like a dream.
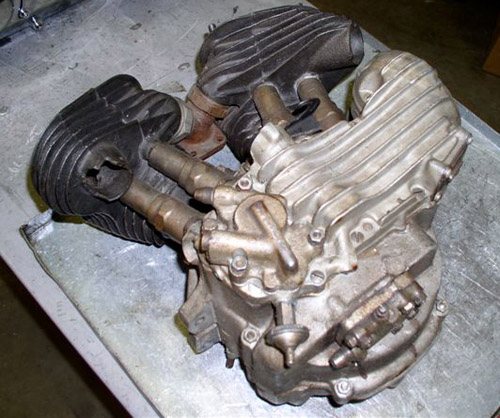
Wait, there’s more. The brothers, at Departure Bike Works, have stripped the Bonne Belle engine and are preparing for hop-up rebuild. The initial plan called for running two front cylinders, dual carbs and bigger valves and pistons. I snagged Greg from the Service Department:
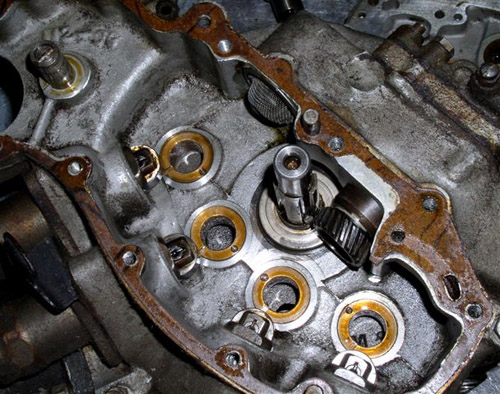
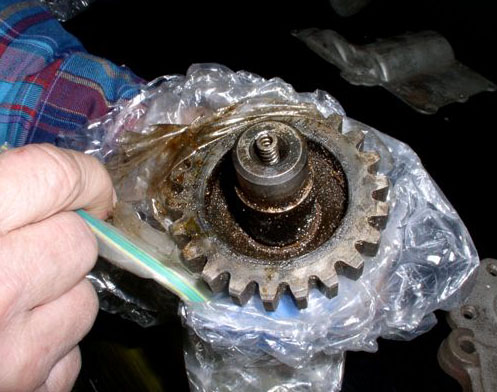
Klink Walton (resident guru of flatheads & other things ancient), and Billy Wheatley (resident motor wizard & stripper afictionado) were the two brave souls who tore into this old, decrepit hunk of iron. Overall, things went pretty smoothly, although Klink forgot to bring all of his special 45″ tools (some guru, huh?)
A few things we noticed were, one of the cylinders had a broken exhaust flange. No biggie, Klink wants to use a set of WLDR cylinders (if we can find a set, hint,hint Bikernet readers). We also noticed the motor had a military oil pump set, by the olive drab color they were sporting. Nothing major, just an interesting little tidbit.

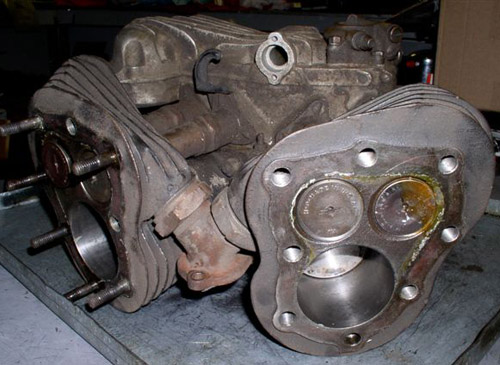
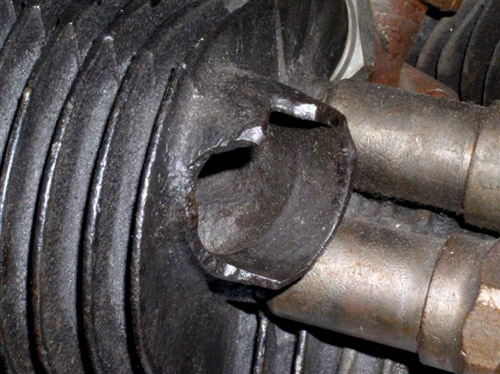
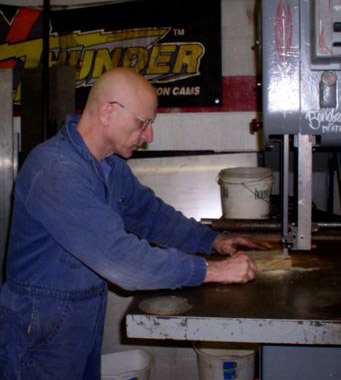
We noticed that the cases will need a bit of welding and machining, but WTF did ya expect on a motor of this vintage. It was about this point that Klink realized the need for a special case splitting tool, so off he went to the bandsaw, and returned with the tool you see pictured. I'm sure it'll be available in the JIMS catalog shortly…
Anyway, the cases were split, the flywheels removed & disassembled, blah, blah ,blah, and we were left with a large pile of parts that smelled like the funk of forty thousand years. Our next step will be to separate the good from the bad & the ugly, and order all the trick parts we're planning to use in this beast(if you can call a 45″ flatty a beast), so STAY TUNED!!!!!
These are WLD cylinders and WLDR already have larger valves and better ports with less distance to the cylinder. The Departure Bike Works boss asked if I could find two front WLDR cylinders, which seems an impossible task. I don’t feel right about breaking up a set either, so I think we’re going to weld up and machine the ports and machine the heads for larger valves. We still need to find another front aluminum head.
The next challenge is having new cams ground. Again, I spoke to Rodan who told me that KR cams will work, or Andrews Bonneville Sportster cams for higher lift. We need to separate the lobes from the gears, switch gears for the reversed valves and put the sets back together. We’ll see. More reports coming soon.

Bikernet Bonneville 2006 Effort Part 4
By Bandit | | General Posts
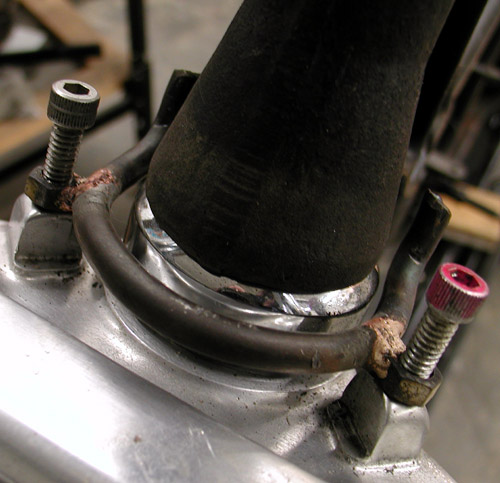
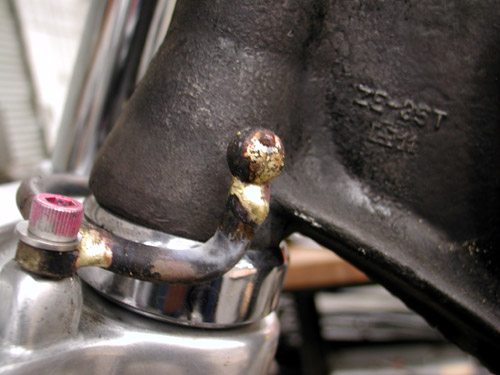
In the last segment the crew of U.S. Choppers straightened the Bonne Belle, 1940 45 frame, but I asked Rick Krost, da boss, if he felt any gusseting was necessary. He pointed out all the strong factory gusseting in the front and even on the single down tube, but suggested that we gusset the rear legs to strengthen the point as which the power hits the salt. My concern was in many respect for Valerie Thompson, our Bonneville Salt Flat rider.
I could tell, while working with Rick, and witnessing his watery blood shot eyes that he was either coming down with something or hungover. His first rocking chair gusset notion met with mixed reviews.
First, I coped the pipe after fitting it all to make sure it would all line up right and fit snuggly to the rear frame rails,” said Rick Krost. “I compounded the top “fish lips” by running the mill head at an angle… 25 degrees to be exact.”
It's real important to have the weld area clean before welding… nothing like emery cloth and elbow grease.
To make matters fun, these old frames are all furnace brazed. There’s brass everywhere on these frames. A lot of the times the pits in the metal keep you from cleaning all the brass out of the clean metal, which is bad for welding mild steels with 70S2 rod. It will contaminate your welds and they will fail.
“I chose to weld the pipe to the stanchions with steel,” Rick said. “and then weld it to the frame with Silicon bronze to avoid any contamination issues or weld failure.” Another benefit of SIB is that we can work around the tubing quicker as it has a lower melting point so as not to put too much heat into this old brazed frame..
”I used a clay heat sink in front of the castings or a sloppy wet rag,” Rick said, “depending, so the heat doesn't crawl over to that nice furnace brazing and loosen it!!! This could be bad!!!”
Done deal– the supports lined up well and were symmetrical. The 3/4 tube was used to help with any possible chain rubbing issues and they tuck up nicely between the frame rails.
Look at those rear frame rails. Notice how they line up and are parallel to each other? That was the frame fairy's work the other night…. boy is she good. “This frame was about 3/8-inch out of alignment, when we started this project,” Rick said. “U.S. Choppers putting old steel back into use again!”
“Hey Bandit, come down with this flu…,” Rick sniveled, “I'm outta here… go cuddle up to my wife and her girlfriends. It's 8:00pm and I'm hoping your liking the finished result.”
He only uses Proto-Fab tubing. It is seemless, cold rolled and drawn over a mandrel bender. No seems or scale that must be removed. “All size increments will slip-fit over the next size,” Rick said, “so no machining was required.” He welded each piece with silicon bronze rod using a Lincoln TIG 355 battleship welder.
Bikernet Bonneville Effort Part 3
By Bandit | | General Posts
We’re rockin’ with this project. I’ve never built two bikes at once, Bonneville aside, but we’re having a blast. Both projects are hustling and this report will bring you up to date.
The CCI V-Bike Panhead is still a roller and we’re waiting on the drive-line elements so we can mock-up the pipes before shipping anything to powder. But we decided to grapple with tank mounting and messing with the seat. But first here’s what Berry Wardlaw said about the 120-inch Panhead from Accurate Engineering:
First off, good morning! I am sending a mock-up engine so you can continue the build and I will give you the theoretical specs for the exhaust diameter and the length. The specs for the exhaust will be for stepped and straight headers. I came to this design from a computer generated program which has been very successful for me in the past.
The REAL engine is going to be pure race and the components have already been ordered. Still waiting for the crankcases but believe (have been told) they are ready. The exterior dimensions of the engines will be the same.
I will include the 3-bolt exhaust flanges. I am using many titanium internal components, modified components as well as custom squish areas, custom oilers and coatings. Ryan Baisley is blue printing my rocker arms (true 1.5:1 ratio). We have been overwhelmed with orders and the Biker build-off thing is getting to be a too much but we are hanging on.
I have two court dates this week, so maybe I can get this shit behind me. I promise to be good. As good as I can be.
–Berry
We’ve sent the transmission specs to Baker Transmission, but haven’t heard anything back. They’re a tough group to communicate with. I’ve offered to write articles about their products, but can’t get a return phone call. We’ll keep trying. I have a lot of respect for their components and we’re determined to use one of their transmissions. Following are communications with John Reed, Custom Chrome Designer regarding the transmission:
The V uses a touring tranny, but any FXR unit will be OK. It uses one of the CCI extended chain sprockets, with the same teeth as stock. But Baker sells a sharp one, If there is any problem with the offset /teeth, etc. let me know and I will go down and measure one. If the back of the engine is the same as a (rubber mount) FXR/dresser, and the front part of the tranny is for a (rubber mount) FXR/dresser, it should be OK.
As far as I know, the back end of the engine mount is the same on Shovel and Evos, and I’m sure Panheads, and late model FXR rubber mount trannies bolt straight to the engines. It’s only really early r/m trannies that need a separate bracket.
The twin cam tranny won’t bolt to a non twin cam bottom-end engine.
On my Vs, with a 110 revtech, I have never had a problem with the engine moving with the tranny, using a stock OEM inner /outer primary, which is a really good stabilizer.If you are using a belt drive with a good billet piece that takes the place of the stock inner, you should not have a problem.
How much hp/ torque do you have on the engine you are using?The V is a lot different than a the Softail setup, that most choppers use, the primary is shorter, and seems to be a lot more rigid.
CCI has a V going to Daytona, Why don’t you ask Your butt-hole buddy, Sean, if you can ride it around, so you can get used to it.
–John Reed
Custom Chrome
John’s in constant trouble with the brass. We will run a BDL primary drive. That brings you up to date on the driveline. Now lets shift to the tank installation.
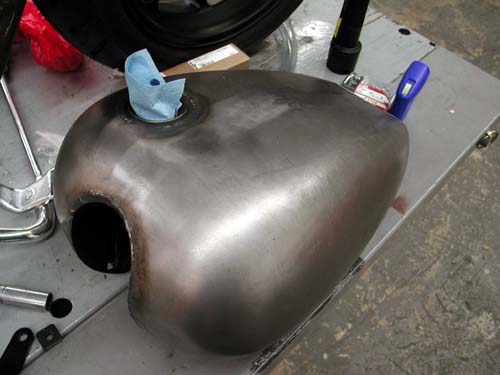
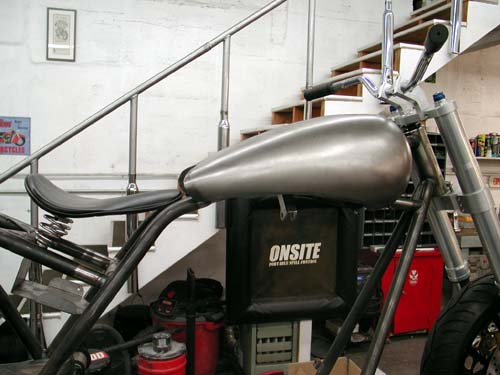
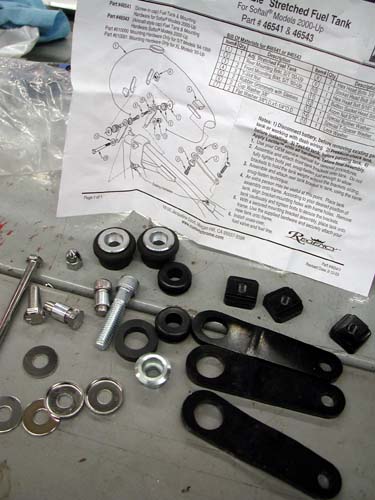
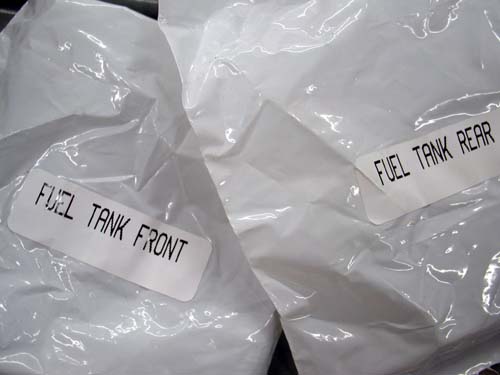
I believe this is a Regency built tank for Custom Chrome. It was designed as an adjustable stretched fuel tank for Softails, 2000-up to contour a seat, in this case a Corbin job. Because of the multi-fit business I received all the brackets to make the tank fit an H-D chassis, then separate fasteners for the V-frame. That often creates confusion. Actually Bikernet Black Market John saved our ass. “Hey, this is going to mount like a lot of Jap Bikes,” John said. “It slips into that scoop thingee and just bolts to the rear.”
Fortunately mounting to the V-frame eliminated a lot of heavy bracketry that we endeavored to use, only to find out we could shit-can them. I never toss any brackets. You never know…
Some of these extra motions I don’t mind, because we become familiar with their use and will know how they work for future reference. Never know when we might wrench on a Softail.
I asked John Reed if I should put a gusset in the neck. Here’s how he responded:
Good news. The frame passed the European TUV test.Our engineeer is back from the states and has just talked to the TÜV.
To pass the TÜV test a frame has to bear 100.000 load alternations. As we have tested the Paioli front fork at the same time the frame was tested with 500.000 load alternations. So the frame beared more than 4 times the standard test.
regards
–Günther
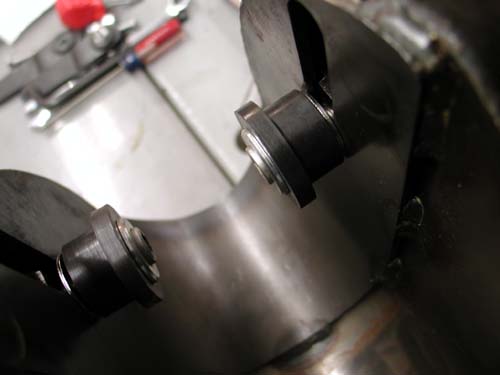
The above shot shows the front Softail mounting brackets in place. The shot below demonstrates how these brackets weren’t going to work. I must have installed and removed this tank a dozen times before I discovered the error of my ways.
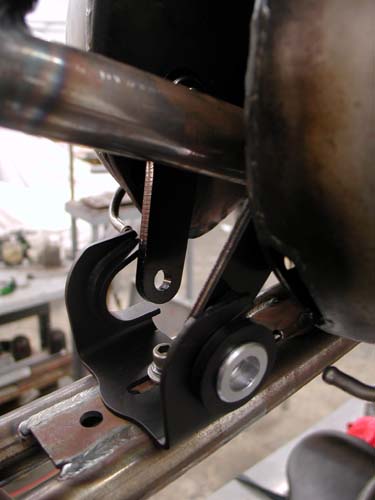
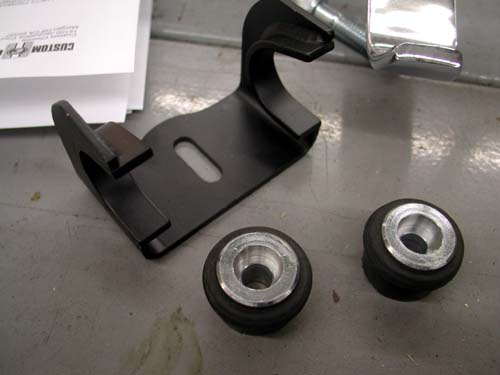
Once Black Market John straightened my sore ass out, we discovered the additional fasteners, carefully labeled in a box. Suddenly the mounting system seemed extremely easy. Mount the rubber grommets into the slider rails, fit them to the scoop, set the Corbin seat in place for accurate tank placement, tighten the Allens in the front tank mounts with the tank adjusted to the perfect height, and we’re golden. That’s the way it should go.
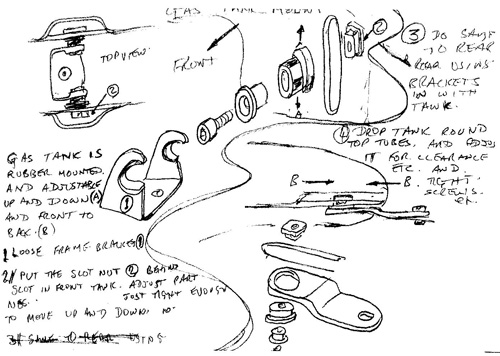
I dropped John Reed a note and he sent me the above sketch, which answered some question, but then we ran into a problem. The scoop is a half-inch narrower than the thick slotted slab of steel bent to fit into the tunnel of the tank and the slots don’t line up. They’re not even. We added spacers to the rubbermounts so they would reach the bracket. That would have been golden, but we couldn’t squeeze the tank over the backbone of the frame.
We removed the spacers and tried again. What seemingly would been the simplest way to mount a gas tank had us completely perplexed. Even with the spacers removed, we can’t get the tank on without removing the scoop, which defeats the purpose of this system. We’re still investigating.
Since this is going to be ridden at Bonneville and we’re calling it the first Sportbike Panhead, we removed the Corbin seat and the plastic tail section and decided to run a sprung slim solo from U.S. Choppers and make the brackets that we can slip way back so the rider can lay on the tank for a fast run on the flats.
We’ll get to the bottom of the tank mounting and mount the seat in the next segment. Hang on. Let’s move onto the Bonne Belle, 45 Flathead progress report.
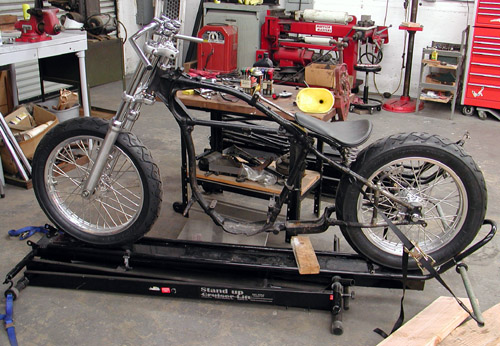
We’re working like mad dogs to create a roller while Klink and the crew from Departure Bike Works rebuilds the engine and transmission. We’re basically building the 45 cubic inch flathead above, with a handful of upgrades, including the recent 39 mm Sportster front end and PM disc brakes and wheels. We are also planning to shift it to a foot shift bike using Tedd’s cycles mods.
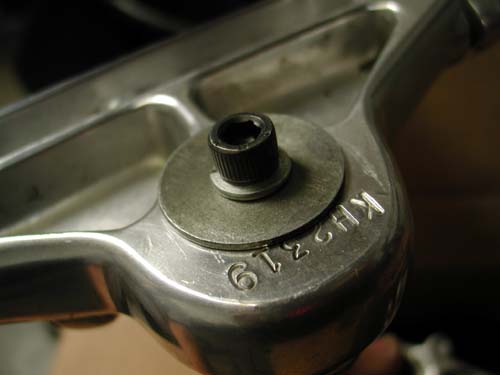
With the help of Larry Settle’s bike shop in Harbor city we machined a Paughco 45 springer stem and pressed it into the late model Sportster aluminum tree. Larry bore a hole in the bottom and taped it ¼-20 so we could install the below Allen and washer to prevent the stem from pulling loose.
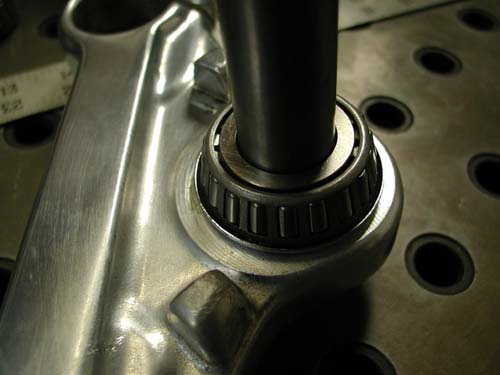
We installed Paughco neck cups allowing us to eliminate ball bearings for Timkens. See shot below.
This created a quirky dilemma. The stem was long for a springer. We had a choice to make and an unforeseen opportunity. From Timken bearing to bearing the neck measurement was 6 3/8 inches. We discovered later that today’s Sportster neck is 7 ¼ inch from top to bottom. We could have turned the Sportster stem to 7/8-inch, but we decided to try the springer stem. For one reason, this system will allow us a more secure pinch bolt system above and below the top triple tree.
We took all the re-machined front end parts to Rick at U.S. Choppers so the frame could be checked with both axles in place for the most accurate frame check.
Larry Settle machine chamfers in the springer nuts to slip inside the top triple tree for the most accurate secure fit. We also machined the springer nut down to make the best use of the stem with a nut on the top and bottom.
Above shows the frame with the front end in place. We will fit up a PM wheel shortly and decide if we need to shorten the tubes more. Actually doesn’t look too bad. Using the springer stem lowered it almost 2 inches.
We already have a set of black powder coated lower legs ready. We will probably powder coat the trees black also.
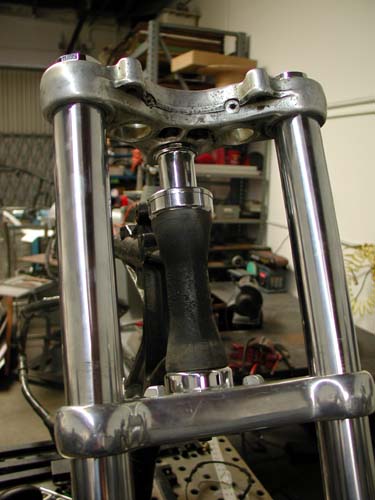
Here’s a close up of the trees in place. After Rick checks the frame, we’re ready to pick it up.
Here's The Report from U.S. Choppers

First, we cut through the frame in several places, making sure to cause as much damage as possible. Actually we're cleaning up an old mess with da grinda. It’s a highly technical and grueling operation requiring skill and tenacity.
Local expert vet and living legend, Fat Paul, bending the frame into place with shear strength using a hardened piece of spring steel which acts as our straight edge. Go Paul, go.
The frame fairy came over night and delivered a fresh straight frame….. straight and true like an arrow. Disclaimer: no heat was used nor animal testing in conjunction with this experiment.
U.S. Choppers
2039 S. Lyon St
Santa Ana, CA 92705
714-546-4699
Appointments Only Please
http://www.uschopper.com/
And now a report from Departure Bike Works, in Richmond, Virginia– Lee Clemens and his crew are responsible for the engine and trans rebuild and hop-up. Fortunately we had a set of performance aluminum heads and an extra front cylinder. Lee is planning to have special cams ground and run two front cylinders with dual carbs.
”I know, I know, better never than late, right,” Greg, from Departure said? “Not a whole lot to report yet. I finally got Klink to come by & take a preliminary inventory of what you sent. He just had one comment…..’You CAN'T put an ELECTRIC START on a Bonneville contender!’
I'll have more soon…..”
Keep It Greasy,
Greg @ DBW

I’m pumped. I may pick up the frame tomorrow and then I’m working with PM and a dirt-bike-foot-controls guy to set up the complete roller. Once we fit the tanks with a new petcock they will be shipped to Jim Murillo for paint with the fenders.
Hang on for the tank and sheet metal tech, coming soon.
–Bandit
April 29, 2010 Part 3
By Bandit | | General Posts
Continued From Page 2

THE BEST BIKE ARTIST IN HAWAII COMES TO BIKERNET– I am now in 12 locations and starting to expand to Mainland galleries now. I have a pretty good bio I can send too. Visit my website www.cosmictiki.com ,to link it to sales.
–Aloha Dennis
# is 808-285-4041
cosmicairbrush@hawaii.rr.com


WIZARDS Saddle Pack for Motorcycles, FROM SADDLEMAN– WIZARDS’ Products introduces a convenient Saddle Pack for Motorcycles. Each Saddle Pack contains four great WIZARDS products in a 2oz. size including: Mist-N-Shine, Bug Release, Vinyl Shine and Bike Wash, as well as one of our Multi-Fiber Cloths — all the products you need to keep your bike looking great while you’re on the road in an easy-to-carry pouch. Saddle Packs are also an excellent way to introduce our line of professional detailing & finishing products to your friends or customers.
RJ Star Inc. / WIZARDS, manufacturer and exclusive distributor for WIZARDS’ Products, offers a complete, professional line of appearance care items designed to clean, shine and protect all surfaces of the vehicle. Other WIZARDS products include the highly regarded Mist-N-Shine Professional Detailer, Shine Master Polish and Breathable Sealant, Crystal Clear Plastic Cleaner & Polish, BugRelease All Surface Bug Remover, Power Clean All Purpose Cleaner, Supreme Seal Paint Sealant, Metal Polishes, Metal Sealer, Mini and Metal Buff Kits and Multi-Fiber Cloths.
Email: AdamB@WizardsProducts.com
Web: www.WizardsProducts.com

SUSPENSION TECHNOLOGIES HEAD TO WORLD CHAMPIONSHIPS–Brass Balls Bobbers latest 2 Wheel weapon, the Brawler*, will make its debut at the 2010 AMD World Championship of Custom Bike Building in Sturgis later this year. It will be running Suspension Technologies’ shocks and forks package, which is a race-tuned dyno-tested solution that provides uncompromising comfort and control.
Mike Alex, President of Suspension Technologies, stated that he is excited to be a part of the Brass Balls Bobbers and Choppers program and that the Brawler will be one of the best handling custom-production motorcycles available on the market today.
Get more details at Suspension Technologies’ website.
* Pictured is the 2011 Brawler mule showcased at the Rick Fairless Bike Show.

FREDDIE KRUGGER TAKES 3rd – 3 TIMES–Freddie Krugger, the Belgian bike builder who single-handedly runs Krugger Speedshop, was the top placed European builder at the World Championship of Custom Bike Building in 2009 when he finished in third place.
It was the third time he had reached this position, with each bike created in a style different from the previous one. His 2009 entry combined aspects of cafe© racers and dirt track oval racers to create the bike “Overmile”.
At the 2009 World Championship of Custom Bike Building, Freddie Krugger was not only the highest placed non-American builder, he also was responsible for the highest placed V-twin motor bike at the event.
Stay tuned to all the latest happenings at the AMD World Championship of Custom Bike Building Blog. See if Freddie can move up in 2010.

GREAT SOUND & BETTER PERFORMANCE ON YOUR FXDF & FXDWG HOGSD&D EXHAUST’s 2008~2010 FXDF & 2010 FXDWG slip-ons – 559-12 – Chrome Slip-onsIncreased performance across the rpm range. Designed with an equal length cut for a custom look.
No tuner needed when used with stock air cleaner.
Call D&D PERFORMANCE ENTERPISES at 817-834-0996 for more details or email the team at.
sales@danddexhaust.com

AEROMACH USA GOES DARK WITH CUSTOM MIRRORS–Aeromach USA latest product, which is influenced by Harley’s Dark Custom line of motorcycles, is the black anodized Maltese cross mirror. The mirror is just the first in the line of products that are targeted at hard-riding cruiser, bobber and chopper jockeys.
This is an ideal product for the slammed and chopped factory motorcycles including the Sportster Forty-Eight, Iron 883, Night Rod, Cross Bones, Nightster and Fat Bob.
Aeromach’s line of billet designed mirrors with midnight black anodizing compliments the latest iteration of Harley’s blacked-out die-hard classics.
The Maltese Cross mirror is built in America and handcrafted with aircraft-quality 6061-T6 billet aluminum. The mirror is designed to be maintenance free and deliver a strong attitude.
Get the details at www.aeromachmfg.com
DROP THE HAMMER & GO – THE AUTOMATIC SS TRIKE–The SS Trike comes with an automatic transmission. It’s easy to use and a pleasure to drive. push button forward, neutral and reverse. See more details at http://www.sstrikes.com.

SHE HAD BIG HANDS & PERKY TITS–She was clean, cute; her make-up was fresh and she reeked of sex.
“Are you going to tell me what you said?”
“Oh, was that something about you being horny and wanting me to slide my hands up your thighs?”She scooted closer to him and put her hands on Chance’s thighs. She had big hands with colorful nails, yet small perky tits.
“Go on,” she said.
“How about we go in the bedroom and I’ll…..”
Get all the action in HARBOR TOWN SEDUCTION, located in the Black Market.
Once you’ve turned the first page you’ll be hard pressed to put this one down as it has it all; Murder, Treachery and Too Many Women. Harbor Town Seduction makes for an electrifying literary ride from cover to cover. This is a must on table tops and in saddle bags throughout the biker community and in the hands of millions who wished they’d gone down the freedom road the first time they encountered a pack of bikers jamming down the freeway, their menacing hair frantically dancing like flames in the wind.
Published by 5-Ball Inc., Harbor Town Seduction retails for $19.95 and can be ordered from just about any reputable book store on the planet or in the Black Market.

THE NEWS IN A BUCKET–About the time the news in completed, I hesitantly reach into my e-mail program only to be startled by a plethora of new, news items. We publish news from anyone, but it helps if it arrives in my in-box on Wednesday or by 10:00 pst on Thursdays. Anything that stumbles into my e-mail after the cutoff time will be posted in the Bikernet Blog on Friday, or over the weekend.
So, what’s coming to the glossy pages Bikernet? Good question. We know about a handful of items in the works. A girl of Bikernet is being wrapped around the lovely Britney (above), the 5-Ball factory Racer, and Torian Leathers. Then there’s Bikernet Betsy’s Laughlin Report. A tech from Bubs and Wimmer regarding a 2010 Touring model and a slip-on muffler is on its way. Plus, we finally caught up with Panhead Billy, the winner of the Bikernet Panhead Award, given to Billy at the Easyriders show in Sturgis last year. Plus Carsten wrote up coverage on Arizona Bike Week and Johnny Humble it putting it all together.
I discovered a tappet roller problem with the Sturgis Shovel. Larry Settle, Settle’s Motorcycles, Harbor City, had a set or fresh rollers, so I turned the tappets over to him, and they’re ready to rock. He mentioned that Twin Cams are not immune to tappet rollers wearing out. I’ll change my oil and replace them this weekend. Larry also rebuilt the Doctor’s VL Linkert carb, so it’s on the project list. I replaced all the gas lines and petcocks, then added a gas filter from Custom Chrome.
We’re making progress. I’ll be back on the road and back on the case for Bonneville.

Ride Forever,
–Bandit