

The Bravest Panhead Ever
By Bandit | | General Posts

Strange mysterious e-mails flashed onto my screen with images of this sharp Cyril Huze Panhead. At first I didn’t know what the hell was going on. The return address was Accurate engineering, but the bike was signature Cyril Huze. At first I was told I had a sharp feature for Bikernet Readers, then the bike was an exclusive for some bike mag. Some editors don’t care if a bike pops onto Bikernet pages. Some like me to promote the planned issue and some are sorta selfish. I try to work with all editors in whatever way rocks their world.

Then Cyril Huze dropped me a line, “You can feature the pictures I gave to Accurate.”

I spoke to Berry Wardlaw, the master of Accurate Engineering, who was standing in the center of a discount store buying barbecue shit for the 4th of July. “Cyril had a film crew document every aspect of building the 120-inch Panhead motor. He was producing a movie around the fireman tribute bike.”

I went back to Cyril. “I didn't show/gave too many pics because client (International Association Of Firefighters), doesn't want too much released before they unveil the bike at the International Convention, in August. They want to surprise all the Firefighters of this world.

When I get a green light (not before August), I will give you more. Just release what you have as a teaser. The bike features several vintage parts coming for ‘40s US firetrucks: extinguisher, search light, radiator cap, etc. The brand of these fire trucks were “America/LaFrance” !!!!. I could not expect a better coincidence.” Cyril’s from France.

Here’s what Cyril wrote, “Do you remember the surge of adrenalin we all felt as kids when a big red fire engine roared down the street, sporting delicious red paint, sparkling gold leaf and screaming sirens. Daily, firemen experience high speed dashes to roaring flames. The business of firefighting is steeped in high adventure, danger & heroism.”

The bike was built by Cyril Huze to benefit the IAFF (International Association Of Firefighters) Burn Foundation. We'll bring you more info on the auction as it nears.

Just as I thought I was limited to a handful of shots another message arrived. “One more picture for the readers to understand what we are talking about with a name like The Bravest,” Cyril said.

Finally one more e-mail arrived with killer detail shots from Don Rogers, in Florida. Don is one of the best, so I immediately went to work.

Let me say something about Cyril and Berry. Cyril is an artist of the highest order. Look closely, every detail is immaculate. He’s tough on suppliers, painters and chromers. Every aspect of his creation must be supreme. Berry is the same way, in the engine arena. He’s a custom engine builder from the tallest mountain. If you want an exclusive engine, a classic or a hand fabricated hot rod, he’s the man. No one delivers wicked dual-carbed strokers that look sharp and run like raped apes, like Accurate Engineering.


Designer & Builder: Cyril Huze.
General:
Fabrication: Cyril Huze
Assembly: Gary.Schmitgen- Cyril
Year/Make: 2006 Cyril Huze Special Construction.
Chroming: Chromemasters
Brass Plating: S.A.L.
Frame:
Builder: Santee
Type: Rigid


Engine:
Year/Model: ‘06 Accurate Panhead.
Displacement: 93 CU
Heads: STD
Cylinders: STD
Oil Pump: S&S
Carb(s): S&S E
Motor Mount: Huze
Rocker Boxes: Billet Pan Tops.

Velocity Stack: Carl’s Speed
Pipes: Custom Huze With Brass Tips

Transmission
Gearing: 6-speed

Painter:
Chris Cruz

Parts and Pieces
Coils Bracket: Huze
Front Fender: None.
Rear Fender: Huze/West Eagle
Gas Tank: Huze/West Eagle
Oil Tank: Crime Scene/Huze
Headlight: Spotlight 49 Fire Truck
Taillight: Huze
Extinguisher: Antique
Primary: PM Narrow Painted
Seat: Jeff Phipps

Forks:
Type: Spring Leaf G. Schmitgen

Wheels:
Front:
Type: One-Off Rowe Performance
Size: 16”
Tire: HDS MT 90
Brake: HHI 4-Piston
Rear:
Type: One-Off Rowe Performance
Size: 16 ”
Tire: HDS MT 90
Brake: HHI Sprockster.

Note: The Bravest Will Be Auctioned To Benefit IAFF Burn Foundation

Cyril Huze Custom Inc.
Tel: 561-392-5557
Fax: 561-392-9923

Tough Bikes From RS Performance Coatings
By Bandit | | General Posts

This story is about a Menlo Park, California, industrial coating shop that started three generations ago, in 1966, with Bob Simpson’s granddad. We’ll cover what they did throughout the history of the shop, info on the bikes and which bitchin’ coatings do what. Not bad for one stinkin’ bike feature hammered out on the Monday before the 4th of July weekend.
The shop, RS Performance Coatings, wasn’t kicked off to paint custom bikes or cars. It originated as an industrial coating service, painting computer cases, industrial components and electronics equipment. Bob’s grandfather painted military stuff, satellite dishes, industrial steel and plastic components. “Most of the stuff was gray or beige,” Bob said.
They didn’t start to dabble with powder until 1986 when the product hit the market with three colors. “It was as thick as pudding,” Bob said. “Powder is basically plastic melted over metal.”
Since their strategic plan was always to stay on top of industrial coatings, they made a point to research each new marketable finish. Today they still wet paint (traditional coatings from House of Kolors and others), powder coat and Chromex, or ceramic coat. “We don’t pinstripe,” Bob said. “We’ve been working with the same pinstriper for years.” But they are capable of any wet paint graphics, flames, scallops, tribal, whatever. Hell, if you’re in the neighborhood, they sell Rudy’s 415 Clothing line in their showroom.
Now I’ll do my damnest to impart some of Bob’s expertise regarding the various coatings. Let’s start with powder coating. It’s generally a heavy, durable and chemical resistant coating that runs 4-6 mils thick. Remember the puddy, but over the years it’s improved immensely, into a substantial, tough custom coating with a ton of color variations including metallics and candies. They even have a powder coating workable body filler, today. The drawback is the UV protection aspect, since some are epoxy based, but hybrids don’t have that affliction. Bob uses mostly hybrid powder coatings from NIC Industries. “Don’t forget to powder your frame first and send a sample to your sheet metal, wet painter, to match,” Bob said. “Not the other way around.”
Next there’s Chromex ceramic coatings, similar to Jet Hot or HPC. They are thinner and some are designed for engine internals. They used one of these interesting piston coats on Gard Hollinger’s recent Seminole Hard Rock Roadhouse customs external parts. It was a terrific textured coating and a strange color, but the finish was thin 1.5 to 2 mils thick and fragile to marring. “These interior engine coatings work well as dry lubes, thermal barriors and for heat dispersion inside engines,” Bob said. They can be use externally, but with some care.

”Ceramics are terrific for more precision coatings and exhaust systems, but the color black is the worst,” Bob explained. “Although most ceramics are great corrosion resistant products and terrific against UV they are thinner and more fragile than powder. Black is the worst for heat dissipation and scratch resistance. Grays and silvers work much better, but they’re not as popular.” For textured surfaces some of the ceramics work well because it’s basically aluminum suspended in the ceramic coating.

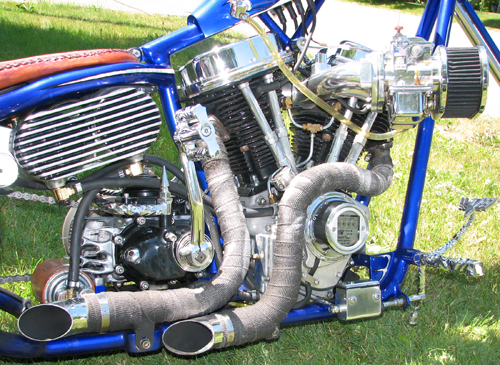
I asked Bob about painting engines. Donnie Smith regularly paints heads and barrels to match sheet metal. “We used a military spec black powder on my heads and barrels,” Bob said. “We didn’t even mask off the fins. Wrinkle is the best because every edge of the paint reaches out to dissipate heat.” They powder coated the rocker boxes, push rod tubes, nose cone and tranny covers to match the frame.
”You need to evaluate your riding style and climate when deciding on engine coatings,” Bob said. “You can wet paint them, but there’s a longevity problem with standard epoxy coatings. More and more the way to go is with ceramics. They are so thin they will expand and contract with the engine components. They capture textures and thermal resistance is terrific. Stay clear of smooth finishes on engines.”

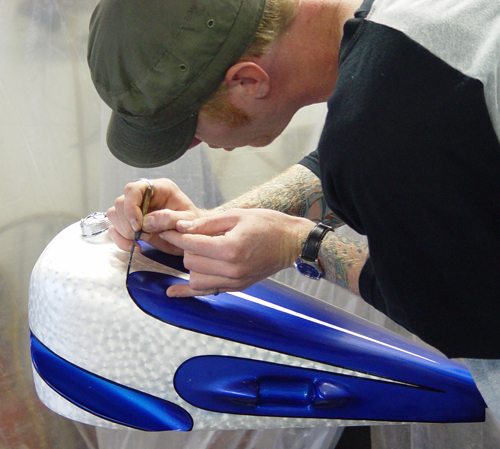
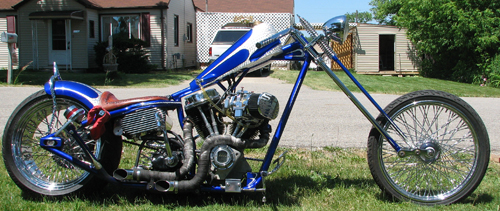
Both Bob Jr. and Sr. have always ridden, so they started delving into custom applications about 15 years ago. The blue and white pearl bike is Bob’s daily rider. Not long ago he lost a lifter and sent small needle bearings flying around on the inside of his engine. Time for a teardown.
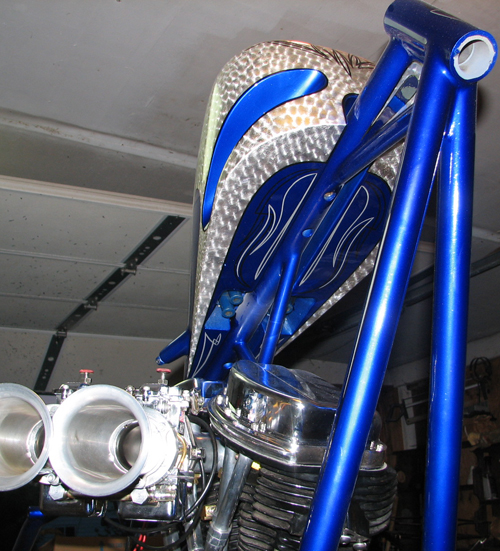
They coated the frame first with a silver base then blue raspberry candy powder. The sheet metal was wet painted with House of Kolors snow-white pearl, then a silver base for the graphics and finally a HOK Burple candy.

He also powdered the wheel rims and hubs to match the frame, then coated the spokes gloss black and left the nipples polished stainless. It gave his bike a tough road-worthy look. “We always tape off and plug mating surfaces,” Bob said. They tape off the entire inside of the wheel rim and plug all the spoke holes in the hub. They also make a point to plug all frame threaded holes and motormounts.

The other bike was dolled up to show off their coatings and finish flexibility at a Rod and Customs Bay Area, California, show. They used a black vein hammer tone, powder coat, finish with candy red fades on the frame. The sheet metal was sponged with silver for the flames then over-coated with candy red. It started with a black base and black metalflake.

“Scott long made the handlebars,” Bob said, “and we painted inserts for the Ness/Battistini pegs to match the grips.” Bob and shop fabricator Josh, built the sissybar, the top motormount, the battery cover and the tubing to hide the wiring. They modified the BDL derby cover for their air cleaner and ran a wild Grandeur auto-clutch to make the bike wild to ride.

So there you have it. Powder coating 101 and the men who studied its applications for over 50 years.

–Bandit

General
Owner: Bob Simpson / RS Performance
City/State: Menlo Park , CA.
Builder: RS Performance / Bob Simpson sr., Bob Simpson jr., Josh Preston
City/state (or company contact info): RS Performance 165 Constitution Drive Menlo Park, CA. 94025 (650) 678-9216
Fabrication: RS Performance / Bob Simpson sr., Bob Simpson jr., Josh Preston
Manufacturing: RS Performance / Bob Simpson sr., Bob Simpson jr., Josh Preston
Welding: RS Performance / Bob Simpson sr., Bob Simpson jr., Josh Preston
Machining: RS Performance / Josh Preston

Engine
Year: 2005
Make: Rev Tech
Model: Evo
Displacement: 110 ci
Builder or Rebuilder: Rev Tech
Cases: Rev Tech
Case finish: Black wrinkle
Barrels: RevTech
Pistons:RevTech
Barrel finish: Black wrinkle
Lower end: RevTech stroker
Heads: Revtech
Head finish: Black Wrinkle
Valves and springs:
Carburetion: Mikuni HSR 45

Transmission
Year: 2005
Make: RevTech
Gear configuration: 6-speed
Primary: 3-in. BDL open
Clutch: Grandure auto clutch

Frame
Year: 2004
Make: Mid West
Style or Model: Rigid
Stretch: 2-in.
Rake: 35 degrees
Modifications: Lots of gussets

Front End
Make: H-D
Model: Duece
Year: 2000
Length: Stock
Mods: RS powdered trees

Sheet metal
Tanks: Jesse James Villan
Fenders: Rear- Fat katz/ RS Performance-Front- none
Oil tank: CCI horse shoe
Other: Battery cover- RS Performance

Paint
Sheet metal: RS Performance/ Bob Simpson sr
Molding: RS Performance / Bob Simpson sr
Base coat: RS Performance / Bob Simpson sr
Graphics: RS Performance / Bob Simpson jr
Frame: RS Performance- Powder coated
Molding: None
Base coat: Black Frost Powder
Special effects: Candy red powder fade over Black frost hammertone powder base
Pinstriping: Apparitions / Rory

Wheels
Front
Make: CCI
Size: 21in
Brake calipers: HHI
Brake rotor(s): Russell
Tire: H-D
Rear
Make: CCI
Size: 18-in.
Brake calipers: GMA
Brake rotor: Russell
Pulley: CCI 70-tooth
Tire: Avon 200mm
Controls
Foot controls: Pegasus Performance
Finish: Chrome
Master cylinder: Pegasus Performance/ 5/8 bore
Brake lines: Goodrige
Handlebar controls: Ness classic
Finish: Chrome
Clutch Cable: Motion pro
Brake Lines Goodrich

Electrical
Ignition: Todds Cycle
Ignition switch: Todds Cycle
Coils: Rev Tech
Regulator: CCI
Charging: Spyke
Wiring: RS Performance / Josh Preston, Bob Simpson jr
Harness: RS Performance / Josh Preston

Headlight: CCI peanut
Taillight: Old Time Stop
Accessory lights: None
Electrical accessories: None
Switches: None
Battery: Big Boar

What's Left
Seat: V Twin solo
Pipes: RS Performance / Bob Simpson jr
Mufflers: None
Exhaust finish: Ceramic Cromex by RS Performance
Gas caps: Jesse James
Handlebars: Z-Bars by Central Coast Cycles
Grips: Ness
Pegs: Ness
Oil filter: Rev Tech
Oil cooler: None
Oil lines: Russell
Fuel Lines: Goodyear
Throttle: Ness
Throttle cables: Motion pro
Fasteners: CCI


General
Owner: Bob Simpson jr.
City/State: Menlo Park
Builder: RS Performance/ Bob jr.
City/state ( or company contact info): RS Performance Coatings, 165 Constitution Drive Menlo Park, CA. 94025
Fabrication: Bob jr./ Josh Preston
Manufacturing: RS Performance
Welding: Bob jr.
Machining: Josh Preston

Engine
Year: 1992
Make: H-D
Model: EVO
Displacement: 80-ci
Builder or Rebuilder: RS Performance / Bob Sharp
Cases: H-D
Case finish: Black wrinkle
Barrels: 80-ci HD
Bore: 3 1/2 .010-over
Pistons: Weisco 10-to-1 comp.
Barrel finish: Black wrinkle
Lower end: Stock
Stroke: 4 1/4-inch
Rods: H-D
Heads: H-D some smoothing & cleaning
Head finish: RS black wrinkle powder
Valves and springs: Manley valves, springs, and collars
Pushrods: H-D Screamin' Eagle
Cams: Black widow 142 (550 lift)
Lifters: H-D
Carburetion: S&S E
Other: The piston tops are coated with our piston coat as is the combustion chamber of the heads and the exhaust ports. The piston skirts are coated with our ceramic dry film lubrication coating. The valve stems are also coated with the same dry film coating. The valve faces are coated with the piston coating. This makes the bike run super cool on hot days. Last week it was about 105 degrees and the oil temp never passed 200

Transmission
Year: 2006
Make: RevTech
Gear configuration: 6-speed
Final drive: Belt 70-tooth
Primary: 3-in open primo
Clutch: Rivera pro
Frame
Year: 2003
Make: Santee
Style or Model: Rigid
Stretch: 0
Rake: 35 degrees
Modifications: Minor
Front End
Make: H-D
Model: FL
Year: 1998
Length: Stock
Mods: Internally reworked- dampner tube brazed up and redrilled and progressive spings added

Sheet metal
Tanks: Sporty
Fenders: CCI front/ Flat trailer rear
Panels: none
Oil tank: CCI round with battery box
Paint
Sheet metal: RS Performance / Bob sr.
Molding: RS Performance / Bob sr.
Base coat: HOK silver-white pearl
Graphics: RS Performance/ Bob jr./ HOK silver base with HOK candy Burple
Frame: RS Performance/ Bob jr.
Molding: None
Base coat: Silver powder coat with Blue rassberry powder top coat
Graphics or art: RS Performance / Bob jr.
Special effects: Powder frame and wet paint match
Pinstriping: Rory/ Apparitions
Wheels
Front
Make: Akront
Size: 21-in
Brake calipers: GMA
Brake rotor(s): Russell
Tire: Metzler
Rear
Make: Akront
Size: 18-in x 200mm
Brake calipers: Performance Machine
Brake rotor Russell
Pulley: H-D
Tire: Metzler
Controls
Foot controls: Thunder heart
Finish: Chrome
Master cylinder: Thunder heart
Brake lines: Goodrich
Handlebar controls: Performance Machine
Finish: Chrome
Clutch Cable: Motion Pro
Brake Lines Good ridge
Electrical
Ignition: Power Arc
Ignition switch: Push button starter
Coils: Power arc
Regulator: CCI
Charging: CCI
Wiring RS Performance / Josh Preston
Harness: RS Performance / Josh Preston
Headlight: CCI
Taillight: CCI
Accessory lights: None
Electrical accessories: None
Switches: Electronic house barrel key
Battery: Standard Interstate
What's Left
Seat: Custom solo
Pipes: Thunder header
Mufflers:
Exhaust finish: Ceramic Chromex
Gas caps: Flush mount CCI
Handlebars: Low rise flander style
Grips: Performance machine
Pegs: Thunder heart
Oil filter: CCI
Oil cooler: none
Oil lines: Goodyear
Fuel filter: CCI
Fuel Lines: Goodyear
Throttle: Performance machine
Throttle cables: Motion Pro
Fasteners: CCI
Specialty items: This bike was built to be a daily rider and haul ass!! This is a no nonsence ride
Comments:
Credits: I would like to give credit to my Pop(Bob Simpson sr.) for the kick ass paint, Josh Preston for the machining and the wiring, and to Bob Sharp for one strong pulling super fast 80ci motor

Contact info:
Bob Simpson
RS Performance Coatings
(650) 678-9216
I am located in Menlo Park CA. That’s dead smack in between San Francisco and San Jose on the peninsula.


The Bitch Slap Biker Build-Off Winner
By Bikernet Contributor Rogue | | General Posts

The two builders and their teams met in Two Harbors Minnesota on Tuesday (6/13/2006) in preparation for the ride that started at the Split Rock Lighthouse just north of the rock, on Wednesday morning at sunup. The lighthouse is approximately 100 miles south of Canada on Lake Superior and very scenic. Oh YEAH! It was Leather and or Thermal weather.

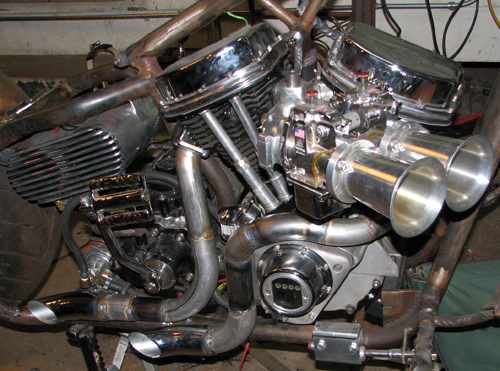
The motorcycles were first viewed by each contestant and the crews at that time. They were beautiful, well built and as different as night and day, as was the builders. Gypsy the small blond female and Kim the tall large male. The motorcycles were reflective of each builder.Engine shot
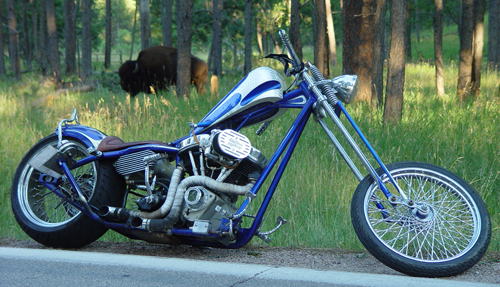
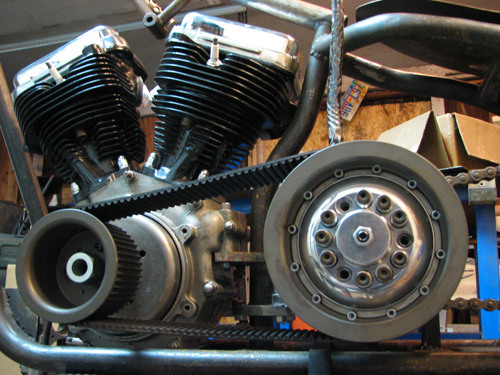
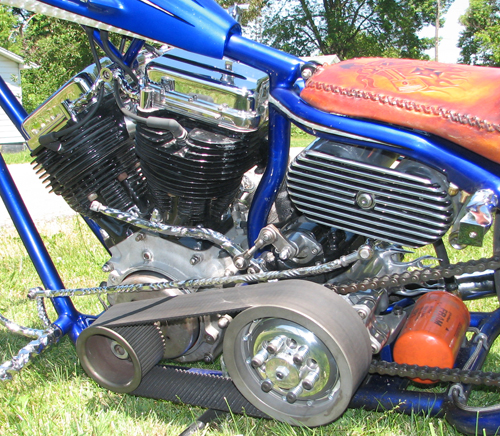
Gypsy’s bike was a rigid. She designed the frame. Berry Wardlaw, of Accurate Engineering, built the 80- Cubic-Inch Knucklehead Engine with two Rear Heads and Dual Mikuni Carbs. The fire engine bobber hosted a myriad of hand made parts.


Kim had a drop seat frame built by MAXIMUM METALWORKS for a 330mm tire, with a prototype swingarm and a new S&S 120-Cubic-Inch engine.With Discovery film crew in hand, they rolled from the lighthouse to La Crosse Wisconsin. While in La Crosse we all visited the S&S facility for a tour. It was very interesting and entertaining to say the least.


The next morning the motorcycles and crew went for a ride on the La Cross Queen Paddle boat down the Mississippi. They then headed for Dubuque Iowa. Kim had some electrical problems on the way. He’s extremely experienced builder and repaired his bike quickly, on the side of the road, allowing him to finish the ride.

We stopped at Midwest Cycles to see Glen and his crew and have a few cold beers before heading to the hotel.

Saturday morning we headed for the final show event. The Build-off Bikes would take center stage for voting. It’s named the Sturgis Mississippi River Motorcycle Rally. It was a County Fair type of thing, with motorcycles. The two contestants were displayed promenantly, and the builders were present to talk to the folks attending and voting on what motorcycle they liked best.


”I know these guys (other custom builders) don’t want to get beat by a girl,” Gypsy said, “but it’s time for them to realize, it’s not a boys’ world out there anymore. It might be a boy’s club – but not their world.”

The Build Off is scheduled to air the end of August or early part of September. It will be interesting to see what happens next. Will Gypsy be invited back? Will she compete against another male or a woman?
I had a terrific time as part of this whole thing and was able to meet a lot of people and make some new friends.

I would also like to say that I was very impressed with the producer Craig Constantine, the camera man Dillon O’Brien, and the rest of their staff. I just know it will be a great show. I guess I will have to watch it and see. I hope you do too!
–ROGUE


Frame Built by Bill Dodge. Designed by Gypsy
80 Knucklehead engine with two rear heads built by Berry Wardlaw – Accurate Engineering
Stainless Intakes and Exhaust built by Larry Curick
Paint by Robert Pradke

Parts include
Cory Ness Wheels
Avon 120/70 Tires
Baker 5 Speed Transmission

HSR-42 Mikuni Carbs
Primo Belt Drive
K&H Handlebars

Antique Items
1930 Taillight

1918 Brooks Seat
1928 Moto-Guzzi Front Forks
1950 Unity Headlight With H-4 Bulb
1925 Pyrene Fire Extinguisher Converted To Oil Tank

Everything Else Hand Made


There are reports on the Gypsy/Kim Suter Ride on INNER CIRCLE BIKER RADIO this Saturday.There will also be reports from the party in Dothan, Interviews and the New Song about GYPSYPLEASE LISTEN TO IT at


Isto Omega
By Bikernet Contributor TBear | | General Posts


Twin Club MC is one of the oldest and most respected motorcycle clubs in Sweden. It was founded in Norrtälje in the autumn of 1969. For 34 years, since 1974, Twin Club MC produced the biggest and most prestigious Custom Motorcycle Show in all of Scandinavia. Builders from Sweden, Finland, Norway, Russia, Germany and all over Scandinavia and Northern Europe ride their creations in, to the delight of the over 10,000 people who crowd the Societetsparken on the harbor in the heart of this ancient town. Last year the show was chosen by American Motorcycle Dealer Magazine, a well respected industry publication, to be a European affiliate show for their World Championship of Custom Bike Building.

This years first place winner was Itso Kotavuopio of Tampere, Finland.It blew the crowd and the judges away.
Please keep in mind that this show is not a “Chopper Show” but a CUSTOM BIKE SHOW although there were plenty of sweet choppers also entered.

Isto's inspiration came from his experiences with death and re-birth at an early age. In small towns in Finland, old ornate horse drawn hearses are still commonplace. Most of the ideas for the fantastic hand made details were taken from these vintage 1800 carriages.

Looking at the bike, it's difficult if not impossible to tell what's going on under its shell and how it was put together. “That's one of the mysteries of life” Isto explained. I'll try to unravel the mystery here. The frame was made out of 25mm, seamless hydraulic tubing and covered in hand fabricated 1.5 mm. Sheet metal. The sheet metal was first shaped on a Pullmax then finished off by hand hammering to its perfect shape. The frame and fuel tank were then molded with lead, just like vintage custom car makers like George Barris did in Southern California back in the 1950s.

The rims were another major project. Isto drew up the plans and laser cut the blanks himself. He then twisted the spokes, ground them round and hand polished them. Being a Silversmith by trade, Itso took the time to design and hand fabricate each exquisite detail piece you see in the photos. The Flying Eyeball headlight itself took almost 100 hours to complete. It's got a modern bulb and lens wired in.

There are lot of symbols of death and rebirth on the bike. It's an old Finnish custom to ward off evil spirits. For example the hour glass jockey shifter symbolizes time running out. The cross on the petcock and Omega design of the framework symbolize rebirth.

The bike’s engine is a vintage 1942 600cc. 741 Indian remade with JE pistons, a Harley-Davidson M-18 Linkert carburetor and a Wico magneto.Isto also designed and fabricated the exhaust pipes.The 30-degree raked neck attaches to a hand made mono strut girder style lower leg, fitting the curve of the front wheel perfectly, while mounted on the left side of the bike. Notice also that the rear wheel is also mounted to a mono, rear mounted from right side to give the bike its balanced look. The rear brake is an outside shoe designed by Isto himself.

The oil tank had to be custom made, as well, to fit in with the lines of the bike. The handlebars are Bicycle style. The foot pegs were made by Stefan of Chemical Choppers and the foot controls by Jussi Hayha both of Tampere. The tires are white Firestone Racing and balance out nicely with the flawless black and pearl red paint job by Pasi Kovula. The hand tooled leather seat was crafted by Sweet Liquid Skin.

I know what you're thinking, this doesn't exactly look like a contemporary motorcycle. Remember what motor bikes looked like back in the late 1890s before Bill Harley and the Davidson brothers had a few beers together and came up with the bicycle-related modern motorcycle. Also compare those bikes with some of today’s whacky designs. Could this be the new composition for future motorcycles? Doubtful at best but I'm sure there are some innovations and attention to craftsmanship, I for one, would like to see return. Take for instance the inset brass plate that guards the frame’s paint work from the chain rubbing against it. It's the hard-to-detect little things and the over all attention to perfection that cinched the jury first place and the spectators who awarded this creation both best-in-class for the Scandinavian Championship as well as the Peoples Choice Award.

Isto will surely face stiff competition from builders from all around the world when they meet for the finals in the AMD ProShow World Championship of Custom Bike Building at Thunder Road in Sturgis August 2006, but win or loose, Isto, the silversmith from the little town of Tampere, Finland, will surely mark his place in Custom Bike Building history.

–TBear

You can reach the Twin Club below:


Legend of The Airplane Motorcycle
By Bandit | | General Posts

Here’s the deal, stirred up a couple of weeks ago with one shot of the above motorcycle, based on a seven-cylinder Rotec rotary airplane engine. Rumors spread quickly and we received another shot of an inline 8-cylinder airplane-based, rotary-engine motorcycle.

Of course I contacted my rare-motorcycle guru, Don Whalen, of Sierra Madre Motorcycles in Pasadena, California. He confirmed that the first motorcycle was spotted at the Legends of The Motorcycle Concourse in Half Moon Bay, California, a few weeks ago. “Jesse’s staff was having difficulty pushing the motorcycle across a grassy knoll,” Don explained. “It was so low the engine hung up in a grassy ridge and they had to recruit help to move it.”

He mentioned Jesse James, but I need confirmation. Another reader, Larry Curik, of Lone Star Choppers mentioned the bike to me and suggested that Jesse built it, based on the WCC frame emblem on the neck. I needed another confirmation and received a strange e-mail from Jesse about Sturgis, but at the bottom were two, out-of-focus shots of the bike in his shop. Done deal?

Ah, but the mystery didn’t end there. We are still trying to locate the owner of the 8-cylinder Rotary. In the meantime Don explained that in 1921 a German company produced 5-cylinder, 4-valve-per-head, dual over-head cam, airplane-based motorcycles.
Some 2000 Megola Motorcycles, from 1921-25, were produced with direct drives, no transmissions and the suggestion to orbit intersections, if you’re unable to enter. The Gnome-Et-Rhome engines powered the front wheel. These same engines powered WWI Sopwith Camel bi-planes and were so powerful that they had a tendency to flip the planes during take off. You can imagine the gyroscopic effect on a motorcycle’s front wheel.
Here’s a quote from a Sopwith Camel history site: The First World War saw the advent of the airplane as a viable military weapon. In a period of only a few years, military aircraft advanced from rudimentary flying craft to killing machines. During this time, aerial superiority over the front changed hands as often as new designs were introduced. In 1916, the Germans controlled the skies over the trenches, and the English developed three fighters to regain control of the air war.
The best and most famous of these three designs was the Sopwith Camel. Small and lightweight, the Camel represented the state-of the-art in fighter design at the time. The Sopwith Camel shot down 1,294 enemy aircraft during World War I, more than any other Allied fighter. However, it was so difficult to fly that more men lost their lives while learning to fly it than using it in combat.

So far the only know sighting of the Jesse James' version took place at the Legend of the Motorcycle: International Concours d’Elegance, the first world-class concours exclusively for motorcycles.

The Saturday, May 6th inaugural event attracted approximately 4,300 participants to the lush coastal lawns of the Ritz-Carlton in Half Moon Bay, California, and raised over $22,000 for charitable organizations.
In attendance were entrants and spectators from five continents admiring the more than 250 motorcycles on display, ranging from an 1895 Pennington brought down from British Columbia to a 2005 KTM Moto GP factory racer shipped over from Austria. While the concours only judged bikes made before 1976, many later models were on exhibit to represent the evolution of motorcycling. Whether it was a 1995 Britten or a recent custom creation from Arlen Ness, almost every facet of motorcycle sport and culture was represented.

Kiehl’s Since 1851 sponsored the Steve McQueen Award conferred by Ewan McGregor and Peter Fonda, along with Steve McQueen’s last wife, Barbara Minty McQueen, to Jim Lattin of California for his 1928 Cleveland Racer, while the Best of Show went to a 1940 Crocker owned by Mike Madden of California.
Pictures, a list of class winners from this year, and a complete list of sponsors are available on the website, www.LegendoftheMotorcycle.com.

“We couldn’t have done it without everyone’s support and we’re already planning for 2007,” says Zaugg. Next year’s event will take place the first Saturday in May and will have as its featured marques Vincent, Excelsior and Henderson.
They had a cool event, but didn’t have a Megola Motorcycle, but Don spotted one on E-bay less than a week ago. “Jay Leno has one,” Don told me, “but there are very few still around. They are worth between $150,000 and $200,000.” We hope to bring you more on this mystery as it unfolds.
AIRPLANE BIKE UPDATE: Less than 24 hours after this article launched, new information appeared on my screen. I’ll let Philip Wakeham’s words straighten out mine—Bandit.

Greetings from England.Loved the aero-engine bike article.I’ve attached a pic of the Megola, a fantastic machine, but it didn’t use the engine form a Camel!
Sopwith used a variety of engines from 100-hp Gnome, 130-hp Clerget to the 150-hp Bentley, but they were all big 9-cyl rotaries. Incidentally they didn’t have throttles power was reduced by cutting the ignition “blipping” whilst landing.Also none of the bikes in your articles are Rotary engines! They're all Radials, the difference being that rotary engines the entire engine rotates whilst the crankshaft stays still!! Where as radials work like conventional engines with the crank rotating and the engine staying still.
The Megola did use a rotary the whole engine spinning with the wheel.

I've also included a pic of another bike with a small radial claimed to be a French bike from the 1900s but in fact made recently in England.
Though one of my favorite aero-engine bikes is the Curtis V8
Hope this is of some help
–Philip
P.S. did you here about the Australian guy who cut to cylinders off the end of a 27L (1647ci) Merlin v12 out of a spitfire to make a v twin for his bike! There are pics on the web some where.
Here’s what we know about the bike in the second image from the top: It’s a Rotec's 7 cylinder 110HP R2800, and they make a Rotec's 9 cylinder 150HP R3600.This 80% Stearman is Under Construction.It’s the1st Chopper to have a R2800 Fitted.Credits go to: Rotec's Paul, Hevle's Eric (Stearman), Ron Herron (Little wing) and John Levey (JRL Motorcycles)
You can Contact Rotec Engineering on International dial 61 3 9587 9530 9.00am to 5.00pm Melbourne Australian time, or within Australia call (03) 9587 9530 or Mobile 0412 469 964.

Latest update 7/06:
My name in Mike Redpath. I was the person who was originally contacted to modify the motor to work in a bike frame. The work was done 3-4 years ago. A guy from Kansas (can't remember his name) called me with a project and would not tell me what it was except he wanted to modify a Rotec engine. When he showed up at my shop and had a bike frame in his van, I knew it was going to be a challenge to make the motor work like he wanted it installed.
A very good friend of mine, Robert Barnett, is a tool and die maker/machinist did all the machine work. We never mounted the motor in the frame, so I can't say if that is the frame the guy had or Jesse's frame design.
I always wondered what happened to the bike. The person we did the work for wanted to sell it to Jay Leno, Jesse James, or some like that who had the resources to bring the idea to life. Anyway's, while watching “Motorcycle Mania 3” a couple years ago when it came out on TV, I caught a glimpse of the motor sitting on the back bench of Jesse's shop. I am glad Jesse did finally build the bike. We had real doubts the bike would work and viewed it more as something to look at. I have included a picture of me (on the left) and the guy we did the work for (on the right).


Mike Redpath
405-414-1072


This just in from a Bikernet Reader:

8th Place European Championship 2006
By Bandit | | General Posts


The finals for the Official World Championship will be held during Sturgis Bike Week in the United States later this year (August 6th-8th). The European and World Championship program, includes endorsements of approved national affiliate events around Europe and elsewhere. It all comes together this year in Sturgis. We’ll bring you the final report and winners in September.

This is our last feature of the winners, out of 127 entries. As you can see, this is the first chopper in the mix, and wouldn’t you know it—Robin Bradley didn’t cover this bike in his report, although it extended to 10th place. I’m sure he didn’t intend to dismiss the 8th Place winning bike by Thomas Habermann of Habermann-Performance GmbH in Erbach-Ringingen, Germany. From my standpoint the chopper gods would spit on my grave if a glistening chopper wasn’t represented and this is one helluva example.

May the evil spirit of the night who draws us into dank garages with perfectly fine motorcycles, praise this offering. He is the one to drives us to dismantle highly engineered machinery, strip it to its barely functioning core, modify it beyond all reasonable means, remove anything that doesn’t speak of the night, shapely women and treachery, adorn it with layers of paint worthy of fine art and ride the sonuvabitch to hell.–Bandit

Photos and most text courtesy of:
Robin Bradley
Publisher/Owner
American Motorcycle Dealer
robin@dealer-world.com

8th PLACE EUROPEAN CHAMPION 2006
Bike Name: Balor
Business: Habermann-Performance GmbH
Erbach-Ringingen, Germany
www.Habermann-Performance.com
Builders’ Name: Habermann-Performance GmbH
Owner’s Name: Thomas Habermann

Year/Model: 2006

Engine Make/size: OEM Twin Cam 1550ccm

Frame Make: Habermann-Performance GmbH
Type: Rigid (oneleg)
Rake and stretch: 40° 5-inch

Transmission: 6-Speed

Wheel (front): 2,5″ x 19″ RC Components
Wheel (Rear): 12″ x 17″ RC Components

Brakes (front): 2 Kolben PM
Brakes Rear: Felgenbremse Habermann-Performance

Tyre (front): 90-90-19 Avon
Tyre (rear): 330-35-17 Avon

Painter: Bianca Hennig Fanta D


Chroming/Plating : Fa Kiesling D-Neusäß


First New Zealand Bike Feature
By Bandit | | General Posts

As a boy my dream was to own a Harley.I got that chance when my nana past away 7 years ago.She never wanted me to get a bike because her Grandad was a daredevil & she use to say I was just like him.

I brought the bike Trader & looked through it cover to cover.A small add stood out, 1974 Ironhead Sportster 1000cc £2000.I asked a few people regarding what to look out for when I went to see it.Everyone said buy an Evo.As soon as I laid eyes on the old girl, I knew I was going to buy her, even though I knew nothing about old iron, and the choice was against everyone's advice.But hell, I was born the same year, so it was meant to be.
Sixty miles down the M1 highway from the purchase location my stubborn relationship with Janisstarted.Four hours later Dave, my mate who took me on his bike to buy my new pride & joy, and me arrived in a tow truck at my garage.To top off a bloody long day, the truck driver released the straps before we were even on the back of the truck, and in slow motion we watched the bike hit the deck.
Four months later I finally got my bike back after a complete motor rebuild.Riverside Motorcycles in Putney, London, UK recommended a complete rebuild even though the top end was all that went tits up.

Four weeks after riding about , the pinion shaft snaps in half.Back to Riverside, repaired for nothing but his guarantee stopped after that.At this point I started reading the manual and getting to know this beast. as I couldn’t keep chucking money away.Plus her in doors wasn't too pleased about this new pile of broken down metal.

I rode around on her for a while, before I decided I started to personalise her a bit.I had heard of Biker Build-offs from a local Harley mechanic who turned out to be a great friend and wealth of knowledge when it come to old Ironheads,Dave at Sunset Motorcycles in Bexley Kent, UK.I discovered two very inspirational builders in Billy Lane & the late Indian Larry were the driving force behind my changes.

Before I left England to go back home to New Zealand I had a springer made for £50 & a shop sign by Steve aka The Angle Grinder Man of SAS Engineering.He is a top fab man & a great bloke.The springer will go on next winter, as I don't want the bike off the road again right now.

My old Bendix carb shit itself so I brought a new one and fitted it.I liked the look of the teardrop air-filter covers but couldn't afford the £80 for one so I decided to make one.I snatched some chicken wire & fibre glass, some P38 bog, and a few faint-headed moments with the fumes and wella £10 later a new air-filter cover.

I had painted her a typical ‘50s style and wanted something different.I love the History of WWII, and this was to be the inspiration of the paint theme for Janis.I decided to call her Janis, after Janis Joplin, because she was a stubborn bitch with loads of character.

Archie Dickens was a famous Pin Up Artist who I met, what turned out to be a scary introduction.He was 97 when I met him to pick his brains regarding painting Pin Up Girls.He had a stroke there & then.After the panic of making sure he was conscious I rang the ambulance.As he was being wheeled away he said come back in a few weeks & we'll start off where we finished.Old Archie died 4 weeks later.The artwork on the air-filter cover is one of his. RIP Archie.


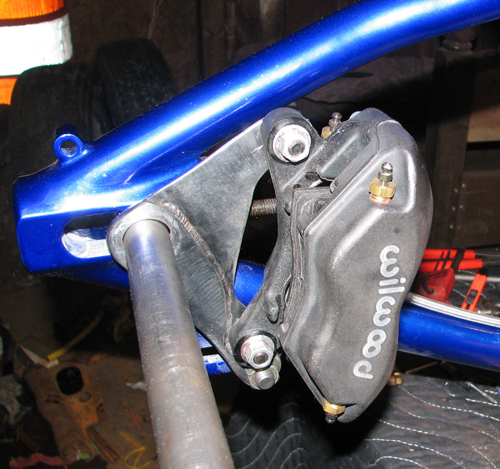
I joined the Harley riders club of Great Britain, www.harley-davidson-hangout.comwhere there was knowledge on tap.It was here I got the idea to change the front caliper so Janis would stop a bit better.A bloke called Roger had just done it on his Ironhead & emailed me the info.The Nissan caliper is off a sports bike and has 4 pistons, and too make it work better you can link them up.It works a treat.


I brought a rear whitewall tyre as I knew it would look right with the overall look I had in mind.Boy that was fun changing my first tyre!


My mate Kiwi Dave from the Riders club had just changed his H-D to a jockey shift.I did a little research & decided I'd get the bits together to do this.I cut up an old sissy bar & got the Anglegrinder man to weld them together for my forward controls.I've cut up an old clutch cable a couple of times so I have a few spares for the foot clutch.I've made a gear lever from a MR2 car shifter with a WWI German egg grenade for the knob.Once again it's a project for the future to install.

My wife and I decided to up sticks and move back to New Zealand.My old man is a stainless steel fabricator which has been awesome.I showed him my plans for the Mustang tank, and we got on to it straight away.There's nothing like learning to weld but learning from ya Dad is even better.He welded the round stock & the extra panels on the top of the tank to hold the A12 Austin Panel van bonnet badge I bought off Trade Me.As soon as I saw this badge I remembered the one Billy Lane put on his bike in the Build-off with Indian Larry, and I thought it would be perfect.The “A” stands for Spitfire Ace as well.
The reason I've tried to scrimp with parts and make as much as I can is it is really expensive in New Zealand for parts etc.There is a Chopper shop opened in Christchurch and one in Wellington, but the style of bikes are the long choppers, I think they may even be imported from a company in the U.S. The price ranges from 50K up.The only Harleys around are new from the factory.You see quite a few old Trumps and BSAs about which is pretty cool.I've never seen a Bobber as such like mine.If you are lucky enough to be able to afford a bike there is some awesome open roads to ride on.

My first go at welding was the relocation of the fixing brackets on the tank.I was quite surprised how quickly I picked up the knack of TIG. It is a very similar movement to airbrushing.I then filled in the tank with bog (Bondo) and started the sanding process.As I said earlier the artwork is inspired by Archie and my interest in WWII.


The flames are gold leaf & inspired by Robert Pradke, he makes it look bloody easy but believe me it's not.I need a bit more stripping practice.Robert your a God!

I only get 69 miles to the tank now but I'm rapt with the way it looks so who cares. I wanted to add a little Larry & Billy touch so I did a gold leaf collage on the oil tank with elements of the two masters.
The 12-inch apes were brought at a Harley Boot Sale for £5. I think they’re homemade.I brought the springer headlight in the US on transit back to NZ & added the gold leaf touch to the light surround.The bracket is a piece of copper bar I had lying about which I bent to the right angle.It should transfer easy enough to the springer.

I had another challenging time with Janis when I got back to New Zealand. The wiring fired.Sick of throwing money at every Tom Dick & Harry, I rewired her myself.I got a friend to check it, and I'm quite proud to say I did a good job.I put the nicest set of turn-signal indicators to match the style I could find.You need them in NZ as the drivers are crap.

Next thing was to change the seat.A local bloke wanted $800NZ to do a solo seat so you can imagine what I said to that.I brought a book off Trade Me for $5 on leatherwork.My Dad got me some copper 16gauge & I made a seat pan.Dad welded a strengthening bracket to it.I wanted copper, so it would reflect off the top of the chrome battery top.I then found the Paul Cox tech sheet on this site, and I was rapt.I followed that step by step, and the result was one of the most satisfying parts of the whole project.I then got carried away and made a single saddle bag as a tool bag.
The rear mudguard was brought at a Harley Boot Sale for £5. It was all bent up so I had to do a bit of panel beating to that.I repositioned the fixing holes as it sat too high on the bike.I brought the beehive brake light as it looked right.

I had drag pipes on it, but so did everyone else so I brought some cool old looking mufflers.But the front one came off, and I couldn't find it, so that gave me an excuse to make a custom set.I got a couple of bends from a car muffler shop, cut them to the right size, and Dad welded them on.I turned them up slightly just like Mr. Lane recommends.I can't afford chroming so I thought I might spray them white with heat resistant paint.If that looks crap I'll wrap them.They sound awesome! I wish I could video them on my digital camera, and you post it on the site.

(We will launch Bikernet TV in 2007 and be able to post everything from events to techs.
I've spent countless hours looking through The Horse mag, checking Bikernet and watching Biker Build-off episodes.I'm over the moon with the look of the bike, and the finishing touch will be the springer.After being off the road so frequently in the past, I am enjoying riding it to work everyday.

There's not really anything in New Zealand with this sort of look so it's quite cool when people have stare.We' ve decided to move back to England so my goal is the ride to the Harley Riders Clubs Vintage 50th Sportster Anniversary in July 2007.

She's been a stubborn bitch but we’re slowly starting to get on now.I will never sell Janis. She's left to my son in my Will so he won't be getting her for some time yet.
Cheers
–Tibbs
P.S. I forgot to mention the gold tap I tried to use.It's a gas tap and I machined out some grooves on the tap itself and fit some small o-rings on it.I brought a really old lathe and am teaching myself how to use it.But the bloody petrol just poured out.I'm going to try and find the perfect size o-ring and maybe slip the tap in with a bit of grease.I want to solve this little problem, as it looks sweet with my tank.


BIKERNET/TONY TIBBOTS SPEC CHART
Owner: Tony Tibbotts
City/State: Christchurch, New Zealand
Builder:Tony Tibbotts
City/state: tonytibbotts@yahoo.co.nz
Fabrication: Tony Tibbotts & Cobbers
Welding: Arnie Tibbotts(Dad), Tony Tibbotts,Steve SAS Engineering(Angle Grinder Man)(UK)
Machining: Tony Tibbotts, Steve (Angle grinder man)

Engine
Year: 1974
Make: 1000cc Ironhead
Model: Sporty
Displacement: 1000cc
Builder or Rebuilder: Jeff Murphy, Riverside motorcycles, UK
Cases: STD cases
Case finish: STD
Barrels: Stock
Bore: .010″ over stock I think
Pistons: Superior.010
Barrel finish: Spray Can Black
Heads:STD H-D
Head finish: Spray can Black
Carburetion: Bendix carb, homemade teardrop aircleaner, made from chicken wire, fibre glass and bog.

Transmission
Year: Stock
Make:H-D
Gear configuration: Stock
Final drive: Stock
Primary: Stock
Clutch: Stock
Frame
Year: 1974
Make: H-D Stock
Style or Model: Stock
Stretch: Stock
Rake: Stock
Modifications: A few more holes here & there.

Front End
Make: Stock, Springer to go on I got the plans from
Model: Stock, Showa
Year: 1974
Length: Stock
Mods: None

Sheet metal
Tanks: Arnie Tibbotts and Tony Tibbotts, my Dad did a great job turning my Mustang Tank into a dished tank aka Indian Larry Style.
Fenders: Dorking Harley Boot Sale, rear fender was 10 pounds which was bent to hell, I straightened it best I could.No front fender.
Oil tank: Stock with gold leaf image of Indian Larry & Billy Lane

Paint
Sheet metal: Tony Tibbotts
Molding: Tony Tibbotts, A lot of bog & even more sanding but it was rewarding when finished.
Base coat: PPG Tiger84U Matalic Orange
Graphics: Tony Tibbotts, WWII Pin up art airbrushed with rivet background. Gold leaf flames on the top & bottom, inspiration Robert Pradke.
Frame: Stock, couldn't bare having it off the road any longer so the motor stayed in.
Base coat: Black
Graphics or art: Tony Tibbotts, WWII Pin up Art, gold leaf flames
Special effects: Tony Tibbotts
Pinstriping: Tony Tibbotts, this was challenging as well, I can paint & draw but stripping is definitely an art. Practice Practice, I'll get there.I wish Robert Pradke was after a apprentice!

Wheels
Front
Make: Dunlop
Size: 21″
Brake calipers: Nissan conversion on front, this was one of the best things I couldn't have done.
Tire: Dunlop
Rear
Make: Avon
Size: 16″ Spoke
Brake calipers: H-D Drum
Tire: Avon Venom X Whitewall 130/90

Controls
Foot controls: Floor boards, mini Custom Chrome, fabricated bracket to fit. I've made a set of forwards but haven't fitted them yet. I cut a old sissy bar & fabricated them so they can be used with a jockey shift.
Brake lines: Braided
Handlebar controls: Stock
Finish: Black
Clutch Cable: Braided
Brake Lines: Braided
Shifting: Foot-shift, jockey to come just need to install.I've welded a bracket to the battery box to create the cross over for the shifter. My shifter is off a MR2 & the knob is a WWI German egg grenade.

Electrical
Ignition: Stock battery ignition
Coils: Accel Super coil
Regulator: Custom Chrome
Charging: Stock
Wiring: Stock I rewired it to the manual
Harness: Custom Chrome
Headlight: Early Springer model
Taillight: Beehive, the Pin Up girl attached was a beer can holder.
Accessory lights: Bullet marker indicators, Harley boot sale, you need indicators in NZ as the drivers are crap.
Switches: Stock
Battery: Yuasa 32-amp, I had to make a bigger box for it to fit.

What's Left
Seat: I made the pan from copper & dad welded a t-bracket to add strength. I did the leather work from the Paul Cox How-to on this site. I'm rapt with the result.
Pipes: Cut up drags and added Tips Billy Lane style
Mufflers: Use to, one fell off.
Exhaust finish: Stainless
Gas caps: Stock
Handlebars: Home made apes, 12″ Harley Boot Sale
Grips: Antique
Pegs: Stock and forwards mini custom chrome boards.
Oil filter: Per Form
Oil cooler: Jagg Oil Cooler, Bargain 15 pounds.
Oil lines: I bent up some copper, idea from Billy Lanes second book.

Fuel filter: Custom Chrome
Fuel Lines: Clear
Throttle: Stock
Throttle cables: Black Stock
Fasteners: All sorts

Specialty items:I like the airfilter cover I made as these are bloody expensive. The tribute to Archie is for the late Archie Dickens a famous Pin Up artist, RIP Archie.I made the single saddle bag for a tool bag.

Comments:Thanks to Dad & Steve (Anglegrinder man) for welding.Dave @ Sunset Motorcycles in UK for loads of free advice.Finally they probably get it all the time but Indian Larry & Billy Lane were a great inspiration in the look of Janis & I'm grateful you guys do what you do. RIP Larry

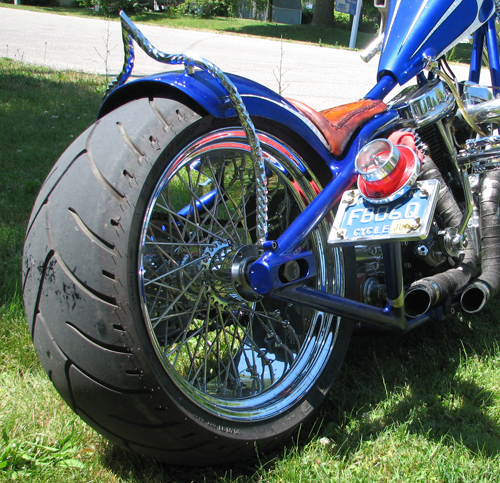
The Bones Panhead Legacy
By Bikernet Contributor TBear | | General Posts

This sweet Panhead had quite a life. It tooled around the San Francisco Bay area in the 1960s and was chopped in true “Frisco” style by its original owner back in the day. When it's owner passed away, the bike was left to Bones, the owner’s riding buddy. The bike was torn down in 1988 and sat as a pile of parts in Bones' garage until 1999.

For the next three years, Bones and his long time friend Paul had talked about how the re-build would go. At the time, Paul was hard at work building his '65 Triumph Chopper project and helping out Bones with his re-building the Pan in his off time.
Bones took a 1930 VL frame and made 17 modifications, including raising and bending the frame’s back bone to be able to shoehorn the 1950 FL Panhead motor in place. He had to also hand fab the axle and tranny adjusters to fit the '50 ratchet top tranny in place. There’s one man in this country who modifies VL frames for a living, Irish Rich, in Denver.

Bones also totally rebuilt the motor. For the lower end, Truett & Osborne Flywheels were used and balanced by Walkers. 74 cu in. Wiseco Swain Tec Coated pistons were installed in the H-D 1964 Outside Oilers heads and Sifton Pushrods & Manley S.S. valves used. The cams are Andrews Special Grind and new C.C.E. finned Pan covers top the jugs. For the carburetor, an SU – H6 from a Triumph TR-3 sportscar was installed and a Ram Flow Air cleaner was added.

For the chromed tranny, a modified 1950 hand-shifting unit modeled after a Lee’s '50 was dug out and re-geared with a 24 tooth engine sprocket, a 22 tooth tranny sprocket, to a 51 tooth wheel sprocket to make her fly like an eagle. New tranny and shifter mounts were also fab'ed up by Bones.

Bones also got to work making up some one off parts. The oil tank, handlebars, shifter, clutch unit, sissybar, the through the primary running board mounts were from Bones own hands. Many of the original 1930 VL parts are still in evidence like the '30 VL Running boards and the VL Brake pedal and fork lock.

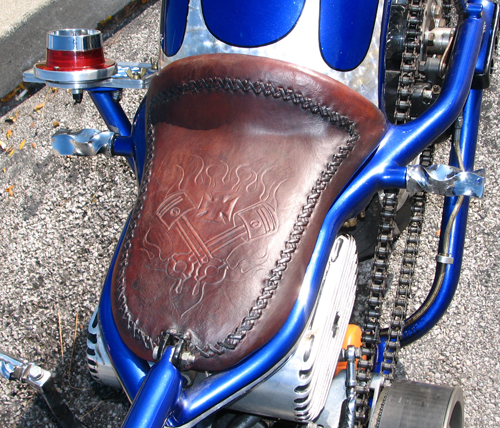
The front forks are 1930 H-D VL I-beam with stock extension using a Jones England 21-inch front wheel from a BSA with an original K-D headlight. The rigid rear end uses a 16-inch drop center rear wheel featuring an original 1940 H-D Mechanical drum brake setup under the bike’s Bates English rear fender with a 1930 Ford taillight. An original '50s Bates’ seat makes for a nice touch

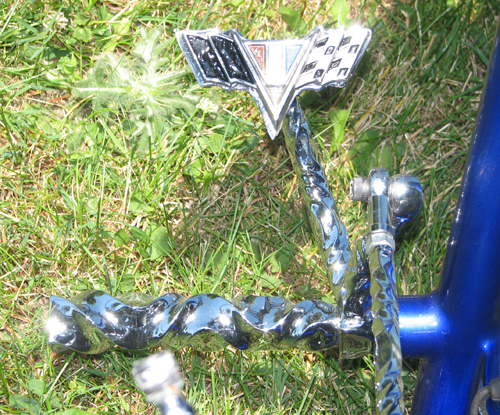
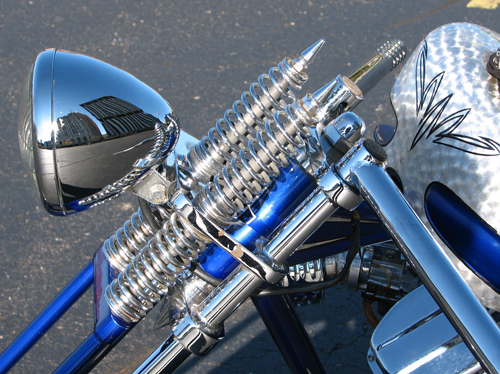
Bones also did the bikes electric's starting off with an M-5 Morris Magneto and H-D 6v, 3 Brush Gen. Bones one-offed the bikes Z-bars and managed to make fit the gas tank off a 1957 H-D Hummer. Bones also did all the bike’s molding and paint. The bike’s wild yellow, orange, Chinese orange, redPPG Lacquer Pure Toners- Custom Mix paint was shot on the bike in Bones’ garage one weekend and the only thing now missing was the exhaust system.

Well, Bones wanted some pipes that would stand out. He got to thinking and remembered seeing some wild tall boys tooling around Frisco back in the day. He got to work piecing some pipes together and soon had a set that turned heads. Then he took an old brass lantern and installed some L.E.D.'s for the rear taillight to give the bike a balanced look from the rear.

The bike was finished in 2002. During the time of the build, Bones' buddy Paul was building his '65 Triumph Chopper at the same time. The Horse issue #22 April 2002) They both thought the same way in building ‘60s era choppers. They revealed both bikes at a local bike show, then at the Laughlin River run in 2002. Everybody thought the same builder built both bikes, so similar were the styles and paint scheme. Bones and Paul had a short time riding together when Bones passed away in 2005.
Paul could not see anybody else have this bike after Bones passing and neither could Bone’s wife, so Paul purchased it from her. The bikes are like brothers, just like Bones and Paul. The bike went from best friend to best friend. Paul keeps it in good shape as a tribute to his late Bro's memory.Such good care in fact, that this bike took first place in the “OLD SKOOL” class at the Big Twin West event by Advanstar in Vegas at the Mandalay Bay Hotel last week. Congratulations Paul, Bones would be proud.
–TB


GENERAL
Fabrication: Bones
Year and Make: 1930 H-D
Model: VL
Assembly by: Bones
Time: 3 years
Chroming: Automotive Plating Las Vegas

ENGINE
Year: 1950
Model: FL
Rebuilder: Bones
Ignition: Morris Magneto M-5
Displacement: 74 cu. in.
Lower end: Truett & Osborne Flywheels
Balancing: Walkers
Pistons: Wiseco Swain Tec Coated
Cases: H- D Polished
Heads: H-D 1964 Outside Oilers
Cams: Andrews Special grind
Lifters: Sifton Pushrods & Manley S.S. valves
Carb: SU – H6 from a Triumph Car TR-3
Air cleaner: Ram Flow
Pipes: Bones

TRANSMISSION
Modifications: Chromed
Year: 1950
Shifting: Hand, modeled from the Lee units '50's
Engine Sprocket: 24
Trans sprocket: 22
Wheel sprocket: 51

PAINTING
Molding: Bones
Painter: Bones
Color: yellow, orange, Chinese orange, red
Type: PPG Lacquer Pure Toners- Custom Mix

FRAME
Year: 1930
Builder: H-D, Bones
Type: VL Flathead
Rake: Stock
Stretch: None
Other: 17 frame mods, to fit motor, tranny, etc.

ACCESSORIES
Bars: “Z” Hand made Bones
Risers: Bates, H-D, Bones
Fenders: Bates England
Headlight: Original K-D
Taillight: 1930 Ford
Speedo: VDO
Front Pegs: Original VL Floorboards
Rear Pegs: Anderson
Electrics: Bones, H-D 6v, 3 Brush Gen.
Gas Tank: H-D Hummer 1957
Oil Tank: Hand Made Bones
Oil System: H-D
Seat: Bates

FORKS
Type: VL I-Beam
Extension: Stock
Builder: H-D
Special Features: Original Fork Lock

WHEELS
Front
Size: 2.75x 21
Hub: American Chopper Engineering 60's
Rim: Jones England

Rear
Size: 16″ drop center
Hub: H-D
Rim: H-D
Tires: Avon Speedmasters
Brakes: 1940 Mechanical Drum

Flint Michigan Flyer
By Bandit | | General Posts
I started building a bike for two reasons: I needed something new to ride, and I didn't want bike payments. I had an idea of what I wanted. I liked the looks of the bare bone choppers, with no gimmicks. I like long springer front ends, and I like fat back tires (to an extent). The first thing I had to do was figure out what I really wanted.
I am a big fan of Billy Lane's bikes, and I really liked his “Whole Lotta' Rosie” bike. I decide these were the dimensions I wanted my bike to have. I did a little homework and learned Billy's frame was a 6 up, 4 out Santee frame with a 42-degree rake and a 250 tire. It had a high mounted gas tank, straight and low split handlebars, plus a long springer front end. I remembered reading in his first book that he said if you can't afford what you want to buy, pick up a book and learn how to make it, so that's what I was going to do.
I only had basic hand tools and a flux core wire feed welder, but I figured I could tack all my parts with it and pay someone else to TIG everything. The parts I couldn't make I thought I would just pick up at a swap meet, and once it was finished I was going to rattle can everything flat black. Nice and simple.
I got an old springer front end, which was made in the early ‘70s from my dad. It came with an old Panhead chopper he bought. It was just extra parts, so he didn't need ‘em. It was missing a lot of pieces, but I figured I could make it work, and it was free.
Next I started shopping around for a good frame, I looked high and low for a good deal on a quality frame and finally came across Chopperhead Road's ad in The Horse Backstreet Choppers. Through them I got a frame with the exact dimensions for $999, and it turned out to be a great frame. Next I started shopping around for the rest of the parts for a rolling chassis. I started to look at local swap meets, but couldn't find anything that was worth anywhere close to what people wanted for it. Soon after this I met a good friend of mine named Andy Schupbach, who introduced me to eBay. It wouldn't be long before the good deals started rolling in.
I started shopping around on eBay and in no time I had wheels and tires. Around this time Andy introduced me to a guy named Bob Archambeau, who used to be a tool and die machinist for General Motors, but is now retired. It turns out he has a 3 phase lathe and mill all hooked up in his garage, and he likes to work for cheap! Bob made me some of the front end parts I was missing, and at the same time I continued to shop around for the rest of the parts on eBay. I now had a rolling chassis and would enjoy riding it whenever I could find someone to push.
I started looking for a motor and tranny, I didn't really have a preference other than the fact that I wanted a kick-start only bike. I preferred a Shovelhead motor but I was open to anything because of my budget. Sometime around June of 2005 I got a good deal on a ‘79 four-speed tranny, which was, “freshly rebuilt with Andrews gears.” I bought it, took the guys word it’s condition and started to figure out my offset distance for the tranny plate, so I could get around that big ass back tire.
Andy showed me how to use the Bridgeport vertical mill at work, so I messed with it a little and in no time I was hacking parts out with the best of them. I made my tranny plate out of a chunk of 1/2 inch thick aluminum, and on the third or fourth try I got it right. I was still shopping for a motor and belt drive, but at the same time I was learning a little about fabrication while building the handlebars, oil tank mounts and rear fender. Sometime around August I came across a guy selling a bunch of leftover Shovelhead parts on eBay. For about $700 I scored just about everything, except pistons, cases, rockers and boxes, push rods and tubes, lifters, electrical, and so on. In other words I bought a bunch of junk that was nowhere near a complete motor. My plan at this time was to rebuild the motor with aftermarket cases, and shop around for everything else.
I kept shopping and came up with some rocker boxes which I was splitting, rounding off and re-polishing. I found a dual throat dell'orto carb set up with the manifold, which was supposed to be in good working order. I also found a belt drive: a 1 ½-inch wide Primo, which I wanted to use to be different, I just needed the clutch parts. I started piecing the clutch together at my local parts store. I also came up with the crazy idea of using old 1950s aluminum malt cups for velocity stacks. I machined a single flange from 1/2 inch aluminum and welded the cups to it. Then I smoothed out the welds and polished everything. The finished product was a dual throat, 6-inch velocity stack, which shared a single flange. By about this time I was starting to get quite a parts collection. My house was starting to look like a salvage yard, because that's where I kept everything, due to a leaky garage roof.
Everything was rolling along up to this point, so it was about time for disaster to strike. In November some punk kids kicked in my door, in the middle of the afternoon, while I was gone. They grabbed all my electronics, some tools, and apparently anything that was shiny. From what I could tell these idiots didn't know a fucking thing about cycle parts. They grabbed my brake caliper but not the rotor, one reworked rocker box but not the other, the stock Shovel heads, but without taking the valves and springs that were right next to them, and finally the carbs and velocity stacks, which I worked so hard on.
I'm sure that once these “thugs” figured out that they couldn't get a dime for the parts they stole, they got tossed to the curb. Meanwhile I was left with so few engine parts that I was better off to start looking for a whole motor than replace everything and continue to shop for what I still needed.
Within another month I received a hefty check from the insurance company, so I started looking for a complete motor. I found a few Evo's going for reasonable prices, but I really grew to like the old Shovelhead motor that I once dreamed of. I watched eBay like a hawk and it paid off, because before long I came across the deal of a lifetime. For $2,400 I bought a complete motor, which only had about 1,500 miles on it. It turns out that the guy built it to show it and rarely rode it further than down the road and back. It was titled as a ‘78 Shovelhead motor but that's hardly what it was. When it was rebuilt it was based on STD cases, with all Crane Cams valve-train components, Keith Black pistons, an S&S HVHP oil pump, and STD Panhead, dual plug heads to top it off. The only thing stock about this motor was the fly wheels and the jugs. Needless to say I got a pretty good deal, but it gets even better. The owner threw in a Daytona Twin Tech single fire ignition, and a complete charging system. Like I said, “deal of a lifetime'.
Those crooks did me one hell of a favor because if it weren't for them I'd still be piecing together a rattly old stock Shovelhead, built out of everyone else's left over parts. I could also start selling some of the old Shovelhead parts on eBay to help finance the rest of the project.
The next couple of months went by fast. I was learning a lot about metal fabrication. I learned to TIG weld from Andy, and I was taking a Machining class at the local community college. Andy drastically changed my original plans, definitely for the better. He helped me fabricate a lot of my parts at work, and he gave me the idea of making all the pegs and other bolt on parts out of twisted steel. Of course this was all inspired by Indian Larry, whom I am a great fan of.
I thought of tapering the steel square stock before it was twisted, which put a new “twist” on it. I still haven't seen anybody else do it quite like that. I also tapered and twisted some hex stock, and decided it would look great as a sissy bar, foot controls, and some other small parts. The hex stock really keeps a nice round shape when it is twisted and it also stays straight.
The tranny I bought the previous summer didn't quite look right next to the motor due to some black powder coating on the motor. I decided to tear down the tranny and polish the case, and send the covers off to be powder coated gloss black. It was when I did this that I realized something didn't quite look right about this picture. This tranny was rebuilt, yet it had globs of sealant on the outside of the case around the counter shaft seal.
I didn't want it leaking all over my back wheel so I bought a manual and decided to tear it apart and change all the seals. When I got it all apart, I figured I might as well add some style to it, so I TIG welded some flames I already had hand-sculpted out of aluminum. When I was done with this I smoothed out the welds (remember at this point I'm still learning to weld. so my beads looked like shit) and polished the whole case. Now, when you look at the tranny, the flames appear to be melting right out of the back of the case, and it looks awesome. I didn't want to have any regrets later so I decided to change all the bearings because some of them didn't look too “rebuilt.” I was certain that this tranny was a huge piece-of-shit and I bought someone else's headaches. The counter shaft leaked due to extreme heat coming off of the bearings. This heat was happening because some asshole pounded the bearings in despite the fact that the hole was about .010-inch smaller than the outside of the bearing. I had my machinist friend bore the hole in the counter shaft to accept the new bearings and before long I had it all going together smoothly. At this point I also learned that all the gears were stock Harley-Davidson parts and that the year this tranny was made Harley was producing some real garbage. Oh well, it was too late to turn back now.
This tranny was definitely a lesson, but I am glad that I can now say I know how to rebuild a tranny, while the asshole that sold it to me never learned.
I didn't have a welder so a lot of the fabrication was going on at work, after the shift. The general foreman didn't like it, so finally it got to the point where he was threatening to fire me. My union reps confirmed that he could, if I got caught using their company equipment again. I needed to buy a TIG welder, so back to eBay I went. I found a barely used Miller syncrowave 180 for under $800, so I drove down to Indianapolis to get it.

The next couple of months sailed by. I fabricated my gas tank, my oil tank, all my controls including the handlebars, and I was getting sharp on a mill and lathe. I made my own license plate frame/taillight using a ‘64 impala lens. I used a lathe in my machining class so I turned all my own brackets and mounts out of round stock. I bought some exhaust flanges from Fab Kevin and tubing out of Jeg's and welded up my pipes with some help from my Dad. I didn't want to spend $400-600 dollars on a brake caliper to go with my sprotor set-up, so I decided to try a Wilwood caliper for a car, also out of Jeg's.
I found a dual Edelbrock carb set-up, mounted on an early weber manifold with S&S velocity stacks on eBay. I also found a good deal on a 3-inch BDL belt drive. which I decided to use to hold up the extra power of my new motor. By early May I had a complete bike, minus paint.
This was my first build and I was figuring out most of it as it progressed. Needless to say I didn't want to have to change anything after it was all painted. I wired everything up while it was all in raw steel, and with about 8 kicks the beast was alive. It was leaking a little oil, but it ran, and that was all that mattered to me at that point.
Within about a week I had it all torn apart, and my good friend Andy was going to paint it for me in his garage, with his paint, and he wasn't charging me a dime, except that I had to repay him for the paint. He volunteered to mold the gas tank, and he did all the work that took any know-how. I just helped as much as I could, molding the frame and sanding where he said to sand.
By about early June I had all the parts back from the chromer, the paint work was done. I had some awesome pinstripes thanks to Chris Hornus of Flint Michigan, and it was time to bolt it all back together and get her running. Reassembly was a breeze, probably because I took it so far in the mock up stage. I put together everything in four days, and it only took about five kicks to start it the second time.
I had a couple small bugs to work out. I couldn't run velocity stacks on the Edelbrock carbs, and I was constantly blowing oil out of my breather line. These were all minor problems and were nothing to overcome. I had to install the stock air cleaner on temporarily, but eventually I put two flathead ford air cleaners on it, they look wild. I also fabricated a bracket out of aluminum to hold a half pint Jack Daniel's bottle, which acts as a catch can for the breather.
As soon as it ran, it was my only transportation, because my truck's rear-end went out in late April. I could only do one project at a time and I made gettin' the bike done my priority. Who wants to drive a truck in June anyway, right? Within a month I had all the bugs worked out, so my trusting girlfriend and I took the blue bomb on it's first long trip, from Flint to Manitowish Waters, Wisconsin, and back, which was about 1,200 miles. I am happy to say it went beautifully with only one minor set back on the way back when my alternator loosened up. luckily I was only about 2 miles into the trip home, so I was able to push it back to the cabin and get it fixed soon enough to catch the second ferry ride across Lake Michigan.
For three months this was my only transportation, I used it to travel 30 miles a day to work and back, and I still beat the hell out of it every weekend. I am proud to say that everything is holding up great. To top it all off I won best of show for the 2006 bike night season at a local bar, Scooter's Bar and Grill. (
This whole experience was great for me, and I can't wait to do it all over again this winter. I decided to make some subtle changes to this bike, and I am also building a Buell based chopper, which I will most likely sell to finance a ‘54 Panhead project. I'll send some pics of those when I can.
Eric’s Blue Bomb Spec Sheet
Owner: Eric Barnett
City/State: Flint Michigan
Builder: Eric Barnett
City/state ( or company contact info):
Fabrication: Eric Barnett and friends
Manufacturing: Eric Barnett
Welding: Eric Barnett and Andy Schupbach
Machining: Eric Barnett and Bob Archambeau
Engine
Year: 1978
Make: 1340 cc Shovelhead
Model: Big Twin
Displacement: 1340 cc
Builder or Rebuilder: Richard Zubli, of Zubli Engineering
Cases: STD cases and STD Panhead heads
Case finish: Cast
Barrels: Stock Harley
Bore: .010″ over stock
Pistons: Keith Black 10:1
Barrel finish: Powder coated gloss black
Lower end: Stock Harley
Stroke: Stock
Rods: Stock
Heads: STD dual plug pan heads
Head finish: Powder coated gloss black
Valves and springs: Crane cam, stock size
Pushrods: Crane cams
Cams: Crane Cams, roughly .570″ lift, duration unknown.
Lifters: Crane cams, solid
Carburetion: Dual 38mm Edelbrock mounted on an old Dellorto manifold, with flathead Ford aircleaners
Other:
Transmission
I bought it on eBay and got royally fucked on it.
Year: 1979
Make: 4-speed,
Gear configuration: as far as I know it's all stock gear ratios
Final drive: Stock
Primary: BDL 3-inch open belt, no backing plate
Clutch: BDL
Frame
Year: 2005
Make: Chopperhead Road
Style or Model: Double down tube rigid
Stretch: 6 up and 4 out
Rake: 42 degrees
Modifications: I cut the tubes around the seat area away from the back bone, shortened them and bent them in, then welded them to the seat post tube. I also used one frame tube as an air tank to fill the airbags, under the seat.

Front End
Make: Very long and narrow springer which was originally built in the '70s. This was actually the first piece I had for this project.
Year: '70s
Length: a mile
Mods: I had to shorten it by about 14 inches, make new rockers, come up with some shoulder bolts for the rockers to pivot on. I had a custom pin and top plate made for the triple trees by Bob Archambeau.

Sheet metal
Tanks: Eric Barnett
Fenders: West Coast Chopper cut in half, (they were having a sale).
Oil tank: I made the oil tank from a really long air cylinder, cut in half. The tank has two chambers, the return oil fills one chamber, then flows to and through the second chamber before being fed to the motor. The two chambers are held together by about 12 fins made of 3/16 by 1/2 inch flat stock, which I welded on individually and them rounded off with a grinder and polished. I had in between the fins powder coated gloss black so I didn't have to polish there. I'd say I have about 80 hours in it, but it turned out pretty cool.
Paint
Molding: Eric Barnet and Andy Schupbach
Paint: Andy Schupbach
Graphics: engine turnded silver leaf scallops by Eric Barnett and Andy Schupbach
Pinstriping: Chris Hornus of flint Michigan
Wheels
Front
Size: 21 by 2.15 80 spoke with twisted spokes
Brake calipers: No front brake
Brake rotor(s): Nope
Tire: 80/90 21 Dunlop
Rear
Make: DNA
Size: 18 by 8.5 40 spoke
Brake calipers: Wilwood Dynalite caliper for a car
Brake rotor: Sprotor style made by a machine shop in Lansing Michigan
Pulley: Sprotor
Tire: Dunlop 250/45R18
Controls
Foot controls: Hand made by me, tapered and twisted hex stock, with '60s Chevy emblems for pedals.
Finish: Chrome
Master cylinder: I believe it's for a newer Indian, eBay item.
Brake lines: Braided
Handlebar controls: None
Clutch Cable: No cable, foot clutch with twisted hexagon likage.
Brake Lines
Shifting: Jockey shift, tapered and twisted hex stock, with custom handle made by me.
Electrical
Ignition: Daytona twin tech Dual plug, single fire with multispark.
Ignition switch: toggle
Coils: Another eBay item, dual coils from Big Dog, mounted in Gas Tank.
Regulator: Stock Harley
Charging: Stock Harley
Wiring: 4 wires, nice and simple.
Headlight: Harley 5.75″
Taillight: '64 Impala taillight mounted in a plate frame made by me.
Accessory lights: None
Electrical accessories: nada
Switches: none
Battery: Odyssey dry cell
What's Left
Seat: I made the pan and did the foam, Leatherman of Flint Michigan did the leather work, also has two goodyear air bags hidden under it for a little comfort on them long rides.
Pipes: Fab Kevin did the Stainless steel flanges, I welded the pipes up.
Mufflers: No way,
Exhaust finish: The first bend and the flange is stainless, most of the pipe is steel, and the tips are autozone chrome. I wrapped most of the pipe in black header wrap so all you see is a little stainless at the beginning and a little chrome at the end.
Gas caps: Brass pipe cap, I turned it on a lathe to put a little style on it. (and because it used to say CHINA on the top)
Handlebars: 1.25 o.d. d.o.m. tubing,
Grips: bars are drilled on the end and I stuck another tube inside, I then welded the end up and smoothed it out for a seamless look. No padding, lots of grip.
Pegs: Tapered and twisted 1″ square stock
Oil filter: Fram racing filter, holds almost a quart.
Oil cooler: Tank doubles as a cooler
Oil lines: black rubber lines
Fuel filter: no, probably should get one I guess
Fuel Lines: clear plastic
Throttle: Cheap internal throttle I got off of eBay, has a bronze bushing instead of a bearing, I don't suggest buying one because mine is looking very rough after only 6 months, this is one thing I wish I wasn't trying to save money on because now It's welded to the handle bar.
Throttle cables: Barnett internal throttle cable.
Fasteners: A mixture of Stainless Steel, Chrome and Black, mostly Socket Head.
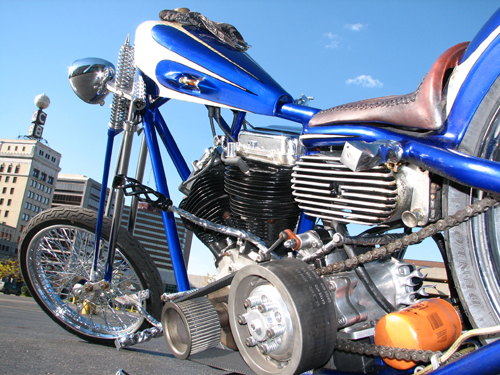
Specialty items: Everything is pretty special to me. You asked about the flames on the back of the tranny case, I made those. I started with a 4 inch square piece of 1/2 inch thick aluminum, and sketchted some flames on it. I then started sawing out the rough shape, but had trouble getting in then tight spots. I then started using a vertical mill to rough out the shape. Once this was done I started using a combination of grinders, files and emery cloth to shape and sculpt the flames. I then polished them with sandpaper and a buffing wheel. When they were finally done they looked great, but I had no idea of what I was going to do with them. A couple months later I decided they would look great on the tranny, so I welded them on and slightly molded them in when I was polishing the tranny case.
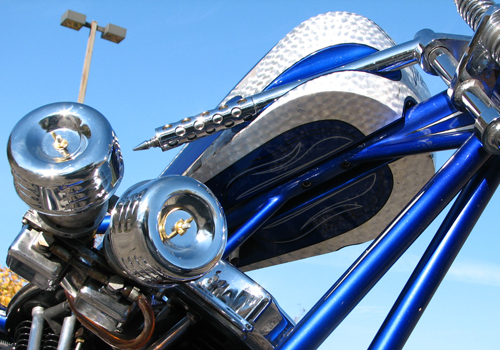
Credits: I definately want to give thanks to Andy Schupbach, he helped me through this bike practically from day one, and never charged me a dime, what he wasn't helping me on he helped make possible by teaching me new skills.
Keino Keeps The Fires Alive
By Bandit | | General Posts


This story will hit home with old school die-hards and young guys still dazzled by metal flake dust. This bike started with a set of 4.25-inch Evo flywheels and rods. “Here’s your next bike,” Indian Larry said to Keino handing him the greasy lower end. Does that hit home or what?
Keino came from a background of building and tinkering with bikes in Japan as a kid. He grew up in southern Japan, Fukuoka an hour-and-a-half north of Nagasaki. “It’s the redneck part of the island,” Keino said. He followed his dream to the MMI School in Phoenix, and took the time to graduate in ‘99. Then, stuck in the vast Arizona desert, he didn’t know, at 27 years of age, but his life was moving fast. The MMI career counselor hooked him up with a H-D dealership internship in Brooklyn, New York. About that time he picked up a copy of Easyriders and spotted the Grease Monkey feature about Indian Larry.
He worked as a grunt at Brooklyn H-D cleaning the shop and performing basic service work, but he hungered for something more custom, with more fabrication and more wild in the streets. A year later he looked around. He was already caught up in the Manhattan Island lifestyle, the action, the nightlife and the broads. He stumbled into a SOHO bike shop, American Dream Machine, and asked about a job. He was hired as an apprentice in 2000 and discovered that the engine guy in the back was Indian Larry.
”I was so excited to see bare frames on lifts and bikes coming together from the ground up,” Keino said. He started sweeping the floors, performing oil changes and basic mechanic labor, but he dug every minute, every new metal flake paint job and every thing he learned. “I didn’t know how to weld,” Keino said. “I asked if Larry could coach me, and I stayed after work to practice.”
A year later Larry gave Keino a How-To book on sheet metal by Wolfgang publishing and he read it cover to cover. His skills were honed on a daily basis, in an atmosphere of the New York groove and creative vibe. “Each day passed in the blink of an eye,” Keino said. “I couldn’t get enough.”

This glistening green machine is all about his history with Indian Larry who moved with the shop when it became Gasoline Alley. He took over ownership in 2004. When Larry unexpectedly passed away, Keino stayed on as a partner with Paul Cox, and Bob and Elisa Seeger to form the Indian Larry Legacy and keep the spirit alive. His bike reeks of class and style. He built-up the engine from scrap parts. A friend gave him a transmission and the bottom half of a Paughco frame, which he formed into a single-loop classic with 4 inches in the single downtube and 3 inches in the backbone.

Keino split the rockers and worked in the aluminum shaped spikes. He ran the oil lines directly into the rocker arm shafts and touched off the pipe side of the engine with handmade silver pushrod covers from silversmith FIN in Kobe, Japan.
Keino studied the sheet metal book and built the gas tank by hand. Then he attempted the rear fender and “fucked-up” three attempts. “It’s tough to make a fender contour the tire all the way to the bottom of the frame,” Keino said. “I took one of the bad fenders, cut it, and worked the oil tank into the bottom of the fender. The frame was stretched almost an inch at the rear to afford the room for the oil tank/ rear fender.

Many of the parts for the narrow 39mm front end came from the shop stash, but the extended tubes were new. The long narrow glide, which was in keeping with the Indian Larry tradition, was touched of with an Indian Larry brass accessory, the dogbone risers. It’s ironic but these risers were made in Japan by Misumi Engineering. He bought the wheel components on E-bay and laced the wheels with stainless spokes himself. He hand fabbed and welded the pipes to slip over the transmission ‘cause he had the space to mess with.

Keino’s excited to return to Japan as the guest of the Moon Eyes Show in Yokohama, December 3rd 2006. The Indian Larry Legacy is alive and well with an expanding product line, and a list of customers who want bikes built by the team. “We don’t do service or repairs,” Keino said. “We just build one-off bikes for customers and work on our product line.” Talk about a young biker’s dream come true. May the Legacy never die.
–Bandit” Hey,” Keino wrote after we finished the feature, “I forgot to mention the paint job. I talked to Robert Pradke of Custom Auto Design, in Conneticut, for the finish.I wanted green. I always liked green. I know it was bad karma for bike paint job, superstition, butI didn't care. One day a soda can on lunch table caught my eye. It was Mountain Dew .
“That's it! Mountain Dew inspired paint job. But I didn't want a Mountain Dew THEME bike, so I left it up to Robert Pradke's creativity to translate my idea into reality, and he nailed it!”


Bikernet Keino Spec Sheet
Owner:Keino Sasaki
City/State:Brooklyn, NY
Builder:Keino Sasaki
City/state:Indian Larry legacy ( 718) 609-9184
Fabrication:Keino Sasaki
Welding:Keino Sasaki
Machining:Keino Sasaki, Knucklehead Steve

Engine
Year:mixed Shovelhead
Make:H-D
Model:
Displacement:88ci
Builder or Rebuilder:Keino Sasaki
Cases:H-D
Case finish:polished
Barrels:unknown
Bore:3 5/8-inch
Pistons:S&S
Barrel finish:powdercoat
Lower end:Evo from Indian Larry
Stroke:4-1/2-inch
Rods:S&S
Heads:H-D
Head finish:polished with modified by Keino rocker covers
Valves and springs:Andrews
Pushrods:stock
Cams:Andrews 2
Lifters:Solid
Carburetion:S&S B
Other:split rocker by keino

Transmission
Year:1978
Make:H-D, thanks to good friend jamie
Gear configuration:stock
Final drive:diamond o-ring chain
Primary:2-inch open belt
Clutch:Barnet

Frame
Year:2003
Make:modified Paughco by Keino
Style or Model:single down tube
Stretch:3-out, 4-up, 7/8 rear
Rake:31-degree
Modifications:a lot

Front End
Make:mixed
Model:39mm Showa
Year:mixed
Length:4-inch over
Mods:a lot

Sheet metal
Tanks:Keino
Fenders:Keino
Oil tank:built in rear fender by Keino

Paint
Painter: Robert Pradke of Custom Auto Design

Wheels
Front
Make: spoke
Size: 21in laced by keino
Brake calipers: two-piston PM
Brake rotor: Custom Chrome
Tire: Metzeler
Rear
Make: spoke
Size: 18-inch laced by Keino
Brake rotor: Custom Chrome
Tire:Metzeler 160

Controls
Foot controls:modified Sportster mid-control by Keino
Finish:polished
Master cylinder:PM
Brake lines:braided
Handlebar controls:modified XLS bar by Keino
Finish:chrome
Clutch Cable:none
Shifting:jockey
Electrical
Ignition:Points
Coils:hidden
Regulator:hidden
Charging:hidden
Wiring:hidden
Headlight:Headwinds
Taillight: Custom Chrome
Battery:hidden yuasa

What's Left
Seat:Paul Cox
Pipes:Keino
Exhaust finish:chrome
Gas caps:Custom Chrome
Handlebars: Keino
Grips:brass by Keino
Pegs:brass by Keino
Oil filter:side mount Indian Larry style
Oil cooler:hidden
Throttle:internal throttle

Specialty items:Special pushrod collars by silversmith from Kobe, Japan.''Keino, not Chica” hand engraving on master cylinder by CJ Allen.Special shift knob by Dichrome.
Credits:Special thanks to Indian Larry for encouragement and inspiration.