When the package arrived with the new BDL belt drive system in it we had a little problem. Unfortunately when our hell hound doesn't get the chance to chase the delivery truck he takes it out on the cardboard.

Fortunately none of the contents were damaged (this time) so I got everything spread out to make sure I had everything I needed and also to make sure nothing had been consumed by the beast . In this package they sent the instructions on a disc but if your computer isn't able to read it I recommend you simply go to their website where you can download the instructions and or just check out some of the various install info here on Bikernet.com.

In the last round I had already installed the inner primary with a new sealed bearing so I went right to the business of assembling the front pulley.


Following the supplement instructions in the box, I installed the spline insert into the pulley and to keep from scratching it up I used a clean red rag on the bench while I installed the supplied roll pins from the back side of the assembly.

Next, I turned the pulley over and set the outer plate into the pulley, applied red Loctite (supplied with the kit) to the three 5/16×18 fasteners and bolted the pulley, insert and outer plate together.


After flipping it over again to install the inner plate, I started checking over the pulley alignment and spacing the front pulley as needed, this process is not too complicated. It is important to rotate the motor to be sure the belt is tracking properly. It's critical to avoid extreme belt wear and a big problem on your hands later.

Once you are ready to install the pulleys it is recommended to use red Locktite on the transmission spline shaft, but I skipped this step because it will come back apart for paint later.

But for Sin's project we discussed chopping up the outer primary cover. This will not only vent the hell out of the primary system but it will provide a different look too.

Most of the time I like to vent the inner primary cover by drilling holes in it while I have it off and on the bench and before I press in the new main bearing.

I also normally cut spacers on the lathe to space out the derby cover to vent the outer cover as I did on this other project bike.
This is actually a very old trick and with all the narrow belts that have been run over the years. I think it's safe to say it's been done before. I think it might be cool to fabricate a belt cover similar to the covers on the open primary systems to give it a cleaner look and keep rocks out?

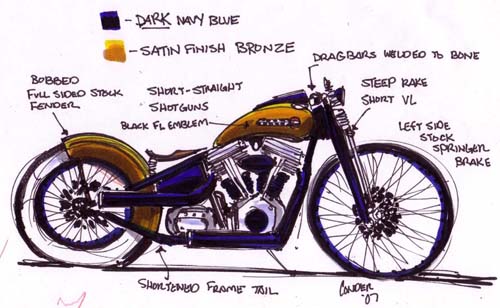
The next thing on the choppin' block for this project will be to get the rear section set up with the new Paughco bobber style rear fender and twin tanks mounted


Speaking of the “other project bike” in the shop

I had the opportunity to install a six speed gear set from S&S along with the closed belt system. During the install I didn't take very many good shots because I was haulin' ass and flyin' solo. I thought it was worth sharin' if nothing else to show some of the case modifications.


S&S products come with good detailed instructions on how to set up the gear set and it went in easy, not that I recommend this task for a total beginner, but a guy with some modification experience can get the job done without difficulty.


Next, I removed the main gear and bearing and began carving up the stock Harley tranny case. Using the supplied template I marked the area to be trimmed and started removing material for the proper clearance for the new shift fork assembly where the outer shift shaft support used to be, as well as a couple other specified places inside the tranny case.


Once I had the case cleaned out, I installed the new main gear & bearing, new shift shaft sleeve & new shift arm assembly, and gear set.
I mounted the shift drum and clearanced the top cover and wrapped up the install. I don't want to make it seem like it took 10 minutes or anything, but it did slip together like sex and so far hasn't given me any trouble. My buddy Rick loves it, so it's all good!


Back at the Root Beer Float we are still grappling with the wheels, the classic VL front end, hubs and fitment. I am cool with running a 39MM front end (and I even have one we can put on) but we will still have the issue with the front hub being too wide and I know ya'll wanted to run the old springer to help with the classic look.
I do have these late factory mags that match the motor / trans that have sealed wheelbearings and narrow glide front hub that will give plenty of room for a brake hanger up there. The only thing you may not like is the front wheel is a 19″ and rear 16″ I know you were going for the big wheel look but I also think these will look good too. if you like the idea I'll get you some tires for them and trade you for what you have. I know I have a front white wall around the shop for the front but I don't have a problem getting you black walls either, maybe some classic style Avon roadrunners?
Right on, what's your preference on the rubber, the white wall I have in stock is a maxis classic so I can get a 150/16 to match if you like or I can get you a set of Avon Road runners, I know you are an Avon fan so I figured you might go that way?
Here is a brief list of stuff we still need to figure out:
brake components ( rotors and calipers )
grips
hand controls
turn signals
gas caps
Speedo
headlight