A while back, I spent a week one day in the garageof Bikernet headquarters with Bandit. Bandit was hot to putapehangers on his shiny new Road King Classic.
Once I arrived and cooled down his “high-bar desire”, I suggestedputting all the handlebar switch wires inside the bars where theywould be safe from his undue attentions in the future. After a quickassurance on my part that I wouldn’t feel a thing, he okayed the idea.

With the bars off of the bike and the switch wires laid out on thebench, he started whining about “all those wires”. It was at thistime I whipped out the handy dandy “wire vise” and showed him how touse it (it only took three times) to solder the wire extensions inplace. While Bandit amused himself with this new toy, he asked whereI found it. I explained to him (slowly) that the first time I saw onein use was at the old West Coast Choppers shop in Paramount, CA. Oneof the mechanics “Koon” was using the wire vise on one of the shopbikes, when I asked where he found it he replied, “some old guyshowed me one.” I asked to see it up-close and personal and tracedthe wire vise on the palm of my hand so I could make one once I gothome.

After Bandit was done with his soldering chores on the switchwiring, I retrieved the wire vise from the bench only to be stoppedat the door. The only escape was to promise Bandit a wire vise of hisown. So, the only way to one-up the doorman, was to showeverybody just how easy a wire vise is to make.

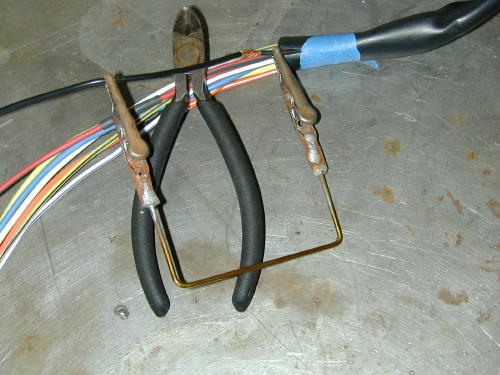
All you need is a short length of wire (a piece of welding rodor even a coat hanger) and a couple of alligator clamps. Here is mywire vise and the components for Bandit’s.

I’ve added a six-inch scale to give you and idea of the overalldimensions. The vise is two and a half inches wide and each arm is aninch and a half long.

After marking where each bend is, the wire is lightly clampedin the bench vise and bent ninety degrees.

You can see the first arm is bent so it is the correct lengthwhen compared to the original.

Pay attention to the orientation of the first arm when bendingthe second arm, make the second bend so the arms are parallel to eachother.

Using the scale to align the ends of the arms, Craftsman sidecutters snip the wire to the correct, equal length.

The wire is bent with the arms parallel and the ends of thearms, where the alligator clips will be soldered, have been cleanedup with Emory paper to insure a solid soldered joint.

Rolled up Emory paper was used to clean the inside of thealligator clip as well.

After the Emory paper treatment each end of the wire and bothalligator clips were cleaned with Super Cleaner from PJ1 to removeany Emory residue.

A good solder joint means using a liberal amount of solderingpaste, here the alligator clip is dipped a few times right into thepaste.

The wire receives the same treatment in the soldering paste.

Now the clips are slipped over the arms of the wire and lightlycrimped in place. The thin wire clamped in the alligator clip jawshelps keep the clips in alignment during the soldering process.

Using a soldering iron held against the alligator clip, feedthe solder into the joint until you see it flow out the other end.Note: it takes a minute or two for the clip and the wire to becomehot enough for the solder to melt and fill the inside of the clip. AnAllen bolt is used to elevate the wire off of the bench top. With theclip sitting on the bench top, it would absorb some of the heat fromthe soldering iron and take longer to solder the joint.

Solder both joints, allow to cool down and your done. Theactual size of the wire vise is unimportant, we found that this sizeworks well in all areas, especially inside the headlight housing ofdressers like the Road King.
I hope this makes Bandit happy for a change. The sonuvabitch wouldhardly let me outta here to go to Daytona. I had to promisethousands of flicks for Bikernet coverages. Hang on for the shots.
Below is a shot of the Wire Vise in use.