Mudflap 8: http://www.bikernet.com/pages/Mudflap_Girl_FXRs_Part_8_Wiring_World.aspx
Mudflap 9: http://www.bikernet.com/pages/Mudflap_Girl_FXRs_Build_part_9.aspx

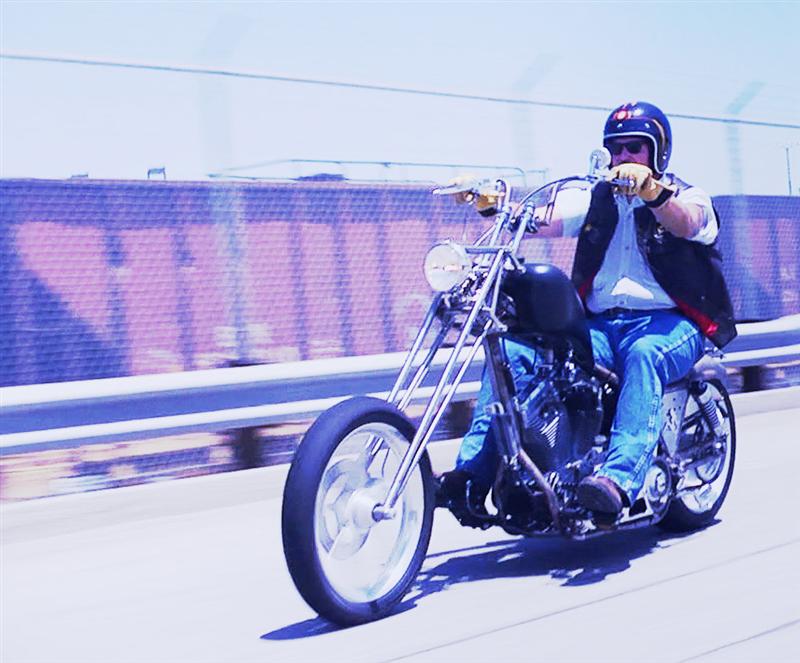
I’ve been riding and tuning Mudflap Girl FXR for a couple of months. We finally dialed in our rear shocks, maybe. David Zelma, from Progressive taught me the ropes regarding spring pressure and travel. We will get into that. We have also been monkeying with my Spitfire Girder shocks. Again, the problem is travel.
My son’s FXR faces similar dilemmas, but hopefully we will be able to transfer knowledge from my bike to his. Fortunately, Progressive suspension is just down the street in Orange County, so David Zelma stopped by with a variety of springs. “Your shock angle is more like a Dyna Glide than an FXR,” David said, “which makes for much more severe spring rates.”

I kept trying tougher and tougher FXR or touring H-D springs and the rate of sag was too much, indicating a too-soft spring. Also, I had to mess with additional bumpers, limiting the shock travel to prevent the fender from smacking the Avon tyre. It’s a humorous dilemma, one that any sport bike rider would scoff at, since he doesn’t care if there’s a foot of air between the rear tire and the fender.
Ultimately, we ended up with 12.5-inch Progressive Dyna shocks, but my travel, with limiters, is just over ¾ of an inch, sort of the same as a lowered Softail.
“I’m not happy with this system,” David said. “I want to see more travel for a comfortable ride.”

I like the way the bike looks, and I will ride it to Mammoth Lake next weekend to hook up with the Hamsters on their long road to Sturgis from the West Coast. That’s the iron test.
Next, I looked at the front Spitfire Girder shocks and discussed it with Rick Krost, who messes with bicycle seat shocks for custom applications. He removes the stock springs and switches them for cut springer springs. They were, unfortunately, too soft for the girders. Our problems with the seat shocks were two fold. The springs were 300-pound jobs and the shocks did very little to dampen the ride. So I went on a hunt. I discovered RockShox and Fox bicycle shocks, which run over $500 a piece. Good god!

Rick supplied me with a couple of RockShox with springs rated at 500 pounds per inch. Again that’s too tough, so I tried running one shock in a position more directly in line with the girder, another Rick suggestion. With one 300-pound rated spring I received good movement, but again very limited, like just over a ½ inch of travel. I’m still on the hunt for 2 inches of travel, and fortunately the Spitfire girder affords me the ability to mess with the positioning of a shock. I found a Fox shock that could be perfect, but the cost was prohibitive. RockShox also allows me a variety of spring rates, but of course I can’t find a price on their web site.

While on the girder shock hunt, we worked with Le Pera on a seat for my son’s Mudflap Girl FXR. Christine and Bob Le Pera took over their dad’s company when he passed. Christine picked my brain for styling, and then sent me a seat pan.

First, I made a bracket to catch the supplied tongue, welded under the seat. Before final welding, I may move the frame bracket back a ½-inch. Even with the tongue extended, I’m still not perfectly happy.

With the pan in place, we marked mods and adjustments with a felt pen and started hours of grinding and fitment. Then Ray C. Wheeler hacked-out an extension to afford my son enough seat for a passenger.

We cut a chunk of like thickness sheet metal and made a cardboard template, which was transferred to the sheet of tin and cut out with cut-off wheels. We could have made smooth work of it with a plasma cutter, but the grinding would burn the clock, and warping might become an issue.

We spent hours grinding, hammering and fitting until we thought we were close. I would love to find an English wheel and make the time to take a sheet metal class. Then we tacked the pan to our extension, and worked on it some more. I didn’t want to send it back to Le Pera’s historical shop looking like shit, so we worked over the pan extensively, and then drilled additional rivet holes to match the traditional pattern of Le Pera holes.

Le Pera is the home of the chopper seat, the cool, low, stylish, bare bones butt pads. “We can’t make ‘em fast enough,” Christine said. They have also shifted to more dresser seats, and seats for tall guys are popular.

This is their 40th anniversary in the seat-making business, and their focus for this year is new products, not parties. They constantly study new fabrics, threads, and embossed products. While in Italy at a dealer show, a customer approached Christine and told her, “Le Pera is the Ferrari of custom seats.”

When I spoke to Christine, my first question was regarding my seat pan. “How did we do?”
“You did a good job,” Christine said. “According to Bob, it was easy to cover.”

After they inspected our Bikernet shop handy work, she sent the pan out for powder coating. Then they installed a tough rubber edging molded over a metal insert. The metal grabs the pan securely, and the rubber clings securely to the metal. Together they protect the cover fabric.
While the pan is prepped for padding, the Le Pera liquid foam formula spilled into the standard Silhouette foam mold and was clamped into place while it cured.

Bob Le Pera, Christine’s brother, glued the foam figure of the seat to the pan and started hand-shaving the foam. “He’s the artist,” Christine said. Once shaped, the seat was ready for the fabric cover.

Bob chose a long-lasting comfortable fabric, but the master of seat patterns, Gus, a 32-year member of the team, laid out and customized the seat template, extending the standard Silhouette pattern, which he transferred to the resilient fabric, cut out the various pattern segments, and sewed the pieces together with upholstery-grade, ultraviolet-light-resistant bonded polyester thread. The color selection is vast.


Another long-term veteran member of the Le Pera team, Rick, with 27 years under his leather belt, completed the seat. He attached the stitched cover over the hand-shaped foam, made sure all the lines were symmetrical and tacked it in place with a couple of rivets, starting at the rear with a rivet gun.


With the completed seat in hand, Rick carefully glued a protective template of carpeting on the bottom.


I asked Christine about ordering custom seats from them, and they are open to a variety or requests. It’s often best to work with a knowledgeable dealer who can give you tips and knows how to speak the lingo to the Le Pera staff. You can always e-mail the staff and hit them up for info. Try to nail down a style before you reach out. Styles range from thin, low, and sleek, to touring, or tall guy seats. Check their catalog for ideas, and once you’ve nailed the basics down, you can discuss custom stitching, inlays, fabrics, leathers, and or embossing, and of course an affordable budget.

With the seat in hand and the Spitfire forward controls mounted and dialed it, Frank’s Mudflap Girl FXR is ready for a ride. He just needs a plate, registration, and insurance documents, and we will begin the Eddie Trotta break-in routine.
Le Pera Seats
D&D Exhaust
Biker’s Choice
JIMS Machine

MetalSport
BDL/GMA
Wire Plus

Branch O’Keefe![]()
Bennett’s Performance
Custom Cycle Engineering
Saddlemen
Bub
Progressive Suspension

Check out my road test in the next chapter: http://www.bikernet.com/pages/Mudflap_Girl_FXRs_part_11_The_First_Road_Test.aspx