Since last time, my Mudflap Girl is still over at Saddlemens waiting on a custom seat, but good news filtered into the shop this week. Next week, we should move forward.
Then my son made his dire announcement: “I wanted forward controls,” he said. “It’s all your fault. I agree with Jesse James, you’re nothing but trouble.”

I struggled with the assembly of his mid controls for months. I kicked the Handy steel lift and stubbed my big toe, knowing full well I stood on the right side of the law, and my son was out to lunch on this issue. But as the dad in this scenario, I should be the bigger man. Besides, mid controls can be a puzzling pain in the ass. I dug through my lockers of old parts and found enough components to make up the shift side of forward controls, but I didn’t have the rear brake master cylinder, or the lever and plate. I kept digging.

I reached out to Paul Cavallo, the boss of Spitfire Components, and our Mud Flap Girl frame builders. I thought if I could order a set of the weld-on ½-inch forward frame mounts, I would find the remaining billet aluminum controls parts at the Long Beach swap meet.

Here are some thoughts when it comes to mid controls versus forward controls: Mid controls tighten the looks of the drive train, but make it harder to work on your primary, clutch, oil pump, engine and pipes. They can be a tight, cumbersome addition. On the other side of the coin, they enhance the appearance of any bike by allowing the frame to slither unencumbered until it fades under the engine. And from a handling perspective, mid controls can actually lesson the weight on the lower back.

Okay, so forward controls are sort of out of the way of the engine, the pipes, and the primary. They are easier to install and adjust for long-legged bastards. So what the hell; we started to shift gears. Paul Cavallo assured us of a new shipment of their super-simple to install and bleed forward controls, so we stepped up.

Oh, regarding Jesse James. He complained to the publisher of Heavy Duty Magazine, in Australia, when I didn’t vote for him during the big American Chopper Build-off, in Vegas a couple of months ago. A year ago Heavy Duty asked me to fill in for Jesse, since he was acting up, so I started writing a column for the largest Harley mag in Australia. But now I’ve been fired, because Jesse threatened the publisher, “It’s either him or me.”

In the meantime back at the Mudflap girl, I grappled with the electrics. I had a few issues to mess with. I planned to install a Wire Plus speedo-dash to Frank’s Spitfire T-bars. Grip Ace would handle switches with their electronic module, and the ignition was a Crane Hi-4, a versatile unit. The Hi-4 can be set up to fire a single-fire system, dual-fire, dual plugs, tach, VOES, you name it. I also had a Wire Plus wiring system as backup. It contained the starter relay, blinker relay, and wiring schematic.

A quick sidebar: We built this belt guard out of solid steel rod and strap. I’m a stickler for strength. I like looks, but strength is everything. I would rather the rear strap was 1/16-inch thicker. I will keep an eye on this puppy during the break-in period. Swingarms are bastards for abuse; that’s why mounting fenders to swingarms is particularly tough. Every bump, vibration, or shock a tire endures is transferred to the swingarm, and anything attached to it. Unlike a rigid frame, a swingarm is designed to move rapidly to cushion the ride.

I dug around and found an old ignition switch with an old worn brass key. I looked for a thick washer with the same I.D. as the switch’s O.D. and welded it to the top motor mount. Seems a very accessible position for a switch, and close to the coil and ignition system wires.
At first, I thought about running a circuit breaker on the other side of the motormount, and installed one. As it turned out, I never ran a wire to it, so I removed it.

Since S&S took over the classic Crane Performance products line, we had access to Crane products. My son’s performance aspects will all be Crane and S&S, including the E-carb, a Crane cam, adjustable pushrods, etc. First, I installed the Crane sparkplug wires. This is one damn thing I take my time with. It’s too easy to cut a wire short. I find the kits often lacking the proper pieces, or pieces too tough or tight to install without going nuts. It’s good to collect spare parts. Don’t throw anything away, goddamnit.


For instance, this kit comes with the sparkplug end of the wire already fastened to the cup and lead. I couldn’t find a brass fitting for the straight-in coil sleeve end, but I had some in another kit. I followed the directions and greased the inside of the rubber boot before I started. With the wire and the boot greased, I slid the boot past its position, carefully cut the insulation back about ¾ of an inch, and then folded the carbon lead over the insulation. I carefully crimped the brass fitting into place using several different configurations of pliers, since I don’t have any special tool for this operation. Notice how the brass must bite into the plug wire insulation.

It’s a delicate, tough operation, but once the boot is pulled into place, the tight rubber will hold the fastener and the wire firmly. My son, Frank, the tattoo artist, stopped over and we handled mounting the controls on the bars. These controls were designed for stock application, and we would not use the stock switch housings, because we were dedicated to using the new Grip Ace system due to its simplicity, but we’ll get into that later in this chapter.


We installed the modified handlebar controls with some 1-inch Dewey wheel spacers to make up for the missing bulky switch housings. We were installing the Biker’s Choice Motion Pro clutch cable when Erik Lundmark, from Lundmark Studios, popped in and started filming us for his new TV series, Kustomz. It’s so long between shoots, I forget about the creative effort, but it may pop onto a cable channel near you someday soon.


This build is interesting, because it forced me to go in different directions and away from another rigid frame. In fact, some readers applauded the variation from rigids to something more long-road worthy, and the FXR platform was perfect. I’m beginning to understand why some builders always use the same tried and true components over and over. I can use the same parts, and they fit the same way as the last build, with no surprises. Since Ben Kudon at Rivera asked me to try their new belt system designed for use in a stock primary, I agreed to try it. No big deal, right? The bike was built in 1996, and we stumbled across a set of 1989 primaries.


As it turned out, the starter jackshaft in the early primary was much larger in diameter than late model units, with less pinion gear teeth, but much larger. Consequently, the Spyke starter wouldn’t work and I had to return it. Then the jackshaft was all wrong, and finally, the ring gear on the Rivera Primo Inc. clutch was wrong. Ben sent me another ring gear and it wouldn’t fit on the Rivera clutch shell. He thought I had a stock clutch. What a minute; I was building this with a primary, primarily to use their new system. Switching ring gears was not fun, due to their red Loctite-coated fasteners, and we had to drill out several locked-down Allens. Fortunately, Rivera-Primo makes ring gears for almost any application, so I was covered.


Ray C. Wheeler and I tried everything, including WD-40 and stronger penetrating lubricants. Ultimately, we rounded Allen wrenches, drilled out a few, and used easy-outs. Then the clutch rolled back into shape with the new Spyke starter and jackshaft assembly, but we were missing one dinky element. That surprise came later.

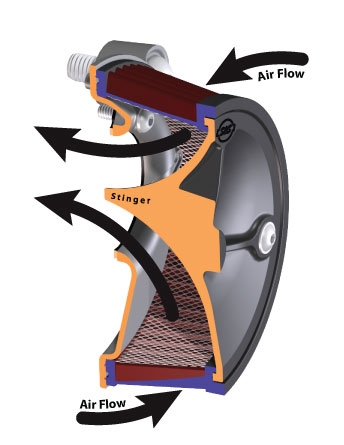
Next, we started to wrap up the carburetor install with the new S&S Stealth Air Cleaner design. Here’s what the gang at S&S said about this system: Everybody likes to go fast, but not everybody likes to advertise. The S&S Stealth air cleaner kits are for the rider who likes to go fast, but wants to be just a little bit sneaky. Get all the performance of the S&S design, including the air directional “stinger” cone in the filter, and hide it under your stock Harley-Davidson air cleaner cover.

Owners of 1999–2012 Harley-Davidson big twins can install the new S&S Stealth air cleaner kit and pick up more power, using their stock air cleaner cover. Nobody will know because it looks entirely stock. We’re talking sleeper hog!


Owners of 1993–1999 big twins with Evolution engines and owners of Sportster models can get the same performance kick, but won’t be able to use their stock covers.


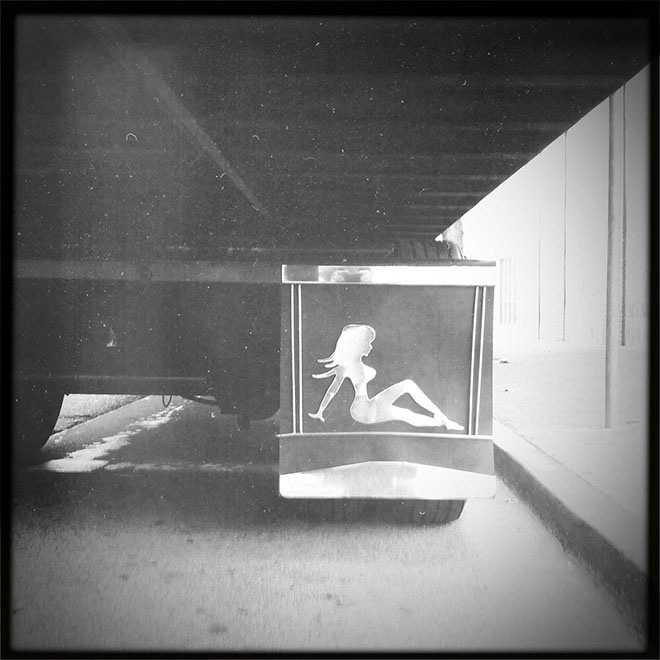
We didn’t want to use a stock cover or be stealthy about it. S&S makes a series of their own aluminum cover designs, but we gave it the Mudflap Girl touch from 2Wheelers just before they packed up and rolled out from Denver, heading east for Daytona Bike Week. I liked this new system a lot, from the lightness of the components to the auto-venting system built into the bracket. No tubes or hoses needed. This installation was a breeze.

Something sneaky slithered around the shop about the time a cold chill slipped over the LA basin. I discovered how aerodynamic Frank’s Spitfire tank was and how well it fit on our Bonne Belle 45 being built for Bonneville this year. I stole the sleek tank off Frank’s bike and mounted it to the 45 Paughco frame. It fit like a glove. I ordered a 3.8-gallon tank from Paughco, and it arrived just after the winter show series. Ray helped me grind off the rubber-mounting tabs.


I started the wiring process, knowing full well the tank would arrive any day, and I would need to reroute some of the wires. I stuck the Grip Ace wiring module in the backbone of the frame, installed the Grip Ace grip, and tried like hell to find quiet, unencumbered time in the shop alone to perform wiring magic. It’s not difficult, but it takes quiet thought, testing, wire running, wire accounting, and figuring.

It’s too easy to run a wire, and then discover another wire needs to follow the same path, such as the neutral switch wires running off the transmission. That wire (one is a ground wire) can run up to the Wire Plus speedo, but the oil pressure switch will follow the same route, as will the speedo pick-up, the wire to the starter solenoid, and maybe the wire to the brake light switch.


I’m using the longer spin-on oil filter to hold the alternator/Spyke regulator plug in place and give the bike more oil capacity. We used the new JIMS tool to pull the filter, and we replaced it by hand. I mistakenly thought I could wire this bike without a circuit board, but quickly shifted gears after I made a small bracket to hold the 30-amp circuit breaker under the seat. Then I welded a small mounting plate to the bracket for the board, and everything started to fall into place. I found some quiet time and started running wires. When I first wire any bike, I draw a schematic with the basic components and start an initial map. It’s a damn good idea, because it’s super easy to forget one item, like the flasher unit for the turn signals.

I also grappled with the VOES switch. I reached out to Bruce Tessmer from S&S for input. I’ve run maybe one VOES switch in my building career, so I didn’t see any reason to go there. Bruce explained the reason behind the switch running off a vacuum tube from the carb. It is designed to help prevent pinging in high performance engines when they don’t have access to high-octane fuels, or run in high altitudes. Since we don’t generally encounter those problems, and we are running near-stock compression engines, I ducked that aspect, and wired the Hi-4 system into place.


My grandson, Frank Jr., recently took over the XS build, and he rolls over to the headquarters on a weekly basis. He’s a worker, willing to sweep the floors, turn wrenches, anything to assist in the process. He’s turned into a major asset around the shop, and has recently become the designated rider for 45 Bonne Belle, since our Australian female tattoo artist had to bow out for this year. Frankie, 18, is also a tattoo artist in the making. We dove into re-installing his XS engine into the Mr. Lucky, Paughco-built frame, and Frankie is now helping with the Bonne Bell build.


Next, we will fire Frank’s FXR, check the wiring, adjust the carb, and we will both be in the market for seats. Mine is scheduled to come from Saddlemen and Frank’s from Le Pera. Hang on. Oh, and we’ll come face-to-face with our jackshaft learning curve. I’m getting anxious to ride. I’m scheduled to meet the Saddlemen crew in two days.

Spitfire
Biker’s Choice
JIMS Machine
MetalSport
BDL/GMA
Wire Plus
Branch O’Keefe![]()
Bennett’s Performance
Custom Cycle Engineering
Saddlemen
Bub