

Eric Bennett grabbed the shop door chain and hoisted the roll up door for the first time, in 2000. He started his mechanical career as a certified diesel mechanic with 60-weight always flowing through his blood stream. Finally, he gave into his entrepreneurial spirit and his desire to make motorcycles his life—he opened his own shop on Signal Hill. The rest is motorcycle history, much of it spent at the Bonneville Salt Flats with his dad, Bob.
He recently owned a modified twin cam FLH, but a customer made him a deal he couldn’t refuse, so he let it go. Then a deal on a Dyna surfaced and he made a quick move to snatch it. This time, he decided he would take it to the concrete and rebuild every aspect of the bike to be moderately fast, ultimately reliable, precise, and built with absolutely all the best mechanical intentions and components in mind. You get to see the 106-inch project unfold before your very eyes right here.

One of the benefits of running a service center in the largest city in Los Angeles County includes encountering every possible mechanical malady and the ability to research whatever solution might be necessary. Since LA is also the motorcycle media hub, he has constant opportunities to test anything new on the market. After working on Twin Cams since their introduction into the market in 1998, Eric has watched every configuration, modification, performance recipe, and model roll in and out of his shop.


With this build he could pour every lesson and improvement into his own ride. It started as a bone stock 2004, 88 cubic inch TwinCam. Eric could choose from any hot rod configuration in the world, but he chose to roll with a 106-inch kit from S&S and Branch re-tuned heads. He started the process by installing a JIMS Timken conversion into his left case and welding his crankpin into the S&S lower end after it was balanced.

“With superior S&S flywheels, I didn’t need to monkey with the cases,” Eric said.
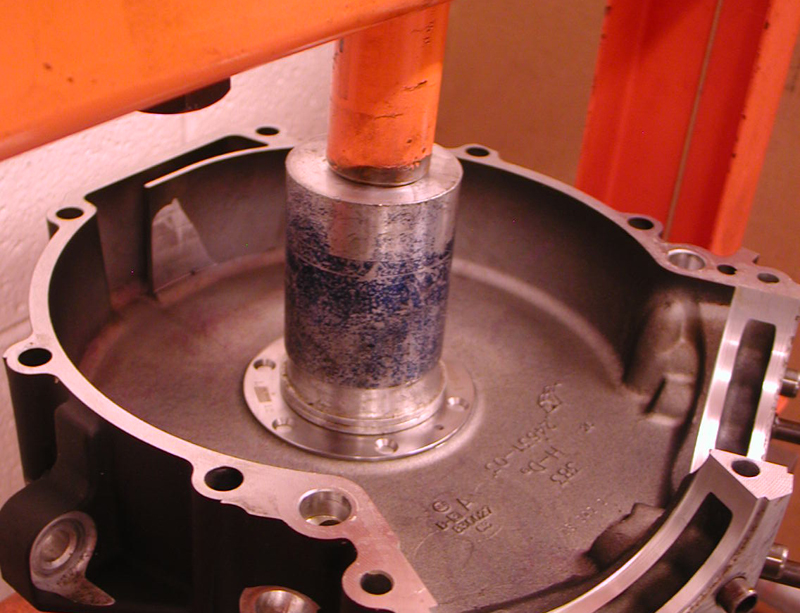

He bored the stock barrels from 3 ¾ to 3 7/8 inches and increased his stroke from 4 inches to 4.5. With JIMS tools he pressed in the JIMS race (using green Loctite) (9-59-1) while keeping his fixture perfectly flat and the hole in the race at 12 o’clock.


Using a JIMS fixture tool, he was able to drill guide holes in the case for Timken bearing and race oiling. The JIMS tool holds the drill and guides it. The drills are set to indicate the depth. Otherwise, he would need to use transfer punches and a milling machine. Then he used another JIMS tool to drill for the race fastener holes, and used tap guides to prevent misalignment.


“I’ve made tap guides for every size tap,” Eric said.


One of the benefits of the higher quality Timken lower end bearings is their ability to lock the lower-end into place.
“I have never seen a Timken bearing fail,” Eric said. Until recently Timken’s were used since 1957. “I’ve seen dozens of roller bearing failures!”
The cost saving shift to roller bearings started in 2003 during the 100th anniversary season. “The best Twin Cams were built in 2002,” Eric confirmed. “Better engines, still carbureted and with 1-inch axles for strength and stability.”


Eric used red Loctite on the race screws. He uses a tool for installing both Timken races at the same time. Kelly McKernnan, an amazing machinist out of Portland, Oregon, manufactured it.


The next phase included welding the S&S flywheels. Anytime Eric has a twin cam lower end out of a customer’s bike, he welds the crankpin in place with stainless TIG rod. It doesn’t create much heat and is not a structural weld; it just cements alignment and prevents shifting. He always checks the true after welding.

Next, he installed the Timken bearing by heating the race to expand it, and it slippped over the shaft easily. There is very little endplay in the shaft, just .001-.002-inch. Eric cinched down the top bearing with another JIMS tool, then pressed in the main seal and spacer with yet another JIMS tool.


At this point, we shifted to pressing the new S&S cam bearings into the new heavy-duty Screamin’ Eagle cam plate for hydraulic cam tensioners, but Eric chose to shift to an S&S gear drive system, so he blocked off the oil passages to the hydraulics.


He installed Torrington cam bearings in the right case prior to installing the new cams. His plan called for installing a D&D Bob Cat exhaust system, which is 20 pounds lighter than a stock exhaust. D&D pipes come bolted together with all spring clips, flanges, and heat shields in place. “They take like two minutes to install,” Eric said.


“It’s the easiest system I have ever installed,” Eric said. “It comes with the all the components needed and the heat shields in place. No shimming is necessary or egg shaping holes.”
Day 2


We took a break for the day and grabbed a beer. But the next day, Eric installed a heavy duty Harley-Davidson pinion shaft bearing kit using a JIMS pinion bearing tool and it was time to slip the cases together with Yamabond on the case edge, while applying assembly lube on the pinion shaft. The case bolts were torqued to 18-22 ft. lb.


“Don’t forget the new oil pump O-ring when installing the high flow H-D pump,” Eric pointed out. Eric has an engine-building quirk. He continually turns the engine over, while rolling through the build process, and constantly tests for changes. “I want to catch anything that might bind early on,” Eric said. We actually ran into a small glitch while installing the cam plate.


But first, he installed the oil pump return gears, and then the separation washer and the spring, before the feed gear. He bolted the cam plate in place with ¼ -20 fasteners torqued to 120-inch- pounds. He used guide pins to help align the oil pump, and turned the engine over while tightening the pump so it would seat itself properly. He tightened two oil pump bolts, then removed the guide pins, and then tightened the other two Allens.


While aligning the cam drive gear dots, he installed the cams and used red Loctite on the drive gear Allen bolts, but used assembly lube on the washer for more accurate torque values and to prevent the bolt from galling against the washer surface for a false torque reading.


As we wrapped up the operation for the day, Eric installed the lifter with the oil holes facing the cam cover, then the guide pins, caskets and covers. No more lifter stools.


Day 3

Eric sub-leased a portion of his Signal Hill building to Branch O’Keefe, perhaps the best head porting business in California. I don’t want to put down any performance heads, but Jerry Branch, who is now about 82, built a helluva business around head performance.

Here’s a description of their heads from the Branch-O’Keefe site:
This is where is all began. Branch-O’Keefe is known throughout the industry for legendary cylinder head modification service. Our extensive reworking of stock Harley-Davidson cylinder heads begins with removal of the stock valve seats and guides. Next, the combustion chambers are heliarc welded to add additional aluminum alloy in the combustion chamber and around the valve seats for re-machining.

The valve seat pockets are then machined for larger nickel-chrome valve seats, and the combustion chamber is cut from the stock low compression rectangular shape to the legendary Branch “bathtub” chamber. After cutting the combustion chamber, new oversize valve seats and performance-quality valve guides are installed to tighter than stock tolerances.

The heads then advance to the porting room where the ports are fully hand-ported, blended and polished to Branch’s exacting specifications as proven on the dyno and flow bench. The head’s gasket surface is machined an additional 0.050-inch, which raises compression slightly. Finishing up, new oversize intake and exhaust valves (hard chrome stainless steel with stellite tips, polished face) are installed in bigger seats with a machined race-quality valve job and then hand-lapped. New seals and a high quality high-lift radius spring kit complete the installation.

The Branch O’Keefe head components are damn impressive from the titanium upper collars to the single oval wire spring with more travel and a larger diameter spring material. They have developed heads for JIMS big inch motors that produce 132 horsepower and ft-lb of torque, at an absolutely stock reliability level, even on a B motor. So natch, Eric had John O’Keefe and his master right-hand man, Paul go through his heads. Actually they used a formula they call the Dave Thew head. It’s a nickname for a performance formula. Dave beat everyone with these Branch O’Keefe head configuration. I will outline the different formulas next week.


We started the day installing S&S pistons with wrist pins first, since the oil rings pass over the wrist pin holes. Seems odd, but it’s the nature of the short-skirted piston. “Actually it allows for more skirt on stroker motors and does away with stroker plates,” Eric said. “This piston configuration will keep a stroker running longer.” The oil ring must be positioned with the dimple in the wrist pin area in a particular location to prevent rotation. The S&S pistons use four-piece oil rings with a removable ring land.


Eric installed the bottom compression ring so that the opening faced the exhaust port area. “No gaskets are used on the bottom of the cylinders,” Eric said, “just O-rings.” He compressed the rings carefully, lubed the inside of the freshly bored cylinder and slid the cylinder into place. Then Eric spun the motor over to check for binding. “I can’t wait to hear the D&D pipe.”


Eric started to install the heads using Cometic gaskets. The heads were torqued to Cometic specs and then he set to installing the rocker boxes and the fasteners, which were torqued to 22 foot-pounds. He started from the inside and worked out. Then he slipped in the S&S Quickee-Install intake pushrods for maximum valve opening. “I run premium S&S lifters with travel limiters,” Eric said. “They become solids at high RPMs.”


He tightened each pushrod until the valve slipped off the seat, and then let it bleed down, for about 10 minutes. He backed off the adjustment until he could spin each pushrod (one at a time). Then he backed off just one complete turn or six flats.


These shots were taken before John O’Keefe came up with a crazy notion to machine Twin Cam cylinder fins in a round configuration. Eric was knocked out by the procedure and pulled his barrels for the process.


In the next episode, Eric will slip the beautiful 106-inch Twin Cam into the stock frame, and we will discuss JIMS tools, while replacing the inner primary bearings, the slightly modified Dyna D&D pipe, and then and the new Rivera Primo clutch, the S&S G carb, and a new S&S high flow air cleaners.


Sources:
Bennett’s Performance
S&S
JIMS