General Posts

Mudflap Girl FXR Part 12—She meets S&S

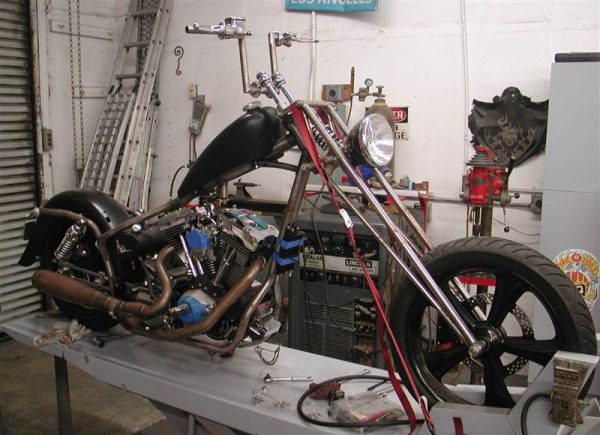
Here’s the link to Mudflap Girl Part 11: http://www.bikernet.com/pages/Mudflap_Girl_FXRs_part_11_The_First_Road_Test.aspx My son’s Mudflap Girl FXR is running and partially broken in. I even, finally, dialed in the Wire Plus Speedometer, and it’s working. I wish I knew what I was doing wrong, but that puppy works like a champ. I enjoy the tightness of the display and ease of installation. In that small cylindrical Wire Plus display, I get a speedo, a tach, trip gauge, neutral light, turn signal indicators, oil idiot light, and what else? Okay, so it’s time to turn the Pro Street version of the Mudflap over to my son, Frank, but first we couldn’t leave the bone stock remanufactured 80-inch Evo engine alone. I reached out to S&S for a cam recommendation, and they recently built a relationship with Crane Cams. Bruce recommended the following stock engine formula: S&S Super E carb, Crane Hi-4 ignition, S&S Cam and S&S easy-adjust pushrods, a Crane dual-fire coil, and the S&S 33-4250 breather and shim kit, for just enough pump to let this motor breathe. I hauled the Mudflap beast on my Kendon tilt-up combo trailer to Bennett’s Performance, a very clean shop, next to Branch O’Keefe Flowmetrics, on Signal Hill. Eric Bennett, the boss, bought the Bikernet Hearse, immediately fired his girlfriend and started to cruise the backstreets of Long Beach. He traded his bagger for a Sons of Anarchy Dyna, and is about to turn the 88-inch twin cam into a 106-inch S&S night flier. His band, the Signal Hill Billies, transformed their usual light country western twang into dark blues. What the hell did I do? We will bring you reports on his engine transformation. I could swear the all-black lowered hearse smirks at me whenever I roll into his parking lot, but we won’t go there. […]

Mudflap Girl FXR Part 12—She meets S&S Read More »

Timbo’s ’64 FL Restoration (Part One)

Not too long ago, my good friend Timbo approached me with a proposition, restore his 1964 Harley FL, I agreed. Problem was, it’s in a box, literally! So after a brief discussion on exactly what we wanted to do, how much it would cost and the possible value at the end of the rainbow, I started the Hard Ride back from Hell with the old ’64. I picked up the bike, basically a roller and all the boxes of parts that came with it. As you probably expected, this will be a frame up restoration as close to factory specs as I can get it. There will be some minor changes, which I’ll talk about as we go along. First thing was to lay it all out and take inventory to see what was missing. After some research, I found replacing parts for the ’64 surprisingly easy thanks to J&P Cycle, Biker’s Choice, and the internet. I ordered the Vintage catalog J&P Cycle puts out and started researching parts I needed to replace. I also found a local polishing company and chrome hardware supplier (needmorechrome.com) to make life easier. Tear down was a snap. Make sure you bag or box all your parts as you go and label what they are, and in some instances what order they go in. It’s not a bad idea to take lots of photographs for future reference. Sometimes a parts manual comes in handy. After tear down, I started the fun stuff, going through each and every part, each nut and bolt and cleaning them. Some parts and hardware will not be salvageable, so you’ll have to replace them with either new, or good condition used. I found that there is a tons of vendors on line for just about everything you need. Buying

Timbo’s ’64 FL Restoration (Part One) Read More »

Road King 4/18/03 Part III

Bad shot, but it’s the horn all blacked out and still grimy. A shot of the spacer made to eliminate the rear shift lever. We were getting stoked by the changing appearance of the King. The black was giving it unity. I re-greased the shifter shaft and installed the back linkage in a vertical position then tightened it. We eliminated one of the shifter pedals for my big feet and installed the remaining one with Loctite and a 1/4-20 Allen or socket head fastener. We cut a 3/4-inch chunk of 1-inch O.D. mild steel tubing for a spacer to eliminate the other pedal. The main part of the linkage to the transmission we had powdered but sprayed the flexible links and fasteners at each end. We powder coated the center section of the shift linkage, but had to spray paint the flexible adjusting links and fasteners. We assembled the kickstand by putting the jiffy stand in place then hooking the spring to the tab, then all four blacked fasteners were unscrambled and slipped in place. The two short 5/16 bolts went toward the front. A long one with a nut fit in the top rear bracket hole and a long one without a nut screwed into the rear footboard bracket. Then the footboard was replaced. We had one element left to complete. We still needed to put the front end back together. I cleaned the interior of the lower legs with solvent to insure we would have a solid seal at the bottom since there are no gaskets. We had to slip the fork tube out of the trees. We replaced the small aluminum collar and inserted the tube into the lower leg. Then the socket head bolt was replaced and carefully tightened. I must apologize for not taking shots

Road King 4/18/03 Part III Read More »

Bikernet/Cycle Source 15th Anniversary Subscription Sweeps Bike Build, Sponsored by XPress Lids

That’s right. You can enter by filling out the coupon, subscribing to Bandit’s Cantina on Bikernet, or to the Cycle Source Magazine. With a Crazy Horse 100-inch engine, and a frame from Texas Bike Works this build is already flying together. From issue to issue you’ll see your motorcycle being built on the pages of Bikernet and Cycle Source. You’ll witness Gary Maurer from Kustoms Inc. and Ron Harris from Chop Docs bend sheet metal, create one-off components, and shoot one of the sickest old-school paint schemes that you have ever seen… The team will carefully select components from the best in the industry, including wheels from Ride Wright, electronics from Accel, leatherwork by the master, Howard H. Knight, and controls from Tim at Grip Ace. “Also, please look at Barnett clutches and let me know what you need,” Prince Najar said. He’s the manager of this process and partner at Biker Pros, who is working closely with our builders, editors, and suppliers. “Also, Blacksmith Baggerville is interested in creating one-off pegs, brake pedal, grip, internal throttle and air cleaner,” the Prince said. The parts list for XPress lid chopper build, including a Fab Kevin seat pan and hinge, expands daily. Gary Maurer plans to split a set of stock fat bobs, modify them and mount them to the Texas Bike Works frame. He will take possession of the frame and Crazy Horse engine this week while the Prince searches high and low for forks cups, a springer front end, tires, rear fender, rear axle, final chain drive components, forward controls, a battery, a Mikuni carb from Rivera Primo, a primary drive system, an air cleaner, front and rear brakes, and the list goes on. Of course the Prince plans on using the D&D performance exhaust system. “Let your wings

Bikernet/Cycle Source 15th Anniversary Subscription Sweeps Bike Build, Sponsored by XPress Lids Read More »

Road King 4/26/04

There’s two shots of the stripped King by Markus. The remaining amatuer shots were taken of the loaded King after a 650 mile weekend run to Laughlin and back to the west coast. Over the last year we’ve tore into this classic 2003, 100th anniversary Road King. I figured I wanted a touring bike for the long haul. The notion was designed around maintaining the 100th theme, adding to the blackness and durability. I wanted a tough black bastard to ride, not detail or polish for shows. A bike for years to come. What could be better? We used 90 percent H-D parts including a modified taillight bracket, Screamin’ Eagle turnsignals and narrow light bracket. Much of it was powder coated by Custom Powdercoating in Dallas We kicked it off with light styling and safety accessories like a blacked-out dash, lowered shocks, rewired turnsignals, touring components and detachable back rests. Here’s the lowered backrest which was black powdercoated. More items need to be blacked out. We worked with a dealer for more involved tech mods and performance enhancements. Our formula was designed around beefing the low-end torque with cams, Screaming Eagle heads, air cleaner and two into one pipes. I ran it directly from the lift to a dyno, for a comparison test, which resulted in 68 horses, an 8-horse increase and 76 pounds of torque, a 6-pound increase. With 16-inch apes from Custom Chrome and new cams it was a different beast as I rolled the King out of the service area and peeled down the street. Here’s a shot of one of the Screamin’ Eagle ported heads. I went with the silver heads for the old Shovelhead or Pan look. My old school notions leaned toward blacking out the king. If the frame had been another base color

Road King 4/26/04 Read More »

Bikernet/Cycle Source Sweeps build part 2, Sponsored by Xpress

Hang on for a chance to win this bike. The odds will be terrific, so step up and enter, or subscribe to Bandit’s Cantina on Bikernet.com, or Cycle Source Magazine, and we will take care of your entry into the drawing towards the end of the year. In the meantime, grab a beer and enjoy this build process monthly on Bikernet, or on the crumpled pages of Cycle Source magazine. Last issue, we discussed the myriad of top-notch components flying at this build, and how Jason built the frame, at Texas Frame Works, around the master’s configuration and the pre-bent contoured backbone. The master is the boss of the 28-year- old shop, Kustoms Inc. and Evil Engineering, Gary Maurer. Gary recently took possession of the Texas Frame Works rigid frame, the magnificent Crazy Horse 100-inch engine, the Baker transmission, Accel electronics, and of course, an Evil primary drive system. “I like to design the sheet metal and frame around the complete drive line,” Gary said. He has a build theory based on the major components in place during the frame and sheet metal design process. This time, the frame was built behind his configuration, then in went the engine and trans, so he could design sheet metal befitting the lines of the frame and make it cup the engine and trans. He asked Jason to stretch the frame to allow him the space to install the battery behind the trans and in front of the fender. “I like to build bikes with the battery under the transmission,” Gary said, “but they’re a bastard to work on.” In this case, the bike will be built as an everyday rider, so ease of maintenance is a major consideration. Here’s the twist of the month, and a major element in the formula behind

Bikernet/Cycle Source Sweeps build part 2, Sponsored by Xpress Read More »

Road King 8/8/03

There’s nothing like a run to nowhere. No plans, no dates, no deadlines and no formula, we just rode in the sweltering heat like two abused dogs searching for new owners. After a couple of beers, if someone asked, “why?” the cryptic answer would contain: Just to get out of town, to test the new H-D Twin Cam oil cooler, against an ’89 Evo, to see the Hamster gang on their way to Sturgis, to roadtest a new pair of denims, to have my bike blessed by a Catholic Cardinal and finally to avoid the rain. The famous comforting Gusset in the Diamond Gusset jeans. Granted some of this scattered reasoning was whacked. It’s summer, why would it rain? Dr. Hamster and I have ridden on perfectly clear days to Arizona, a fuckin’ desert, and it rained on us. Not a misty sprinkle that relieved the heat, but a goddamn downpour that had us standing knee deep in gas stations attempting to refuel. High dollar chain wallet for road protection. It was given to me at the LA Calendar show by a blonde knockout. She handed out free wallets to anyone who would stare at her tits or her sponsor’s truck, Schapiro & Leventhal, The Motorcycle Attorneys. This time we got the hell out of Dodge in the middle of the day, under scorching rays. The day before I tore into the King, changed all the fluids and installed a new 1999 and later oil cooler for touring models. Several readers wrote concerning cooling problems with Twin Cams, and I did some research. According to Clyde Fessler the Twin Cam was destined to be a fluid cooled motor, due to the excessive heat that the factory design crew couldn’t eliminate, until Jim Fueling stepped in, at the last minute. Jim

Road King 8/8/03 Read More »

Mudflap Girl FXRs, Part 8 Wiring World

Click here to see: Mudflap Girl FXRs, Part 7 My Son’s almost Grip Ace Wired  Since last time, my Mudflap Girl is still over at Saddlemens waiting on a custom seat, but good news filtered into the shop this week. Next week, we should move forward. Then my son made his dire announcement: “I wanted forward controls,” he said. “It’s all your fault. I agree with Jesse James, you’re nothing but trouble.” I struggled with the assembly of his mid controls for months. I kicked the Handy steel lift and stubbed my big toe, knowing full well I stood on the right side of the law, and my son was out to lunch on this issue. But as the dad in this scenario, I should be the bigger man. Besides, mid controls can be a puzzling pain in the ass. I dug through my lockers of old parts and found enough components to make up the shift side of forward controls, but I didn’t have the rear brake master cylinder, or the lever and plate. I kept digging. I reached out to Paul Cavallo, the boss of Spitfire Components, and our Mud Flap Girl frame builders. I thought if I could order a set of the weld-on ½-inch forward frame mounts, I would find the remaining billet aluminum controls parts at the Long Beach swap meet. Here are some thoughts when it comes to mid controls versus forward controls: Mid controls tighten the looks of the drive train, but make it harder to work on your primary, clutch, oil pump, engine and pipes. They can be a tight, cumbersome addition. On the other side of the coin, they enhance the appearance of any bike by allowing the frame to slither unencumbered until it fades under the engine. And from a

Mudflap Girl FXRs, Part 8 Wiring World Read More »

Road King 9/10/03

The King lives again, thanks to the Harley-Davidson Spring catalog supplement. The factory now offers complete blacked out Road King front end components. We replaced the warped nacelle. With a small brush and a 1/2 pint of gloss black Rustoleum, we touched up chipped fasteners over a couple of Coronas. What’s next? The rear fender needed touch-up. The all-black King was cool, but the damn thing needed some color. That called for old school pinstripping. Finally we liked the new mostly black mags except for the tits around the rim. They seemed out of place. We pondered a solution. There’s Henry with a Jitter-Bug orbital sander. We rode over to Henry Figueroa’s Auto Restorations, a steel corrugated building on the wrong side of town. Henry worked for his dad as a kid fixing cars. His mainstay is restoring antique autos and custom paint jobs for four-wheelers from the ’20s through the ’60s (310) 218-9097. Henry said he would fill the holes in the bottom of the fender and prepare it for George, The Wild Brush, to perform his pinstriping magic (310) 488-5488. Since we didn’t change the color scheme, paying homage to the 100th, we decided to snatch the gold from the edge of the silver band and expand it to other elements of the King. We removed the license plate holder and plastic fender tip in preparation for reworking the fender and filling three holes. Henry handled the small holes with Z-Grip bondo and welded a plate behind the large quarter-sized hole (used for accessory wiring, then filled it with bondo. With nasty-rough 80-grit sandpaper he shaped the bondo to conform with the fender. Then he used finer sandpaper to continue to smooth the surface until it was as slick as a baby’s ass. Sheet metal and bondo work

Road King 9/10/03 Read More »

Road King 11/08/05

The Australian Connection standing in the Bikernet Headquarters shop. Around mid June Kerry and myself were organizing our trip to Sturgis, when Bandit contacted me an asked how would I liketo ride the Road King to Sturgis. Immediate thoughts were Wholly Shit, I’ve read all about the King on Bikernet and watchedthe different stages Bandit has put it thru, so I was very familiar with it, and for Bandit to be asking me was really a big deal, meaning, I felt honored enough when Bandit invited Kerry and myself to join them on the ride, let alone ride his bike. So youprobably guessed the answer was a big >>>>>> Yes Sir !! thank you very much. For the readers who aren’t familiar with the Road King, I’ll enlighten you. It started life as a stock 2003, 100th Anniversary model.Bandit said he designed the bike be a big bad assed, blacked out touring bike with heaps of attitude. Bandit and his crew wanted to use as many H-D parts as they could to prove you could build a mean assed bike out of Harley Davidson’s catalogue. They started by blacking out the dash, a set of one inch lowered air shocks and a detachable back rest along with some neat touring components. With the help from a dealer for some more involved tech mods to gain horsepower and some low-down torque, they came up with a formula by adding performance cams, Screaming Eagle Heads, air cleaner kit and two into one pipes powder coated black, giving them 68 horses compared to 60 and torque was 76 pounds with a 6 pound increase. Next they installed a factory oil cooler which Bandit tested on a run to Barstow saying how it kept the oil at a very reasonable temperature which is critical

Road King 11/08/05 Read More »

Scroll to Top